


Hi All,
I just received my beautiful TLA-1Q kit in the mail. My goal is to build a tuff-dog Tele. The top looks beautiful so I am excited. Wish me luck!
Pete


Hi All,
I just received my beautiful TLA-1Q kit in the mail. My goal is to build a tuff-dog Tele. The top looks beautiful so I am excited. Wish me luck!
Pete
Last edited by brandanop; 17-01-2020 at 12:38 AM. Reason: Adding Image
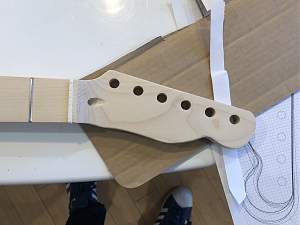
So, I have started my mock build and it is looking great with the possible exception of the bridge position. It appears to be about 1/4 inch too far back. Will I need to route it closer? I will be using a tough dog pic guard so it won't be obvious if I don't reroute, but I don't think the string length will be right. I measured from the nut to the 12th fret and it was exactly 12". I measured from the 12th to the bridge and it was 12" to the front of the gold plate of the bridge. Is that correct?
Questions:
1. Do I need to reroute?
2. Does the neck look good? It is very tight in the pocket.
Last edited by brandanop; 17-01-2020 at 08:49 PM. Reason: adding pics

As Jim says, there is normally a small gap between the bridge plate and the pickguard. Just search the web for images of Fender Teles and you'll find that it's part of the general design. The control plate butts right up to the 'guard, but the bridge sits off a bit.
That's very incorrect, as the scale length is 25.5", so the 12th fret should be very close to 12.75" from the nut. Make sure you haven't measured to the 11th fret (on my Tele the 11th is just slightly under 12" from the nut). It's best to use a solid rule (as in Jim's pics) rather than a tape measure.Originally Posted by brandanop

You are then better off measuring from the nut to the top E saddle for the overall scale length. Your pictures show the B/E saddle in the correct position for measuring the scale length. Measure from right by the top E slot to the middle of the top E string saddle. The intonated string length will be slightly longer than the scale length by 1mm or so.
Sometimes the Tele kits do benefit from some slight enlargement of the bridge pickup rout, but it's normally only by a maximum 2mm or so, and can normally be done using a sanding drum on a Dremel.
I re-measured and it seems right on! Thanks for this help again Simon! You are awesome.
So, I made some progress today. I did a mock build and validated the length and neck fit. I dyed the face gold after dyeing it brown and sanding back. I also cut the headstock by hand and then sanded it.
brandanop,
Love the gold top. I am building something similar (see my build log).
I have stained the finish on mine but am interested as to what stains and technique you used.
Also interested as to what the back looks like.
I had a lot of fun staining mine but have ended up with a brown guitar which was not my intention haha.
However, the more I look at it the more I like it.
However, my second one will be more like I intend it to be
Cheers, Fatboy.

A gap between scratch plate and bridge plate is usual, so that's not a worry.
I've attached a couple of photos of my JV Japanese Telecaster with the rule up against the nut. Hopefully that's a reasonable guide. Its a home built scratchplate BTW, so not a perfect guide to how the scratchplate should look.
Last edited by JimC; 17-01-2020 at 11:12 PM.
Build #1, failed solid body 6 string using neck from a scrapped acoustic (45+ odd years ago as a teenager!)
Build #2, ugly parlour semi with scratch built body and ex Peavey neck
Build #3, Appalachian Dulcimer from EMS kit
Build #4, pre-owned PB ESB-4
Build #5, Lockdown Mandolin
Build #6, Sixty six body for Squier
Build #7, Mini Midi Bass
Build #8, Acousticish Telecasterish Guitar
That is a great help! Thank you!

Geeeeezzzz. That looks good. Do you see the face down the middle where the veneer joins? RotoTok had a spectacular example of such a feature. Ask me (which you didnt), Im happy with right now.
Last edited by DarkMark; 18-01-2020 at 03:26 PM.
1) ES-5V
https://www.buildyourownguitar.com.a...highlight=Es5v
2) ES-3 (Custom)
https://www.buildyourownguitar.com.a...ead.php?t=8953
3) GR-1SF (Custom)
https://www.buildyourownguitar.com.a...ead.php?t=9376
4) Non-Pit Bull Travelling Guitar.
https://www.buildyourownguitar.com.a...ad.php?t=10303
5) AES-1 Special (Unwanted Custom)
https://www.buildyourownguitar.com.a...ad.php?t=11118
Thanks Dark Mark! I didnt notice the face until you said it. That is so cool! Part of me wants to just leave it as-is, but I dont like the glue marks around the edge. I want to cover those.

 Reply With Quote
