Guitar Rotisserie for painting.

fender3x

Moderator
Staff member
Someone posted a pic of a rack they had built for finishing their quitar body. I hope whoever did it, will post here and get some credit ;-) The rack allowed him to turn the body as he was painting. A great idea.

I recently realized that I was going to need something like this because I am using a brush-on clear coat. Much easier to do if I have both hands free, and if I can turn the body to catch drips and do both sides.

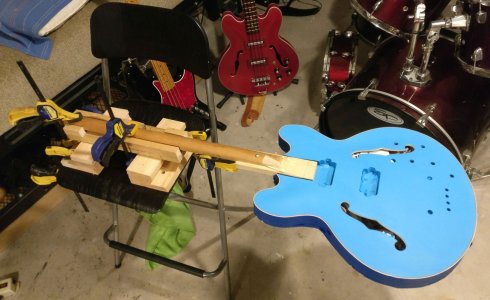
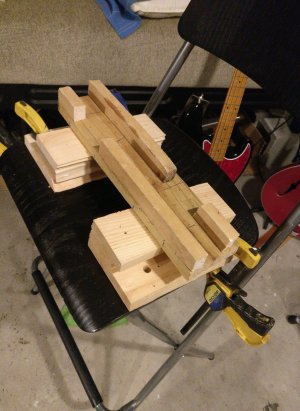
Unlike my predecessor who built a floor stand. I built this to attach to a tall, stable chair that I have in my garage. You could also make this to attach to a sawhorse or workbench.

It's a very simple rack. Here's a pic of it clamped to a chair.
rotisserie.jpg

I attached the guitar body to a meter-long wooden cylinder that was left over from re-modeling a closet. I made the central channel in on the rack.

[/ATTACH]rotisserie_in_action_close.jpgrotisserie_in_action.jpg
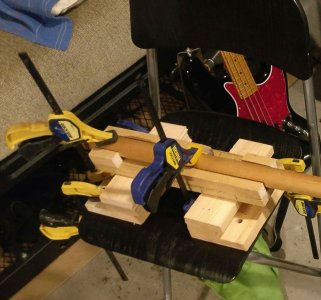
To rotate the guitar body, you just need to loosen the two upper clamps that hold the cylinder in the central track of the rack. Works like a charm.

BTW, if the rack looks rough that's because it is constructed primarily of boards my kids broke in Taekwondo. They have broken so many over the years, I have had to find creative things to do with them...
 
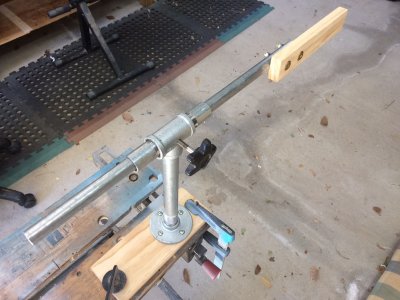
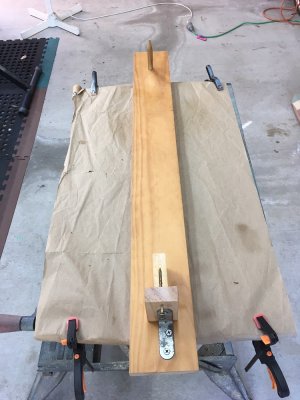
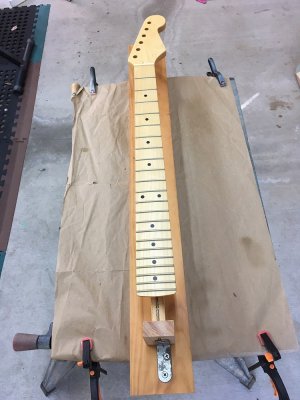
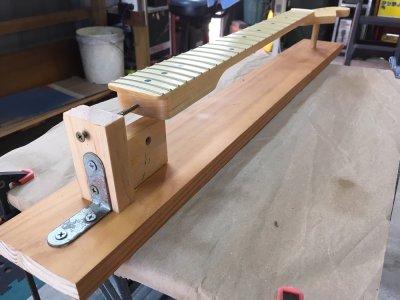
I made a new rig last year using the same principle.
I used 3/4" galv pipe with a bit of pine fixed to it for the neck pocket. It works a treat.
I clamp mine onto my 20 y/o B&D Workmate portable bench.
I hope that chair is heavy enough to counter the body weight. I'd hate to see a post about a freshly painted body crashing to the ground!

New Paint Jig 2.jpg
 
I hope that chair is heavy enough to counter the body weight. I'd hate to see a post about a freshly painted body crashing to the ground!

The chair may look flimsy in the pic, but is actually very stable, and the body is pretty light. If it were heavier I might add cinder block but I don't think it's necessary for this build.

I made the rack in about an hour out of stuff I had around the house.

Yours looks like it belongs in the shop of a professional luthier. Nice!


Sent from my ONEPLUS A3000 using Tapatalk
 
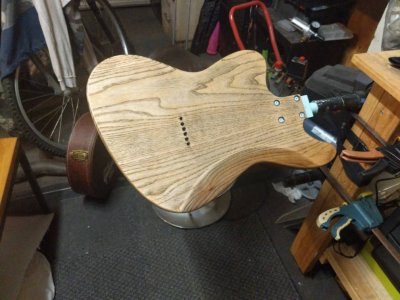
Very impressive Rotisseries there boys. Beats mine I made out PVC pipes had lying around. It was actually recycled from a first attempt at making wheels for my kayak. Clamped to the side of my workbenchIMG_20190420_213537_1.jpg
 
My first thought was to do it with PVC. I am very much into cheap, fast and effective. You have achieved that nicely ;-)
 
Yeah! That works!

And, nice chunk-o-wood there too! (ash?)

Another observation, I think we bought our work benches at the the same place! Almost identical construction!
 
Yeah! That works!

And, nice chunk-o-wood there too! (ash?)

Another observation, I think we bought our work benches at the the same place! Almost identical construction!

Yep that was my Ash JTL-1 (July GoTM) in the midst of TruOil progress :) wanted it on the spit so I could do all sides in one sitting. The rack is a very minty green colour from my Strat build. For that one, I was able to clamp it to the fence post outside for spraying. Super handy.

Made my workbench about 6 years ago out of structural pine from the BGS. Got plans from the interwebs somewhere haha you may have used the same plans!!
 
I wondered about the color. Assumed PVC is a different color in Australia...until I noticed that the screws are also minty green. I am sure we don't have the same workbenches. For one thing, the BGS is Orange here... But we may have the same decorator ;-)
 
I wondered about the color. Assumed PVC is a different color in Australia...until I noticed that the screws are also minty green. I am sure we don't have the same workbenches. For one thing, the BGS is Orange here... But we may have the same decorator ;-)

My workspace is currently decorated in a lovely shade of saw dust :)
 
He Hotwired it to a tesla battery, it took off in a whoosh with him riding it. I heard a splash and found Igor in the moat, but the shop vac was last seen heading for Bourke.
Haha, lucky you keep the crocs in the moat well fed. Or maybe Igor's love of electrodes saved him and he acts more like an electric eel in the water.
 
Hi looking to build my first guitar and trying to figure out how to work hands-free when I start painting. my question is how do you fasten a piece of wood in the pocket is it glued in or screwed in? I'm building this guitar for my son and he says he doesn't want to put any holes in the guitar. Any any advice would be much appreciated thank you.
 
Definitely screws. All the pics on this thread are for bolt on necks. It's easy with those because there is already a hole.

I think I saw that you are doing an ES 1 which is a glue on. I have not seen one of those kits, but I am guessing it's like my ES4-B kit. If so the bottom of the neck pocket is pretty thin.

You might be able to screw your stick to the center block in the neck pickup cavity. You have to be careful about the length of the screws, but there should be enough wood to mount the stick solidly.

That was not possible on my ESB-4 kit, so l attached a stick to the bridge pickup cavity. The stick stuck out perpendicular to the body. Not quite as simple to manipulate as the rotisserie, but doable with bit of creativity.

The trick is for the screw holes to be in a place where they won't be seen. That is pretty much just the pickup cavities or the neck pocket.

Sent from my ONEPLUS A3000 using Tapatalk
 
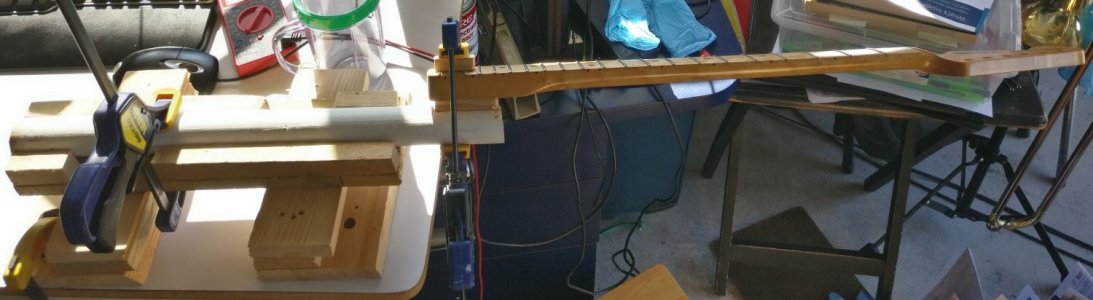
I am just about to put some clear coat on a bolt on neck. This one has not yet been drilled, and I would like to get the clear on before the body's paint finishes drying... Is there any way to do it without having it hang from the tuning machine holes? I don't want to drill if I don't have to, but the rotisserie would be my first option if there were a way to attach the thing without screws. It's a strat style neck so I can't even clamp the bottom part...because the "south" side of the neck will show...
 
This is the best I have come up with so far....

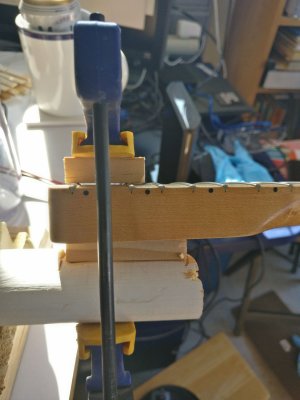
I am using a maple neck, so I will be finishing the fretboard, but it occurred to me that I don't care about the tops of the frets themselves. So I tried clamping a small block of wood (36x19x12 mm) on top of the frets. I screwed a similar but a little longer 56x19x12 block to a piece of old closet rod. I used a clamp to hold the whole thing together:

IMG_20200403_170911.jpg

In a close up you can see that the clamped part on top is not touching the fingerboard, just the frets. I am thinking I can clear coat the treble end of the fingerboard first, then clamp, then do the rest. It *should* only mess up the clear coat on the top of the last three frets, which are going to have it sanded off in any case.

IMG_20200403_170922.jpg
 
Are you spraying or hand applying the finish?

If you're patient, I'll post a pic of my neck jig shortly. I'm still only half-way through my first cuppa.

I know it's just me, but I like my heel to be completely finished. I also like my finish to be contiguous rather than "filling in" where the block was later.

If you are spraying a rattle can clear by any chance, than block on the frets is problematic. The tiny gap between the block and fingerboard will create aerodynamic weirdness with the pressure of the spray. Don't ask me how I know this...
 
Last edited:
I am doing the finish by hand. So I will be able to finish the highest three frets before clamping.

I am not concerned about the parts no one can see, although I don't think you are alone in that. For me it's hard enough to get the parts people can see up to acceptable.

I don't have a good place to spray, even with rattle cans. And the curing will take place in my garage/workshop/office.

Also I found a product that produces a reliable, hard result and is non-toxic. It is as close to idiot proof as anything I have found, but it doesn't come in a rattle can.

I have done a bunch of tests with rattle cans, and one full guitar. Conditions are really variable here. Lots of heat and humidity. Sunshine punctuated by torrential rains. That may combine with my lack of skill to produce an inability to get a good finish out of a rattle can. I can't seem to get them to finish hard, and I tend to have a bunch of other problems as well. Drips are clearly my fault. But I don't know how else to explain that one day I get a smooth finish, and the next day, doing the same thing, it comes out pebelly. And sometimes they don't seem to cure completely.

I finally found a color that I could spray on and get decent solid color results. But I have yet to get a good clear coat out of a rattle can. So it's back to the hand applied clear coat that has worked at least once before ;-)

Sent from my ONEPLUS A3000 using Tapatalk
 
Back
Top