DHB-5 Semi-Hollow Electric Bass Guitar: HELP

Hello folks,

I have been putting together this semi-hollow bass and am a little confused about a few things. Was hoping someone could help me out ...

1. Timber Bridge:
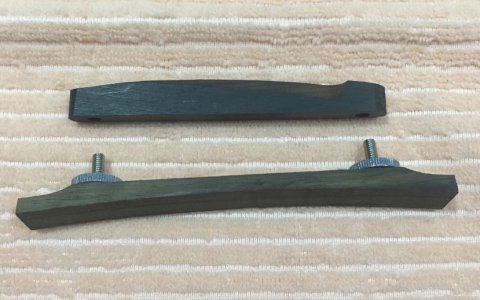
I am not sure how to attach this and could not find any videos to help me.
- Do I need to screw it to the body or glue it?
- What holds the top piece in, as it falls out - is it just the strings holding it in place?
IMG_5078.JPG

2. Angle??
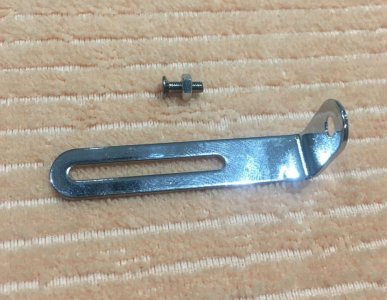
- I have no idea what this is for. Im assuming this bolt comes with it?
Please could someone let me know? Thank you!!
IMG_5080.JPG

3. Triangular plate??
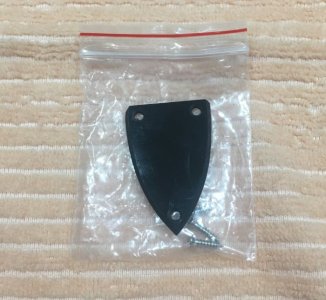
I have no idea what this is for. Please help :)
IMG_5079.JPG

4. Neck-to-body attachment:
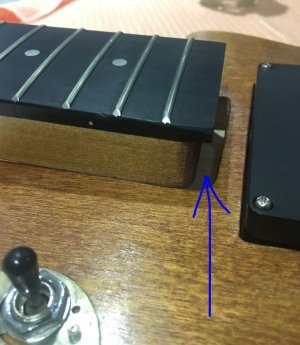
- When I align the screws, there is a gap (see image). Logically, I am thinking that the ebony on the fretboard should sit on top of the body (there is a lip).
Do I need to screw new holes so that it sits flush?
IMG_5081.JPG

Thank you for taking the time to help!!
 
The bridge will be held onto the body by the string tension, definitely don't glue or screw it - you'll want to be able to adjust it in future (possibly seasonally ).

The triangle bit is the truss rod cover - Simon posted about it in your other thread a moment ago, so you can see from the picture he supplied.

The angle piece is (I assume) for the pick guard, but I haven't built one of these kits so am basing that off a repair I did in the past. Someone with more knowledge of the kit can probably chime in and correct me.
 
John, you are indeed a legend! Thank you so much for clearing that up. Yay!!
Yes, the video explained it well. Its for the floating scratch plate.
 
Last edited:
1) The bridge is a 'floating bridge' type, and just sits on the top of the body and is held in place by string pressure. Yes, the saddle just sits on top of the screws in the foot and the strings hold it in.

Some people will 'pin' their floating bridge so it doesn't get knocked/moved when playing. You'll first need to be happy with its position so the strings all line up down the neck and the intonation is correct. It's best to put some masking tape on top of the body, first, then get the position right. Mark the outline of the bridge foot on the tape, and knock in a small panel pin/nail a few mm near each end of the bridge position, leaving a few mm and the head still showing. Then cut off the head of the nail with largish side-cutters or pliers, wil a couple of mm of the pin still proud of the wood.

Position the bridge over the correct marked location and just tap it, to leave a couple od small indents on the foot, Drill these out with a small drill of the same diameter as the pin to a couple of mm. Remove the tape and put the bridge over the pins, It is still loose and 'floating' but you won't knock it out of position by accident.

Note that this will fix the intonation, so you need to do the set-up with the same make and gauge of string that you use. Don't do it with the cheap Chinese kit stings (which are only any good for helping with initial test and basic set-up of the bass).

If you keep changing string gauge or string type, then you'll want to move the bridge each time to get the intonation correct, so don't pin it until you settle on a string gauge. It is possible to remove the pins and pin the bridge in another position, but you can only really do this a few times before you end up with a lot of holes in the top.

2. That's the support for the scratchplate/pickguard. The short leg is screwed to the side of the bass, the long leg is fixed to the scratchplate with a nut and bolt. It keeps the lower edge of the pickguard off the body. The kit is loosely based on a Les Paul shape, so look at how the scratchplate is fixed on a Les Paul as it's the same.

3. Truss rod cover (goes over the hole on the headstock that give access to the truss rod).

4. The neck should certainly sit against the end of the neck pocket. So plug the holes in the neck with some hardwood dowel, then when all is dry and the dowel ends levelled off, fit the neck into the pocket, clamp it in place and mark out the hole positions in the correct position. Then remove the neck and drill the holes, making sure not to drill too deep. It's also best to enlarge the body neck screw holes so that the screws just about push through (you don't want them rattling about in the holes) rather than having to be screwed through the wood. This allows the screws to properly pull the neck down firmly to the body. Otherwise the screws may bind up after screwing into the body before the neck is fully pulled down.

The neck will sit high over the body as it's a bolt-on, and the height is needed so the strings clear the pickups and are high enough for the minimum bridge height.
 
@Simon Barden: Thank you for your detailed response thats some great information there.

1) Thanks for explaining that, I had no idea. I might leave the pinning until I am certain :)

2. Perfect - I watched the video JohnH posted and that helped me understand.

3. Sweet! Got a custom one I have made :)

4. You explained that so well thanks! Great tip about increasing the holes in the body - I will do that as the holes are currently super slim.
 
Back
Top