Page 1 of 6 1 2 3 ... LastLast
Results 1 to 10 of 57

Thread: Build #2 - PSH-1 (Redux)

Hybrid View

Previous Post Previous Post   Next Post Next Post
  1. #1
    Member dbeltrami's Avatar
    Join Date
    Oct 2020
    Location
    Mitcham, Victoria, Australia
    Posts
    79

    Build #2 - PSH-1 (Redux)

    Re-starting a Build Diary for my second build which is a PSH-1 kit from PBG.

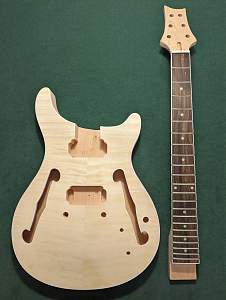
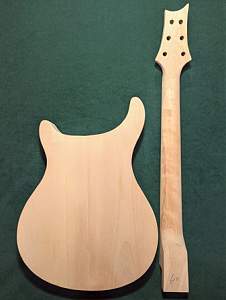
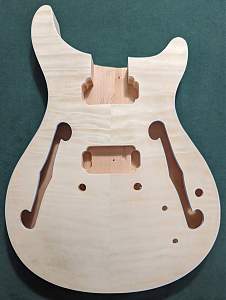
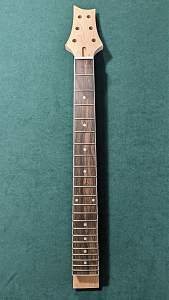
    PBG were awesome in their customer support and service. I took their advice in not going with a replacement of my custom order rather taking one of the standard PSH-1 kits they had in stock. They picked out a very nice expression as well - I can barely see any glue spots with the naked eye (just one so far); the maple veneer looks very nice; the basswood body does look good - not as nice as the mahogany on my custom order but perfectly acceptable; the neck and fretboard look great too with the headstock shape a much nicer profile than the very elongated/pointy one on my previous kit.

    My original design ideas are the same.remains the same as for the original kit. I'll use a two-tone (chrome and gold) style for the hardware, in the same style as the PRS SE Hollowbody II. I have purchased some Tonerider alnico II pickups, new pots, switch and locking machine heads.

    I just need to do something about the truss rod cover as the standard black plastic trapezoid one is not ideal. This may be an opportunity for some unique design and handcraft

    All in all, I'm very happy. I'll wait for my replacement bridge to arrive before doing a mock assembly and checking the neck angle, bridge locattion, etc.

    In the meantime, here are a few shots of the kit body and neck.

    Just one question for the forum: The standard kit has white binding. My pickup surrounds and toggle switch knob are both cream in colour. Does anyone have any suggestions for how to tint/stain/recolour white binding?

    Click image for larger version. 

Name:	PXL_20220127_033937603.jpg 
Views:	396 
Size:	193.0 KB 
ID:	42454 Click image for larger version. 

Name:	PXL_20220127_034001581.jpg 
Views:	380 
Size:	29.3 KB 
ID:	42455 Click image for larger version. 

Name:	PXL_20220127_034034198.jpg 
Views:	403 
Size:	166.8 KB 
ID:	42458
    Click image for larger version. 

Name:	PXL_20220127_034047530.jpg 
Views:	397 
Size:	164.0 KB 
ID:	42456 Click image for larger version. 

Name:	PXL_20220127_034056245.jpg 
Views:	377 
Size:	296.4 KB 
ID:	42457
    Last edited by dbeltrami; 06-03-2022 at 05:27 PM.
    ---------------------------
    First build: TLA-1F
    Second Build: PSH-1

  2. #2
    Member XP Rider's Avatar
    Join Date
    Sep 2019
    Location
    Western Utah
    Posts
    170
    Looks like you are on your way. You can find quite a selection of truss rod covers at www.thaliacapos.com. If they don't have your solution, you might find some good ideas. Good luck.

  3. #3

    Build #2 - PSH-1 (Redux)

    Quote Originally Posted by XP Rider View Post
    Looks like you are on your way. You can find quite a selection of truss rod covers at www.thaliacapos.com. If they don't have your solution, you might find some good ideas. Good luck.
    I made one from an old plastic box was made from some gloss black plastic. Just sanded it down and applied a decal on it. Agreed the kit truss rod cover is ugly.


    Sent from my iPhone using Tapatalk
    Last edited by mrpearson; 28-01-2022 at 07:50 AM.

  4. #4
    Member dbeltrami's Avatar
    Join Date
    Oct 2020
    Location
    Mitcham, Victoria, Australia
    Posts
    79
    Quote Originally Posted by mrpearson View Post
    I made one from an old plastic box was made from some gloss black plastic. Just sanded it down and applied a decal on it. Agreed the kit truss rod cover is ugly.
    I really like it. So you only need the one screw, per the PRS style? Simon advised me that three screws would be required. How did you get the white writing on it? Is that a waterslide decal?
    ---------------------------
    First build: TLA-1F
    Second Build: PSH-1

  5. #5
    Quote Originally Posted by dbeltrami View Post
    I really like it. So you only need the one screw, per the PRS style? Simon advised me that three screws would be required. How did you get the white writing on it? Is that a waterslide decal?
    1 screw works fine on my real PRS, the bottom rests against the nut. White lettering is a waterslide decal from Nova Sublimination in Sydney - http://novasub.com.au/ They laser print them so pretty resliant to finish being applied on top. You will need to provide your artwork in vector format and any fonts with outlines applied (get a graphic designer to help if know someone) I am debating whether I should tru-oil over the decal on to make it a bit tougher and also seal the edges down to stop it peeling.

  6. #6
    Overlord of Music McCreed's Avatar
    Join Date
    Oct 2018
    Location
    AUS
    Posts
    3,552
    That's good outcome, even if it's not what you originally intended.

    I'll throw two things out there for your consideration. (both pertaining to upper fret access)

    1) A scallop in the bottom cut-away on the front (like genuine PRS)
    2) Reshaping the back area where the body and heel of the neck join.

    Just one or the other will make a difference, but I think doing both would provide the best result.
    I added the scallop on mine much later after it was finished and it made a big difference, but if I were starting from scratch again, I would have reshaped the back as well.

    The standard neck join is quite a square, stepped kind of design. Not ideal IMO.

    Here's a link to my PRS-1TS showing before & after scalloping.
    Making the world a better place; one guitar at a time...

  7. #7
    Member dbeltrami's Avatar
    Join Date
    Oct 2020
    Location
    Mitcham, Victoria, Australia
    Posts
    79
    Thanks McCreed, Your PRS guitar looks awesome.

    How did you go about creating the scallop and what did you do to make sure the binding had a good clean edge?
    I'm not sure I'm up to something like that but I have a friend who is pretty handy with wood and may ask him if he thinks we could manage it.

    Do you have a photo of what you did on the back?
    ---------------------------
    First build: TLA-1F
    Second Build: PSH-1

  8. #8
    Quote Originally Posted by McCreed View Post
    That's good outcome, even if it's not what you originally intended.

    I'll throw two things out there for your consideration. (both pertaining to upper fret access)

    1) A scallop in the bottom cut-away on the front (like genuine PRS)
    2) Reshaping the back area where the body and heel of the neck join.

    Just one or the other will make a difference, but I think doing both would provide the best result.
    I added the scallop on mine much later after it was finished and it made a big difference, but if I were starting from scratch again, I would have reshaped the back as well.

    The standard neck join is quite a square, stepped kind of design. Not ideal IMO.

    Here's a link to my PRS-1TS showing before & after scalloping.
    As this is a hollowbody kit I doubt there is enough wood in the wings for the scallop. I have been using a bit of dowel through the jack connected hole when drying the stain and seems to go all the way up to the top edge. Ie. No chunk of wood of there to carve. Correct me if I wrong if someone has been successful


    Sent from my iPhone using Tapatalk

  9. #9
    Member dbeltrami's Avatar
    Join Date
    Oct 2020
    Location
    Mitcham, Victoria, Australia
    Posts
    79
    Quote Originally Posted by mrpearson View Post
    As this is a hollowbody kit I doubt there is enough wood in the wings for the scallop.
    Yep, It's hollow. Probabaly a good outcome as I would have given it a go even though I am sure my skills are not up to it.
    Then again, it could be interesting have another port in the hollow body :-)
    ---------------------------
    First build: TLA-1F
    Second Build: PSH-1

  10. #10
    GAStronomist Simon Barden's Avatar
    Join Date
    Oct 2016
    Location
    Reading, UK
    Posts
    10,547
    There is no easy and reliable way to colour the binding that I know of, short of painting it. Stain is unlikely to be taken up much except in the micro cracks that exist in the binding especially on the tighter bends, and that’s not a good look. I’d suggest using an amber tinted lacquer or a slightly yellow/amber finish like TruOil, which will take the edge off the white and bring it nearer the cream. They’ll never match exactly, but rarely do on big name guitars either.

    Alternatively you could look for white pickup rings and toggle switch surround. They don’t cost much.

Page 1 of 6 1 2 3 ... LastLast

Tags for this Thread

Posting Permissions

  • You may not post new threads
  • You may not post replies
  • You may not post attachments
  • You may not edit your posts
  •