Page 4 of 5 FirstFirst ... 2 3 4 5 LastLast
Results 31 to 40 of 49

Thread: Sam’s Goldtop

Hybrid View

Previous Post Previous Post   Next Post Next Post
  1. #1
    Member samr's Avatar
    Join Date
    Jan 2019
    Location
    Perth, WA
    Posts
    24
    So I haven’t done an update for (checks notes) uh, 16 months. In my defense I’ve had a lot of other projects which unfortunately ranked higher in the Spousal Satisfaction Index, but I have made some minor progress.

    One of the distractions I hit, was restoring this bad boy that a relative was throwing out:

    Click image for larger version. 

Name:	IMG_1106.JPG 
Views:	401 
Size:	219.9 KB 
ID:	41612

    It’s an old jarrah workbench complete with...

    Click image for larger version. 

Name:	IMG_1699.jpg 
Views:	385 
Size:	241.0 KB 
ID:	41613

    a 7" Dawn quick-release vise that doesn’t seem to have had a lot of use.

    The workbench appears to date back to the mid-60s (based on some writing found underneath) and has been remanufactured at least once already - it looks to originally have had angled legs. This means the angled steel side cabinets look a little odd when mounted vertically, but I 'plumbed them up' with some pegboard. The original colour looks to have been close to the Rust-oleum 'Pastel Peppermint' I resprayed them with.

    Click image for larger version. 

Name:	IMG_1768.jpg 
Views:	382 
Size:	202.9 KB 
ID:	41614

    I replaced the old-school timber bench stop with a flush mount job from Carbatec.

    Click image for larger version. 

Name:	IMG_1767.jpg 
Views:	373 
Size:	243.1 KB 
ID:	41615

    I also replaced all the old brass flathead screws with modern galvanised jobs, which also gave me a bad case of tennis elbow. The bench was missing several of the top pieces and it’s pretty difficult to source 60mm jarrah nowadays. I do have tonnes of 50mm though so managed to lift some up with 10mm floorboard. It’s not super flat but honestly it’s much better than balancing stuff on cheap saw stools.

    At any rate, I’m crossing my fingers that the 4" x 4" jarrah frame will be sturdy enough to hold up a guitar

    Click image for larger version. 

Name:	IMG_1738.jpg 
Views:	394 
Size:	223.1 KB 
ID:	41616

  2. #2
    Member samr's Avatar
    Join Date
    Jan 2019
    Location
    Perth, WA
    Posts
    24
    Anyhoo, the Goldtop. Main issue I wanted to resolve was fixing the bridge post holes, the positioning for the angled wraparound seems to be inordinately difficult. I ended up synthesizing some measurements from:

    1. Random internet dude on the My Les Paul forum who claims to have been taught a specific method by an authorised Gibson repairer
    2. StewMac fret position calculator
    3. Clamping strings over the bridge & tuning/intonating

    Click image for larger version. 

Name:	IMG_0454.jpeg 
Views:	387 
Size:	243.6 KB 
ID:	41617

    The resulting measurements were... all pretty close, actually, well within adjustment range. Photo also shows how far out I drilled the last holes. The main risk again is really the vertical positioning; I think I’m trying to centre the back of the bridge where the strings exit, but I won’t know for sure until everything’s together.

    Click image for larger version. 

Name:	IMG_0642.jpeg 
Views:	401 
Size:	225.5 KB 
ID:	41618

    I didn’t have a lot of luck with the FW sanding sealer - it went on very thick, and certainly clogged up the sandpaper like crazy, but after several coats didn’t seem to have done much grain filling. So I ended up doing my tried and true "just spray lots of coats of poly". I’ve probably done about 6 or 7 coats now - I don’t have a recent photo, this was one of the earlier coats:

    Click image for larger version. 

Name:	IMG_0783 2.jpeg 
Views:	386 
Size:	327.2 KB 
ID:	41619

    Perhaps most importantly, I’ve stamped a serial number. This is meant to be an incentive for me to get the thing done within the next few months.

    Click image for larger version. 

Name:	IMG_1454.jpeg 
Views:	397 
Size:	310.1 KB 
ID:	41620

  3. #3
    Member samr's Avatar
    Join Date
    Jan 2019
    Location
    Perth, WA
    Posts
    24
    Couple of updates from the weekend. A glamour shot of the plugged & redrilled bridge post holes:

    Click image for larger version. 

Name:	IMG_1457.JPG 
Views:	169 
Size:	270.3 KB 
ID:	41676

    And the relocated bridge tone pot

    Click image for larger version. 

Name:	IMG_1458.JPG 
Views:	178 
Size:	177.0 KB 
ID:	41677

    Bridge ground wire is in.

    Click image for larger version. 

Name:	IMG_1459.JPG 
Views:	177 
Size:	220.0 KB 
ID:	41678

    And I drifted in the vintage-spec extra long steel anchors. First bit of hardware attached, I’m unreasonably excited by this.

    Click image for larger version. 

Name:	IMG_1460.JPG 
Views:	182 
Size:	228.6 KB 
ID:	41679

    Some more masking and the first light coat of primer. From my test sprays with the Rustoleum metallic it shows every surface imperfection so there’s a lot of work to do here - eg the mark between the pickup routs where I dropped something on it.

    Click image for larger version. 

Name:	IMG_1468.JPG 
Views:	186 
Size:	195.3 KB 
ID:	41680

  4. Liked by: OliSam

  5. #4
    Member samr's Avatar
    Join Date
    Jan 2019
    Location
    Perth, WA
    Posts
    24
    So spraying metallic out of a rattle can has knobs on it. I've probably done about 30 coats all up, with substantial rubbing back on several occasions. The best technique I found was basically multiple light mist coats applied a few minutes apart in a single swirly pass as the bugger likes to spatter at inopportune moments.

    Click image for larger version. 

Name:	IMG_1917.JPG 
Views:	164 
Size:	484.0 KB 
ID:	42209

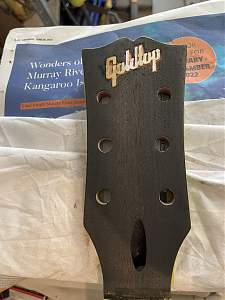
    My $15 jewellers saw finally arrived from China so next step was cutting the MOP inlay. I looked into the logo font option, I think I saw someone selling one online, but ended up designing it myself in Sketch. If anyone would like a copy of the vector file let me know & I'll post it.

    Click image for larger version. 

Name:	IMG_1918.JPG 
Views:	162 
Size:	269.1 KB 
ID:	42210

    This is time-consuming and is very nerve-wracking/concentration-intensive, probably like being an english batsman at the MCG

    Click image for larger version. 

Name:	IMG_1919.JPG 
Views:	156 
Size:	333.7 KB 
ID:	42211

    Finished product, it’s not perfect but I'm pretty happy with it. Next step routing.

    Click image for larger version. 

Name:	IMG_1923.JPG 
Views:	162 
Size:	471.9 KB 
ID:	42212

  6. #5

  7. #6
    Mentor dozymuppet's Avatar
    Join Date
    Jun 2020
    Location
    Perth, WA
    Posts
    842
    Nice work. Might have to hunt down a cheap jeweller's saw myself...

    Sent from my Pixel 4 using Tapatalk

  8. #7
    Member samr's Avatar
    Join Date
    Jan 2019
    Location
    Perth, WA
    Posts
    24
    Quote Originally Posted by dozymuppet View Post
    Nice work. Might have to hunt down a cheap jeweller's saw myself...
    I bought the saw from 'huanshop2015' on ebay, it's not fancy or well constructed but works fine.

  9. Liked by: dozymuppet

  10. #8
    Member samr's Avatar
    Join Date
    Jan 2019
    Location
    Perth, WA
    Posts
    24
    BD - here’s hoping I can argue that MOST of it was done in '21

  11. Liked by: Bakersdozen

  12. #9
    GAStronomist Simon Barden's Avatar
    Join Date
    Oct 2016
    Location
    Reading, UK
    Posts
    10,547
    We English are used to disappointment and despair at our cricket team’s results. It’s the occasional slight glimmer of hope we can’t cope with.

    30 coats of paint must have meant quite a few tins of paint. Really worth thinking about investing in a small compressor and a mini-spray gun if you ever do something similar. The chances of getting paint blobs with one are very small indeed compared to using rattle cans.

    Nice inlay work!

  13. #10
    Member samr's Avatar
    Join Date
    Jan 2019
    Location
    Perth, WA
    Posts
    24
    Setting up for routing with the Dremel attachment. It was less precarious than it looked.

    Click image for larger version. 

Name:	IMG_1927 2.JPG 
Views:	169 
Size:	455.6 KB 
ID:	42223

    The depth limiter on the Dremel router is complete rubbish though, best results were routing it in stages and just locking the bit down a little bit further each time. I gave up on any prospect of a neat fit and just hacked out a 1950s-esque large recess that I'll fill.

    Click image for larger version. 

Name:	IMG_1928 2.JPG 
Views:	144 
Size:	434.0 KB 
ID:	42224

    Removed the plastic nut and found it was glued on harder than it should have been, so I tore a couple of small chunks out of the headstock. I did some repair work/grain-fill with timbermate and stained the mahogany (although I'm going to paint anyway).

    Click image for larger version. 

Name:	IMG_1931.JPG 
Views:	157 
Size:	359.9 KB 
ID:	42225

Page 4 of 5 FirstFirst ... 2 3 4 5 LastLast

Posting Permissions

  • You may not post new threads
  • You may not post replies
  • You may not post attachments
  • You may not edit your posts
  •