
Looks absolutely awesome, great job.Originally Posted by MadMike


Looks absolutely awesome, great job.
Fender electric Fat Strat mim. (Bought)
Maton Electric Acoustic EM325C
Pitbull Guitars ST-1 ( finished) http://www.buildyourownguitar.com.au...ead.php?t=5970
Pitbull Guitars SG-2 ( Finished) http://www.buildyourownguitar.com.au...ead.php?t=6124
Pitbull Guitars JM-1 (Finished. 2018 June GOTM))http://www.buildyourownguitar.com.au...ead.php?t=7150
Pitbull Guitars TL-1 (In production) [url]https://www.buildyourownguitar.com.au/forum/showthread.php?t=8676

So first I used a water based ink to lay my black down. It was an ink for craft rubber stamps. I then used 220 (USA) grit to rough it back, and finished with 320 (USA) grit. It is a pretty fine grit, so it took me a while to sand it back. But on the plus side it didn't eat through the Veneer, and it is finish sanded at the same time.
And thank you for the complement, I have been very nervous about messing it up.
Thank you, so I have been very busy today as you'll see by the pictures. I figure out to get the exact finish i was seeking in the first place. So the black was straight forward, black it and sand it back to show the grain. I accidentally figured out how to get the white, i meant to do a wipe down with my mineral spirits, and used my acetone instead. Well it turns out that the acetone does a bleach like effect. I then airbrushed cyan blue, this also was a water based ink meant for craft rubber stamps, and sanded the blue back to reveal the silver. I am still getting the final tone where I want it. But here are the update pictures for today.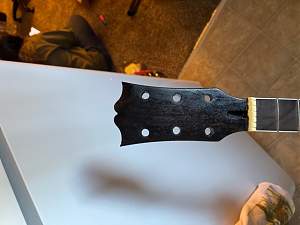

Very cool. Looks like it might work out as planned!
Sent from my Pixel 4 using Tapatalk
Kit builds: JBA-4M | STA-1M | AIB-1Q | TL-1 (in progress)
Side projects: Artist TC59 | Sheoak Dreaming | Spalted Marri Metal | Randy Vs | Sassafrassin' | St. Vincent
Ok so sorry I haven't posted the past couple days, I've been very busy. But I have made some major strides in my guitar. So I have made a couple changes to my original staining of the body and neck. I had some scuffs in the neck, so I went back and resanded it. I decided I like the wood grain showing, so i did this fancy two tone job on the neck. I sprayed 18 coats of polyurethane / mineral spirits mix. I set my neck. and have assembled it while I am waiting for the clears to cure so i can buff it out. I still have to put my EMG pickups, but I will wait till I buff it out. I have one fret that buzzes, the 2nd fret, will be easy fix. She has a supper low action, sounds awesome, and looks goodto boot. Here are some pictures to catch you guys up.

Loving how this is going! Great Job MadMike!
FrankenLab:
Turning tone wood into expensive sawdust since 2016!
Here is one more picture for now, of my guitar hanging with my other babies. I'll be back at it in about two weeks, I need to let the clear cure before I start buffing it.
I am so impressed by this guitar. The sound it makes is amazing, the playability, the feel of, I just can go on and on about what I love about this guitar.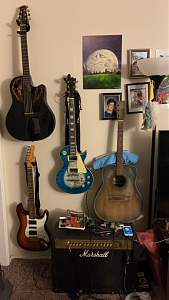
 Posting Permissions

 Reply With Quote