
Thanks cade, it's probably more a credit to the colour chart for MTN 94 paints - it's pretty accurate, maybe a fraction darker. You can pick your colours from there with a good degree of confidence.Originally Posted by cade711


Thanks cade, it's probably more a credit to the colour chart for MTN 94 paints - it's pretty accurate, maybe a fraction darker. You can pick your colours from there with a good degree of confidence.
Completed Builds: #1 TL-1 "Telemaster" (GOTM Oct 2016); #2 The "Maplecaster" scratch build; #3 JB-4 "Bass IV" (co-winner GOTM Jan 2017); #4 ST-1M "Surfcaster" (GOTM Apr 2017), #5 JZA-1 "EC Deluxe"
Also, add a clear coat or 2 after masking and before drawing the line. The clear provides an extra seal between the masking tape and the surface which helps stop the paint bleeding under the masking tape.
Current:
JBA-4 done! http://www.buildyourownguitar.com.au...ead.php?t=6865
TBird GOTM November 2017 http://www.buildyourownguitar.com.au...ead.php?t=7064
JB-4 with mods - underway http://www.buildyourownguitar.com.au...ead.php?t=8014
That's a great idea billb, thanks so much!
Completed Builds: #1 TL-1 "Telemaster" (GOTM Oct 2016); #2 The "Maplecaster" scratch build; #3 JB-4 "Bass IV" (co-winner GOTM Jan 2017); #4 ST-1M "Surfcaster" (GOTM Apr 2017), #5 JZA-1 "EC Deluxe"
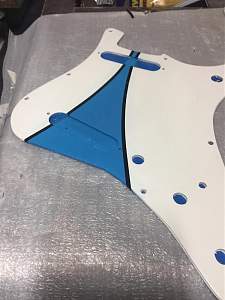
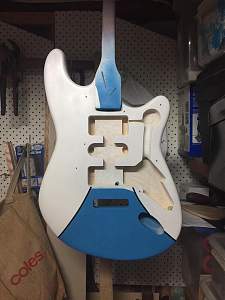
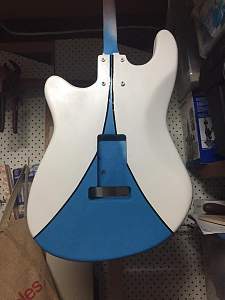
A few days and a bit of progress! With colour coats complete, on a whim I decided on a different approach. First a did a couple of light layers of clear, then did the pinstriping with automotive tape (after a long discussion with the bloke in the shop who assured me he'd applied acrylic over the tape and it had worked fine!). It was very easy to do I have to say. I then did another clear. At this point the tape decided to lift a little and I thought I was screwed, but I've managed to keep it in place and do a couple more coats. I think I've got it firmly fixed now. I'm happy with the pickguard and front, the back isn't quite as tight but close enough! I'm going to do a heap of clears to get try and get a glassed look so I'll have to be patient!!
Completed Builds: #1 TL-1 "Telemaster" (GOTM Oct 2016); #2 The "Maplecaster" scratch build; #3 JB-4 "Bass IV" (co-winner GOTM Jan 2017); #4 ST-1M "Surfcaster" (GOTM Apr 2017), #5 JZA-1 "EC Deluxe"

now thats different the tape will be fine under clear just dont spray the 1st 2 coats over it to wet after a couple of dry costs you'll be fine, if it was me i would have put the tape over a few coats of clear as will stick better
Last edited by phrozin; 05-02-2017 at 12:21 PM.
My facebook
126 guitars done so far still going, 34 Starts, 25 Teles, 27 Les Pauls, 11 SGs, 8 Hollow Body, 21 Super Strats
It did do a couple of clears first but probably a bit too light to make for a really good surface to stick it to. Your suggestion would have been spot on! I've now done three over the top and it's settling down.
Completed Builds: #1 TL-1 "Telemaster" (GOTM Oct 2016); #2 The "Maplecaster" scratch build; #3 JB-4 "Bass IV" (co-winner GOTM Jan 2017); #4 ST-1M "Surfcaster" (GOTM Apr 2017), #5 JZA-1 "EC Deluxe"
With all the heat/rain/humidity, painting on the body is going very, very slowly! So at the very least I figured some logos were in order. Funny thing is that when I originally started this project I'd called this one the Surfcaster, but at some point I've created logos with word Surfmaster. Oh, well, let's just go with Surfmaster from now on! I also did a very small logo from the surfboard I'm basing this on and put that on the back of the headstock as a nod to its origins.
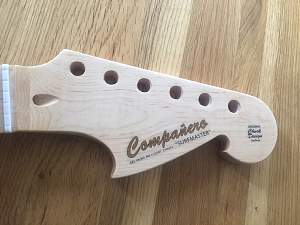
A few more coats of TO, then some dingowax on the fretboard and at least the neck will be ready to roll...
Completed Builds: #1 TL-1 "Telemaster" (GOTM Oct 2016); #2 The "Maplecaster" scratch build; #3 JB-4 "Bass IV" (co-winner GOTM Jan 2017); #4 ST-1M "Surfcaster" (GOTM Apr 2017), #5 JZA-1 "EC Deluxe"

Looking awesome Chuck! I really love the headstock shape man. How did you create your headstock decal? Is it just a water-slide? Could you tell me the font, color, printer type etc. to replicate? I would really like to do something similar.
thanks dude.
cheers,
Gav.
--
Build #01: BC-1
Build #02: ST-1
Build #03: JR-1DC
Build #04: ES-2V
Build #05: ESB-4 (GOTM July 2014)
Build #06: RC-1
Build #07: MK-2
Build #08: TLA-1
Build #09: JR-1DC
Build #0A: LPA-1
Build #0B: STA-1 (GOTM April 2015)
Build #0C: MKA-2
Build #0D: LP-1M
Build #0E: JB-1
Build #0F: FS-1
Find me:
https://www.facebook.com/firescreek.guitars/
http://www.guitarkitbuilder.blogspot.com.au/

love the headstock shape and logo's Chuck ! really looks like rolling waves or a spare beer bottle opener ! haha
Current Builds and status
scratch end grain pine tele - first clear coat on !
JBA-4 - assembled - final tweaks
Telemonster double scale tele - finish tobacco burst on body and sand neck
Completed builds
scratch oak.rose gum Jazzmaster - assembled needs setup
MK-2 Mosrite - assembled - play in
Ash tele with Baritone neck - neck pup wiring tweaks and play in
If I'd thought about it more it would have been great to get a stainless steel insert for the hook so it really could crack a beer!!
Completed Builds: #1 TL-1 "Telemaster" (GOTM Oct 2016); #2 The "Maplecaster" scratch build; #3 JB-4 "Bass IV" (co-winner GOTM Jan 2017); #4 ST-1M "Surfcaster" (GOTM Apr 2017), #5 JZA-1 "EC Deluxe"
 Posting Permissions

 Reply With Quote