GR-1SF custom build, as a tribute to a Harmony H62.

After a long and protracted ordering/order disappearing/factory finally finishing/delivery saga, it's actually due to arrive some day soon. In these COVID times, with AusPost under the pump, I'm sure they're all pedaling as fast as they can! ;)

Here's a pic of the real deal - I'm hoping that I'll be able to do it justice:
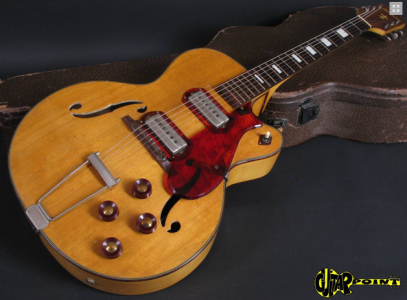
Screen Shot 2020-12-08 at 9.46.36 pm.png

The reason for this build is that I haven't seen a Harmony H62 for sale in Australia in all the time I've been looking. I ended up buying a Silvertone 1385, which is basically the same guitar, but finished in a black gloss, which I really dig
also, but it's in amazing condition, and I don't want to gig with it, and wreck it, thus devaluing it. The basic specs of the GR1, make it sound like it will be a suitable base for this build to work, mainly the body shape/size, and the wide neck, which I need, to allow for the extra width of the polepieces on the Gibson P13 pickups. These pickups were the precursor to the P90, and were not used by Gibson, after the P90 came into production, but are pretty much the same design, with some construction differences. I assume the P90 was cheaper to produce, thus the P13s went by the wayside - well, not totally, as Harmony still used the pickups up until the early 1960s, but there's scant info on who continued to build them for Harmony.
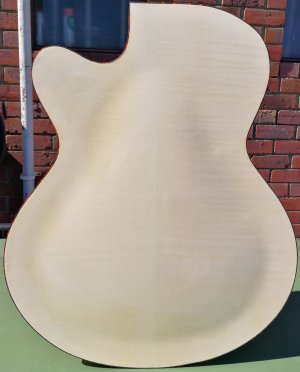
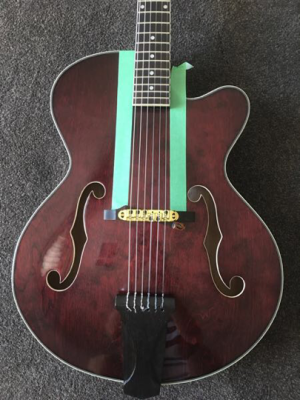
I'll post some pics in the comments (as supplied by Ben) of the body supplied by the factory - I wanted flame back and front, and because the Gretsch style build they supply is not the same layout/pickup size, etc, I asked for only bridge post holes and f holes on the top. Now that I notice the f holes are in a bit of an odd position (pretty much all archtops have the bridge positioned central to the f holes), I may or may not live with this one as the f hole positions in relation to the bridge get to me....
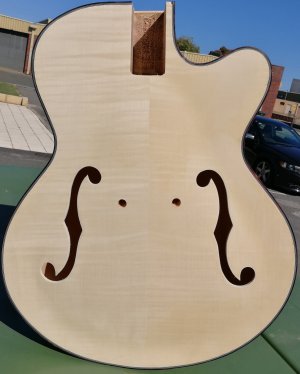
 
The F-holes start off in the standard kit position, certainly the top/front of the F-hole relative to the waist, but the angle of them looks wrong to me, compared to the standard GR-1SF kit. They don't splay out as much at the bottom as on the standard kit, which doesn't help the look, and adds a bit to their perceived length. Of course the F-holes on the Harmony in the picture are about 3/5 the length of those kit F-holes, which moves the centre of the F-hole further away from the bridge position. The kit guitar F-holes are generally a lot longer and a bit wider than on their 'inspiration' guitars. Of course on some guitars it makes it easier to get the electronics through the holes, but on the hollow bodies where you can use the pickup cut-outs for this purpose, it isn't anything like as important.

I'd also hazard a guess that the Harmony has a shorter, more compact body, despite the overall shape looking quite similar. I caught sight of a plan for one giving a body length of 17.5". If the GR-1SF is the same length as my ES-3, which I assume it is, then that's longer at 19". Both necks join the body at the 14th fret.

So you've got much longer F-holes set, a bit further back from the waist than on a Gretsch (or Harmony) and a 1.5" longer body (which will also move the waist back in proportion), so that's generally why the bridge doesn't line up with the middle of the F-holes. Which I'm afraid doesn't solve or improve anything.
 
I wonder where you've sighted a plan for an H62? I must say I haven't looked, but I'm surprised to hear there is one about.

I can compare body sizes with the 1385 'Black Beauty" when the kit finally arrives. I may even make a decision at that point, if I can see it's not going to "do it" for me, due to obvious major differences, (that I didn't pick up on from seeing pictures), I may well seek out other options, and just make the GR1 as a Gretsch knockoff for the experience. We'll see.....
 
Well you’re faster off the mark discovering the unsymmetrical f hole positions compared to me. I was finished before I noticed the bridge closer to one f hole than the other.
 

Attachments

  • PNG image 88.png
    PNG image 88.png
    464.5 KB · Views: 546
Last edited:
The outline plan came up as an image when doing a search for a plan. But it was a fleeting glimpse as it was on Pinterest, which very handily gives you a totally different picture within seconds.
 
@DarkMark - I actually hadn't noticed that element of them being badly positioned....
I can't unsee that either - egads!!
@Simon Barden - If you want specs of the 1385, I'm happy to measure her up for you.
This is the link to the Harmony Espanada, which is the same guitar, but has the Harmometal binding, and Espanada logo, instead of the Silvertone logo. Colour aside, it's essentially the same as an H62.
https://web.archive.org/web/20200809135146/http://harmony.demont.net/guitars/H63/175.htm#
 
I was only really looking to see if I could find reasons why the F-hole position was out by so much.

It mainly comes down to kits that are definitely not exact copies of others, and that are routed using templates, not CNC machines, by a less than precise workforce.
 
It mainly comes down to kits that are definitely not exact copies of others, and that are routed using templates, not CNC machines, by a less than precise workforce.

Damn straight!

I probably should make a suggestion to Adam that the factory could make improvements like fixing these basic design flaws. I guess day to day errors aren't going to change, but the fundamentals could be addressed....
 
We did provide a list of things that needed improving a few years ago. We saw some improvement, but I think things have slipped back to how they were. Pit Bull are but one reseller of the kits these factories make (Pit Bull use kits from 3 or 4 different factories), so their influence alone is relatively limited.

Ideally the kits would be made using CNC machines, not manual routing using templates, but that involves capital investment and reducing the number of employees. But whilst labour rates in China are low and the Government pushes for full employment, that's unlikely to happen.

Some of the kits seemed to be of a much higher quality than others, the kits starting with a 'G' for example; but they too can come with fundamental flaws that can ruin them. My GSM-1 has a superb 1-piece body, but I discovered the bridge post holes were about 3mm too close together only after all the finish was on.
 
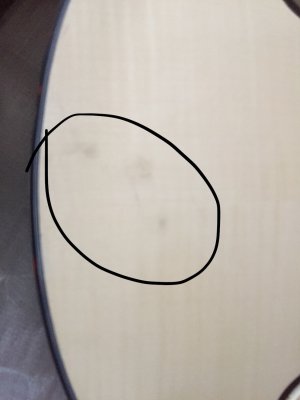
I wonder if people might chime in, and let me know if these are acceptable levels of poor finish - I realise it's not a rolls royce, but I'm not totally happy with these issues, nonetheless...
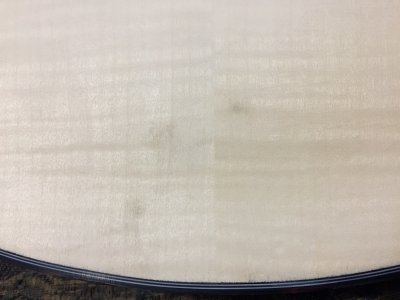
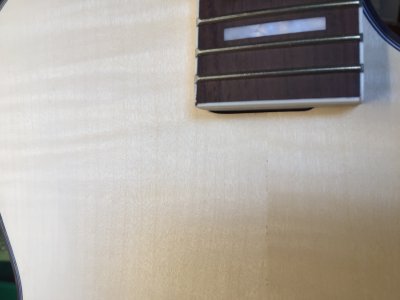
Marks (sorry the photo is blurry, and I should take another one to enhance it, but I can't ascertain what these three marks are - I don't believe they're a natural part of the wood's appearance, and if it is, surely it shouldn't have been used for the top?!
IMG_7620.jpg

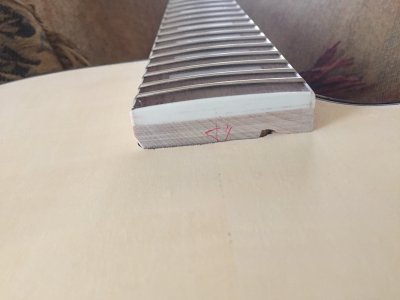
End of neck finish below fretboard - I don't know what to do here - get it replaced, or could I try to tidy it up?
It's not like I can hide it...
IMG_7621.JPG

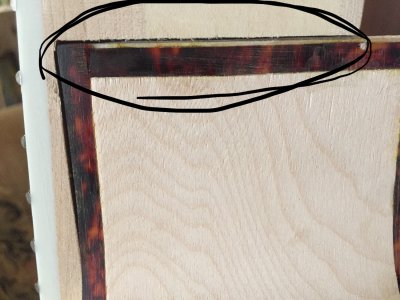
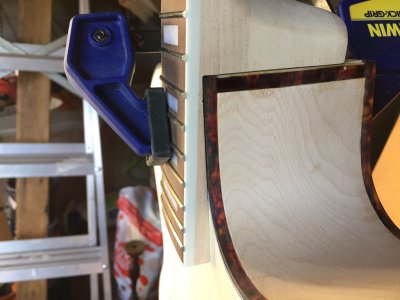
Binding alongside neck joint, front to back - poorly finished, binding not even fully going to edge of joint...
IMG_7623.jpg

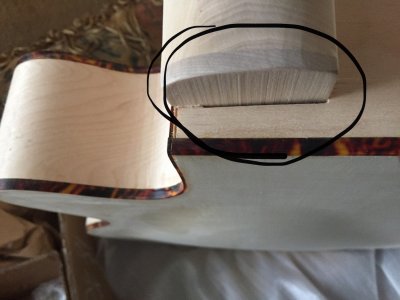
Gap at rear of neck/body joint - maybe a bit of sanding to underside of neck heel will bring it down?
IMG_7624.jpg

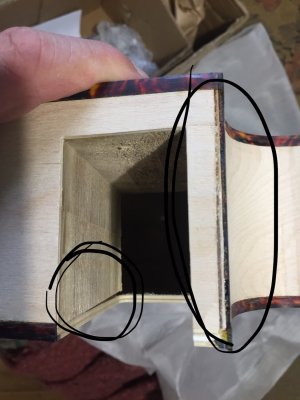
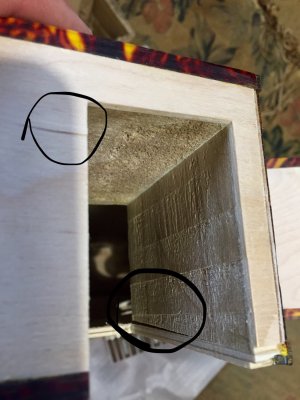
Another view of poor binding alongside neck/body joint, plus the neck block not even joined to top all the way
IMG_7626.jpg

The other side of neck block not touching the top, plus a visible crack in the side, near neck/body joint
Photo limit reached - I'll add that pic next comment...
 
More pics, then I'll think about getting the Goof off, and having some quality sanding time with the body
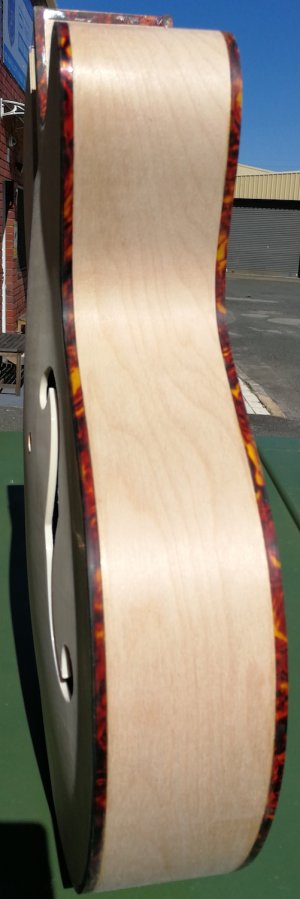
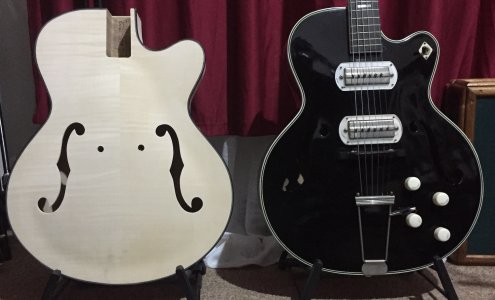
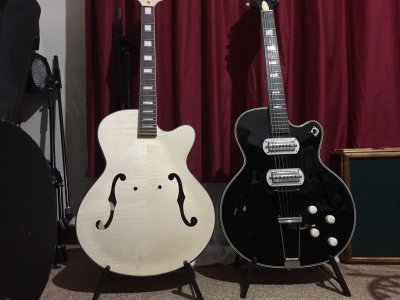
Here's a couple of pics of the kit body, alongside the Silvertone 1385 (aka Black Beauty), essentially the same guitar as the Harmony H62, to check body proportions. The Silvertone is 3 1/2" thick, and the kit is 3 1/4" thick. The Silvertone is a bit rounder in the bottom bout, and the kit is a bit wider in the upper bout, making the cutaway a bit bigger. The Silvertone neck is substantially wider (60mm at end of fretboard), and the kit is around 55mm. I don't think that the neck will be suited to the extra wide pickups, which are 56.5mm bridge, and 52m neck. Maybe all is not lost, as pickup maker Curtis Novak has just (literally last week), mentioned he's in the process of making reproductions of the P13s, with a 50mm polepiece spacing. At $175USD per pickup, I not about to buy something I don't need, but if I can't get the string gap right, I may have to fork out (ouch)...
IMG_7629 2.JPG

IMG_7630 2.JPG
 
The marks look like oily fingerprints to me, so may come off with naphtha or isopropyl alcohol.

The poor binding alone for me would be a reason to reject it.

The end of the neck would normally be hidden by a pickup ring, so less care is taken. But on a custom order like that, it should be perfect. With a solid colour or a sunburst you could fill the gaps and cover it up with the solid part of the burst. But with a natural/slightly tinted finish, then it's not going to look good.

I always say it's best not to decide on a finish until you get the kit in your hands, and then let that decide how you go. If you want a particular clear finish,then it really is best not to go for a Chinese kit guitar, but often that's the only affordable option. You can normally make a good guitar from these kits, but you need to allow for some failings in the cosmetic side of things. But basic failings like wrong neck angles or bridge post holes in the wrong place shouldn't happen, but do, and tend only be found out right at the end of the project when you've invested a lot of time and effort and probably materials into the finish.

I've filled cracks like the ones between the top and the neck pocket with glued-in slivers of veneer. Structurally it doesn't make much difference, but it does a lot for your peace of mind.

Small non-structural gaps that won't be seen I wouldn't worry about. Fill them with glue if necessary, but if it can't be seen, don't spend too much time on it.

There's almost always going to be small gaps around neck joins, especially on glued-in necks, on these kits. Clamping hard when gluing can often reduce them to much smaller apertures, but some small amount of filler is normally required. Another reason for so many of this type of guitar having sunburst or solid finishes by the big manufacturers.
 
Edited with new info:

Thanks Simon - interestingly, those marks (I agree they look like that oily fingerprints), weren't in the original pics sent to me by Ben, so it must have happened when it was being packed up to send to me, from the warehouse.
I really am not interested at all, in making this a burst, or painting it a solid colour.
I'll send the pics him, and grumble about those things, though he has already helped me out a bit, when I questioned him about other finish marks, so there may not be much more help on offer....

Cheers, Ian.
 
Last edited:
After much deliberation as to whether to go ahead with this build, (it's amazing the number of things you notice that are wrong with something when you start looking, as opposed to seeing the things you want to see that are right, when you first contemplate a build), I have a plan B, so I'll push on, and make the best of it. Beats waiting for another custom kit....
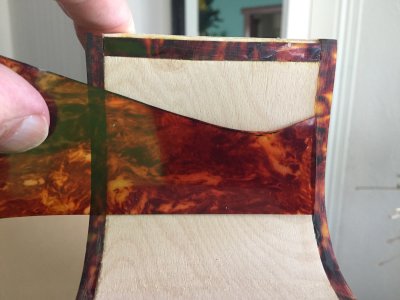
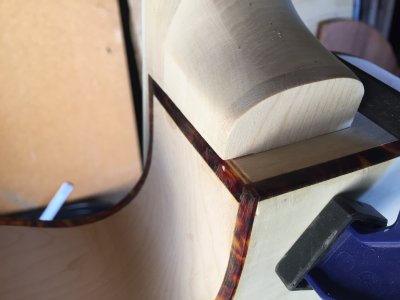
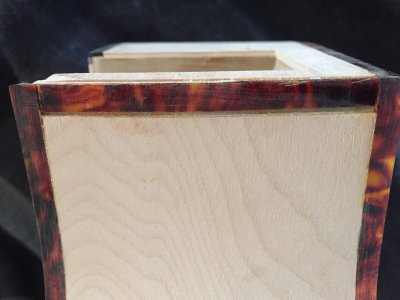
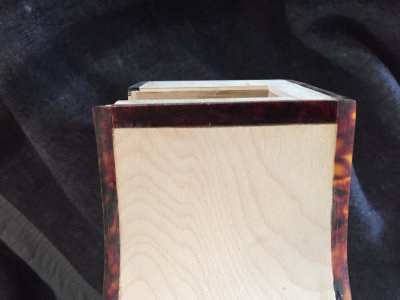
Anyway, I'm not sure yet how to make the end of the neck work, but I'm going to cut some tortoiseshell to replace the binding alongside the neck joint from the front to the back. I just can't come to grips with the timber showing along that edge, where it should be covered by the binding, and I have no idea how they could've finished it like that. The tortoiseshell material I have is thinner, and not as dark, but if I cut two strips, and make it double thickness, I reckon it'll look better than it currently does
IMG_7649.JPG

I've never done binding before, but I understand superglue is a good choice for fixative. What's the best method of removing binding? I have to buy some acetone for ensuring glue free top and back prior to sanding, and staining - would that deal with removing that small section ok, or is there a better way?

Also, with the staining I get that some combinations of finishing materials won't work. I'd like to use shellac, over a hint of dingotone Coolangatta Gold stain, although I'm wondering if it will be too full on for what I want - I'm aiming for a subtle amber, to look like an aged natural finish. Being these are both spirit based, they should be ok, I think...
Could I dilute the Coolangatta Gold with something to make it a subtle stain?
Any finishing advice gratefully accepted!
 
Last edited:
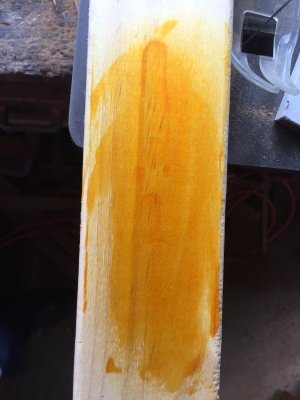
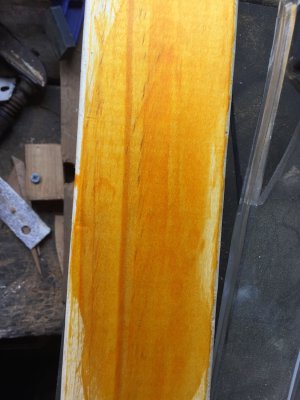
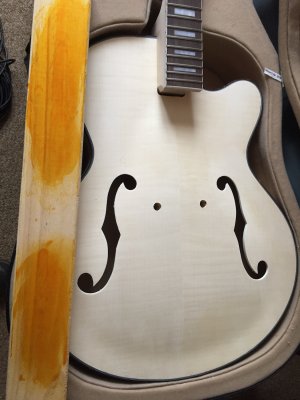
Here are a few pics of Coolangatta Gold on some scrap pine stud, (closest I had to the shade of the guitar body), and as you can see it's pretty strident. Pic one is the stain, second is just the intensifying coat (a bit darker), and third is both of them next to the guitar body.
IMG_7653.JPG

IMG_7654.JPG

IMG_7655.JPG
 
So, I decided to come back to the build, after getting disheartened at my missing key points about the kit, and thinking I wouldn't be happy with it at all, once it's done. Now, after more than enough time of getting distracted by life, and otherwise just sitting on my hands thinking about this build, (and a bunch of other things I'd like to kick off), I pulled the bits out today, and had a crack at sanding the neck heel, and pocket, to get things lined up and fitting better.
The heel slides into the pocket nicely now, still nice and tight, but doesn't need a ridiculous amount of heft to get it in and out, as it did originally - I think a much better fit for when it's glued in. I also had a crack at cleaning off visible glue marks from the front, using acetone, and filling tiny rough patches near the binding with natural putty, mainly near the bottom on the front. I tried filling the shocker of a gouge at the end of the neck with it also, but the end grain of the maple there is much darker, so I'm thinking I'll have to redo that with stained putty, and if that's no good, I'll probably cut a piece off the end of the headstock, and make a thin wedge to cover it up somehow. There's also a decent gap between the end of the neck, and the top. which I need to make disappear, so this idea may solve both problems. Overall, it's a much better fit, and once I replace the small section of tortoiseshell binding alongside the neck heel, there'll only be the small gap under the heel to fill.
I bought a small bottle of F&W Golden Teak stain from the big green shed today, when I went to buy some shellac, which I plan to use on the body after staining. Rubbed a little onto the heel of another maple neck I have, and it's just as yellow as the Dingotone Coolangatta gold I got. Bleah... The sample at the store (on a piece of pine), looked a nice honey hue, nothing like this!! I realise it depends on the type of wood it's applied to, but this was nothing at all like the sample. I'm going to put some rusty nails into some isopropyl alcohol for a week, and from that, add some red/brown stain to the yellow, to get an amber stain.
Next will be straightening the neck, and levelling and recrowning the frets, then shaping the headstock. Not sure whether to chase up a rosewood veneer for the front of the headstock, or maybe another veneer I have here will do - maybe myrtle, or silky oak instead?
some pics showing the improved fit, and work still to do around the neck/pocket, which will also include re-shaping the bottom of the heel a bit.
IMG_7975.JPG

IMG_7976.JPG

IMG_7977.JPG

IMG_7979.JPG

IMG_7980.JPG
 
Finished sanding back filler, and rest of body - I think the sanding is done for now...
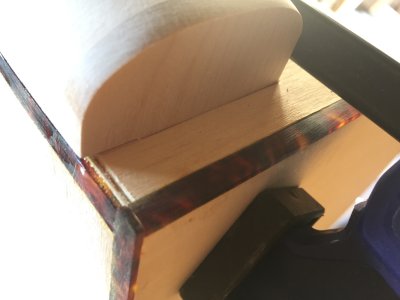
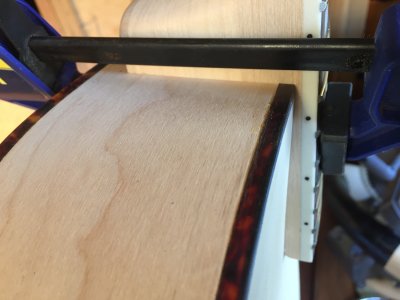
Only pics I'll update are the tortoiseshell binding alongside the neck-pocket, front to back. I was tossing up between simply re-using the piece of binding, and fixing it 1 mm away from the veneer in the cutaway to get it flush with that corner, (meaning I'd have to use natural putty to fill a gap on either side of that strip), or make a replacement strip 1 mm wider out of some tortoiseshell I have here. It's much thinner material, so I cut three strips of required size, and used acetone to stick them all together, and make up the same thickness of the original. Now of course, it's really dark compared to the rest, with none of the light tort patches lining up together.
I'm not gonna stick it on just yet - what do you guys think? Fill two thin gaps, or fill one, and put up with the darker home made replacement strip?
IMG_7984.JPG

IMG_7986.JPG
 
Back
Top