Drummerdude's first build.. TLA-1Q. Wish me luck

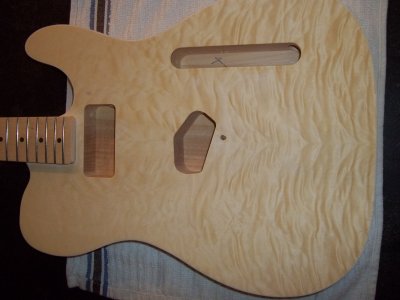
So I have finally received the first of three kits I ordered. This one is for the Pastor of my church and he loves tele's. I have plans to do a stained fade finish in his favorite colors blue to green. I will be posting a picture tonigh of the kit to get some input. The thin quilted veneer has some grain missing that looks to be close to being they the veneer. Since I am staining can and should I fill with some grain filler or something to fill the spots before sanding to level and will it take the satin like the veneer? I plan on upgraded bridge and know from lots of reading that I will need to widen current bridge rout to accommodate. I will be changing pick ups and installing 4 way tele switch for more sound options. I am thinking if the finish goes as planned I may install a hum bucket pickup with trim instead of pickguard with single cool pickup. Any thoughts I could use a clear acrylic one with some airbrushing around pick up. I am going to change the tuners to locking grovers or similar.

My next two builds will be basses for me a IB-5 in a short scale Ash body. And a PBH-4 for that classic fender p bass with a bigger range both will be made active and more to come. I really look forward to all the input from you all I have been super excited to get ideas and help from the experts..

Cheers
 
Welcome Drummerdude. You will need to check the route for the front pickup. For most to the TL guitars the front route is too big for a standard humbucker arrangement.
 
Welcome mate. Looking forward to seeing another TL-1Q onboard. I used a dual rail humbucker in the bridge position. Saves doing too much work in the pocket. I did another tele with a 4 way switch, humbucker in the neck and single coil in the bridge. To be honest....the difference between series and parallel positions is not alot, just a bit more low end beef IMO. Make sure you dampen the veneer first to find any glue spots and remove them. There are plenty of spare parts, new pickguards and bits of stuff available online to customize just the way you like it. Take time and get a good idea in your head first as to what you want then go for it. Check the kit first, do a mock build to check alignments, etc, also gives you a template for your ideas. Enjoy! Check out my build in the photo gallery if it helps.
 
P.S. You could try a dual rail humbucker in the neck pickup. That would save time and money. Would recommend the Wilkinson bridge or a 6 saddle bridge for easier intonation adjustment. You will need to grain fill the ash body, for sure. Be careful with the veneer, very careful! Some other guys will have better ideas on what to do with the veneer.
 
Thanks for all of the ideas. I have dampened the whole thing down and have only found a couple very small blue spots but I am very worried about the veneer it came with some pretty deep spots in the grain and I doubt that I will be able to sand out without going thru veneer. I will probably use the guitarferish bridge with the six saddles and it can be strung both ways, not sure if I am going to attempt the string they body. I for sure want to try and leave off the pickguard to show all the quit. Will the dual rail humbucker fit in the front routing and can I use a trim ring to cover sides? Not sure . I tried to post pictures from my phone but it says size is too big and I need resize so I will have to do that from my computer and I never seem to use that thing anymore.
 
Thanks. ILR. You build was a huge inspiration for my overall idea. My pastor has wanted a blue to green fade like on the PRS and the quilt just explodes off the guitar and I want that but don't want to sand much on the top. Can you tell me exactly how you got the deep quilting with out sanding much. I think you said something about using scotch rite pad or nylon pad of some sort but did you use a black stain and then try and sand back before color?
 
I used a very diluted wash of black stain first, then a very light sand back with a nylon pad ( the type to use for washing your dishes ). I also used some very fine grade sandpaper where I thought it was a bit too dark in the middle of the burst. I practiced and practiced on scrap wood to get the colours and sanding skills right. Always better to do multiple light coats than one heavy coat. I used many coats of Tru-Oil to do the finish. It gave the finish a lot of depth and also gave a slight yellow tint.

The dual rail is the size of a normal single coil, so no problem in the front. There maybe some small routing/chopping to do but fine adjustments are always a possibility with kit builds.

I found the front routing too big to cover with a ring so I modified the existing pick guard to minimize the shape, but still cover the rout and mount the pickup. It also allows some artistic expression for you.

String through the body with be easy. Get the bridge in the right position for correct intonation, mark the string holes, drill through using a pilot hole first, then the ferrule hole from the back.

With the veneer problems, you could try to fill the damaged areas with some Timbermate, carefully sand back to flat, then stain.

A build is also an organic thing. As you build there will be problems or things wont happen like you want, so you need to be adaptable and search for the best solutions to make you happy with the build.

Once you get your ideas and practice, there comes a point when you have to got for it. Nervous time but well worth it in the end.
 
Just had a second look at the kit. A standard humbucker will fit straight in with a ring. May need a little shaving depending on which one you get.
 
Yeah sorry having trouble get them to upload.. I have to get the picture in a smaller format and I am technically challenged but good with tools.
 
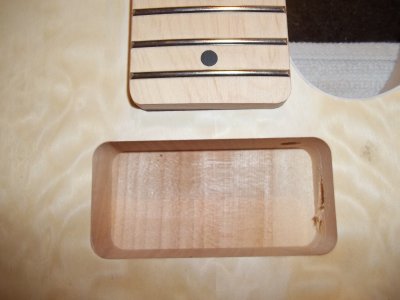
guitar front close.jpgneck pocket.jpg
 
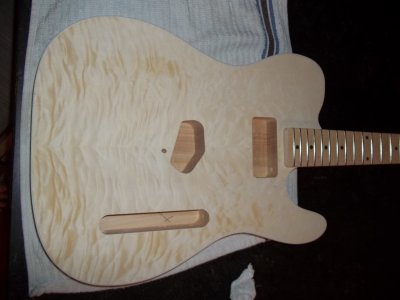
Here are a few pics that I have been able to resize to fit but I can't get any of the close up picks to resize and keep enough clarity to see the issues. But nonetheless it does have a great quilt pattern which should pop good using ILR's method of staining.
 
Kick has a nice method of staining on his LP-1Q. He has done the colour first then the black. I use a spirit based stain for the black and a water based stain for the colour. Try a few different ways on scrap to see what suits best for the result you want. Can't wait to see it.
 
Kick has a nice method of staining on his LP-1Q. He has done the colour first then the black.

The reason I done this was purely because of the thin veneer. Normally its done by doing some coats in black and sand that down. You can do this when you have a thick layer of quilt. You can even use a sandingmachine. But when the veneer is only 0.7 mm thick you can not sand the black of because you probably end up sanding through the veneer.

So I started with the color (red in my build) and then slowly added black to the red mix to get the dark in. And I used full black for the burst effect.
 
I have wiped down the whole body 2 times with damp cloth and only found 2 very small blue spots. Should I use turps or naphtha to make spots show up better or is the water fine. I don't want to miss any.
 
Back
Top