1st DIY Build and never touched a guitar before, Terminology?

howdy all.
we are building a IB-5 Bass Guitar and we have never built a Guitar before let alone play one.
with this mock build, which we are up to, we have a problem in finding where the Bridge goes and we quote the following from the manual which makes no sense to us Synth Twiddler...


If you measure from the inside (face) of the nut to the top of the 12th fret, then double that
measurement, you will have the scale length of your neck.


Once we find where the Bridge goes, our Build is pretty much done except for the final touches and making the Bass Guitar look all pretty in Red.

Info greatly appreciated.
 
we figured out that this has to do with Placement of the Bridge.


34″ Scale with 24 medium jumbo frets


so would we be correct if we fit the bridge twice the distance from the 12th fret to where the scale of 34" lands?
Also, the 12th fret is the 12th fret from the Nut?
 
Hi,

Measure from the inside of the nut (the fretboard side) along to where the saddle will be for the highest string (you are basically measuring along where the string would be if it were there).

at 38" that's where that saddle should be.
It's the same as measuring the distance from the inside of the nut to the 12 fret (as this is half the distance) and then doubling it. This is done in case you do not know what the scale length is.... but as you know it's 38" you can use that.... although you could make sore by making sure it's 17" from the inside of the nut to the centre ov the 12th fret...
 
thanks. a lot! very good explanation and now we know where we are heading.
we have been searching for terminology as never been around instruments other than for Electronic Music Instruments.
an idea for someone, not us, but for those as us who do not know everything about guitar/bass guitar could be an glossary, or index of parts what they do and what to do with them. Or is it expected that we know all there is to build a DIY Bass Guitar?
just an idea...
the Pitbull Guitars manual expects you to know everything about a guitar and the name of every part and where they are and what they do.
similar difference from a Gregory's Car Manual and a Proper Workshop Manual for a Mechanic. where one is for the DIY market and the other is a Trade tool.
 
EE gave good advice...but 34" not 38"

It'll be 34" from where the string leaves the nut, to where the string leaves the saddle on the highest string, which on an EB5 is G string (and is also the thinnest).

If you measure from the 12th fret (the one with the double dots behind it) you measure from the center of the fret to the place where the string comes off of the saddle.

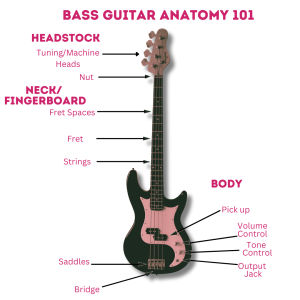
Here are a few diagrams to help with the parts of the instrument. I think you have a 5 string bass. The pics show a 4 string but it's basically the same.

You are correct that the manual assumes a minimum knowledge of guitar anatomy and maybe a little knowledge of tools and assembly techniques. However, the forum does not assume this, so keep asking your questions here! Most of us knew very little when we started... In my case I knew even less than I thought. You pick things up along the way ;-)

bass_parts.png

Note that what are called "Tuning pegs" below and "tuning head" or "machine heads" for some reason have many names. The can be called:

Tuners*
Tuning pegs
Tuning machines
Machine heads
Tuning heads


bass-guitar-headstock-anatomy.jpg

BTW, the "Headstock" can also be referred to as the "Peg head" or "tuning head"...but most frequently headstock.

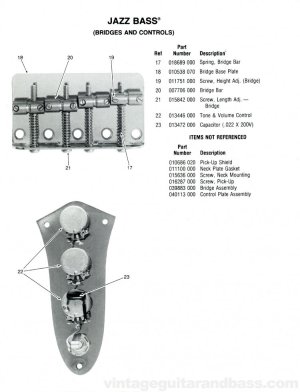
FenderJazzPL1976-2.jpg

What is called the "bridge bar" is more commonly called the "saddle" or "bridge saddle." It's bar shaped on most Fender basses, and I think on your IB5, more generically (and almost always on this forum) it is called a saddle.

I didn't find a better pic than the one above, but what they refer to as a "tone and volume controls" we would refer to on the form as "tone and volume potentiometers" (or pots for short).

Hope this helps!
 
thanks fender3x, we couldn't find info as good as this.
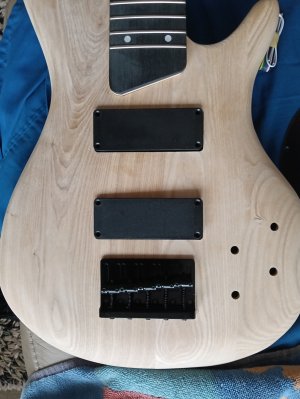
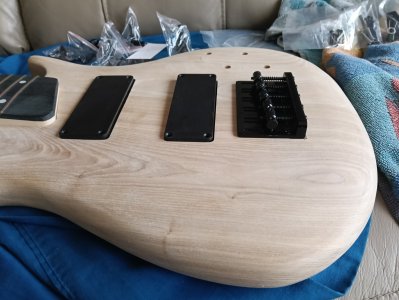
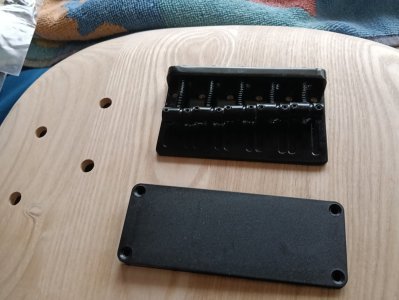
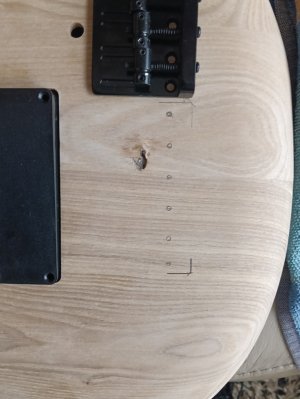
what we are up to now is the mock build and the photos will show where we come to at 34".

can not upload photos at the moment as computer is complaining photos are too large so will have to appease the pc and decrease size of photos.

TBC...

we will start to have a good look at the Pick ups as if you drop them into the cavities, they sit odd due to sitting on the wires. but we think this is where the long screws and springs come in.

been a lot of fun this build. something different from the norm is always refreshing.
 

Attachments

  • IMG20250311123051 - Copy.jpg
    IMG20250311123051 - Copy.jpg
    643.3 KB · Views: 2,476
  • IMG20250311123058 - Copy.jpg
    IMG20250311123058 - Copy.jpg
    635.3 KB · Views: 2,488
  • IMG20250311123108 - Copy.jpg
    IMG20250311123108 - Copy.jpg
    636.6 KB · Views: 2,472
  • IMG20250311123147 - Copy.jpg
    IMG20250311123147 - Copy.jpg
    640.8 KB · Views: 2,463
Last edited:
EE gave good advice...but 34" not 38"

It'll be 34" from where the string leaves the nut, to where the string leaves the saddle on the highest string, which on an EB5 is G string (and is also the thinnest).

If you measure from the 12th fret (the one with the double dots behind it) you measure from the center of the fret to the place where the string comes off of the saddle.

Here are a few diagrams to help with the parts of the instrument. I think you have a 5 string bass. The pics show a 4 string but it's basically the same.

You are correct that the manual assumes a minimum knowledge of guitar anatomy and maybe a little knowledge of tools and assembly techniques. However, the forum does not assume this, so keep asking your questions here! Most of us knew very little when we started... In my case I knew even less than I thought. You pick things up along the way ;-)

View attachment 45481

Note that what are called "Tuning pegs" below and "tuning head" or "machine heads" for some reason have many names. The can be called:

Tuners*
Tuning pegs
Tuning machines
Machine heads
Tuning heads


View attachment 45482

BTW, the "Headstock" can also be referred to as the "Peg head" or "tuning head"...but most frequently headstock.

View attachment 45483

What is called the "bridge bar" is more commonly called the "saddle" or "bridge saddle." It's bar shaped on most Fender basses, and I think on your IB5, more generically (and almost always on this forum) it is called a saddle.

I didn't find a better pic than the one above, but what they refer to as a "tone and volume controls" we would refer to on the form as "tone and volume potentiometers" (or pots for short).

Hope this helps!

.


... I knew I'd get something wrong!

(Ihope LU recognised the error...)
 
thanks again fender3x,
only difference we see is that the pick ups are different position, and of course the 4 strings instead of our 5 strings.
so, all is measured up to be drilling the screws to mount the bridge plate as we found the 34" measurement.

just a question while we are here... the 2 pickups require 4 screws each and we find 8 long screws packaged with 8 springs. would these springs be to raise or lower our pick ups into the body of the Guitar as in Suspension for the pickups and to lift the pick ups from the wires out of the pick ups so the pick ups sit level?

this is where we are at.
 
...

just a question while we are here... the 2 pickups require 4 screws each and we find 8 long screws packaged with 8 springs. would these springs be to raise or lower our pick ups into the body of the Guitar as in Suspension for the pickups and to lift the pick ups from the wires out of the pick ups so the pick ups sit level?
...

Yes, the springs raise the pickups off the cavity base, and allow you to adjust the distance of the pickups from the strings.
 
thanks Trevor.
we are slowly learning about this weird stringed instrument that they call a Bass Guitar and what makes it work.
we've listen to death metal for 32yrs, but never had any interest in playing any interest.
when we were heavily involved with Electronic music is what drew us toward Bass Guitar for we prefer Rhythm over melody.
so, listening to Slamming Brutal Guttural Death Metal and Electronic music don't mix, but they do.
 
hody all.

build is complete except for stringing up to IB-5.

we have a problem... our strings we are using are to think to fit trough where the strings fit through in the bridge. most of the string fits, but is very tight but the problem comes when you get to the end of the string where wire of the string is wrapped around the mount that terminates the string at the bridge.

this can not be changed in any way as we built this guitar especially for these strings. the Strings are Ernie Ball Power Slinky Bass 5 at 50/70/85/105/135 string gauges.

the only fix that we can see is that we drill our the Bridge to accept the larger gauge string.

Anyone see a problem with this?
 
Hi L.U.
I cannot recall this being a problem before! Redrilling the string holes at the back of the bridge should be OK. I cannot see a problem!
 
howdy and thanks T D.
we ended up drilling just enough to fit the larger gauge strings.

we fit the strings and go to tune the Bass Guitar... and... no sound.

bad wiring we will check up on the morrow.

only sound from amp was when pulled the 1/4" TR cable out of the Jack. Massive feedback through amp, so at least the amp works...
 
If you cannot see the problem, post some pictures (closeups) of the wiring and soldering and we may be able to help out!

For future reference - I would normally do a tap test with a screwdriver to test the pickups and circuit before I put on the strings. I use a battery powered "toy" amp for this test. That way I can problem solve issues while I'm in the circuit building and soldering mode .
 
Last edited:
thanks TC, we will check these out as is rather frustrating.

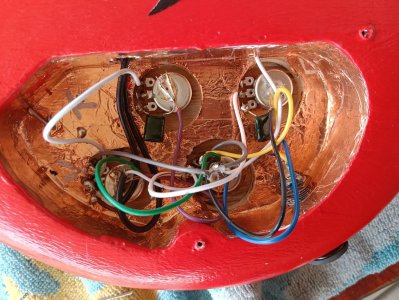
we will attach a photo as best we can below.

is very messy, we usually wire much better and intend to tomorrow as we desolder everything and start over again.

36% - IMG20250322135320.jpg
 
No battery is needed. The battery/power tab is to be left blank.

I'm not sure, but the picture looks like the solder and pot legs are touching the copper shielding! If that is true it could be the problem!
 
Last edited:
Back
Top