Page 1 of 5 1 2 3 ... LastLast
Results 1 to 10 of 46

Thread: MB-1 Kit - The Krook

  1. #1

    Smile MB-1 Kit - The Krook

    Hey guys!

    I'm super excited to finally be in a spot to put a kit together, and to put the plans for a design I've had for a while in to action, so I'm gonna document it all and share it, now that I've got all of my details sorted.

    For a little bit of background: I had an idea for some fairly simple, block coloured designs based off Pokemon, taking the idea from wallpapers in that style. A fairly simple artstyle ended up giving me a bunch of mockups that were nice and interesting, but not too busy, and that would be fairly easy to paint. Eventually, after a bunch of culling ideas because they didn't turn out great in mockups, or because I wanted to use them for grander plans (Multiscale kits will happen one day I'm sure...) I decided on an MB-1 kit (because I need a Mockingbird in my collection somehow,) and using Krookodile as my themed Pokemon.

    Click image for larger version. 

Name:	Krookodile Final Mock V2.png 
Views:	401 
Size:	357.6 KB 
ID:	8729
    EDIT: Updated the mockup to represent the Grey on the front better. It was originally darker, but with the paints I'm using it will need to be lighter. It does also make the outlines on everything a little cleaner and sharper looking though too.

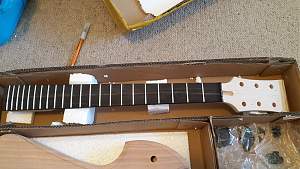
    I did talk to Adam, and I got my kit customised too. So we've got a Mahogany body, Ebony fretboard, black hardware, and no inlays (but I will be looking in to getting some Sharkfins added at a later date).

    There are a couple of little gripes I have with the kit, the neck pocket is on the large side, asking for no inlays resulted in no side dots, and the glue joins in the body are a little thick. Of course all of these can be worked around (well the glue will just be painted over so no visual damage done there) but it does add a bit more work to it.

    I also bought a couple of Push-Pull pots to add some splitting, but it turns out the pickups aren't 4-wire, so I might have to get some new pups a little sooner than I planned (but that will have to wait a bit because I'm still quite undecided on that front...) Oh and the Ebony fretboard was a little lighter than I'd hoped/planned, but it also has light streak down the whole fretboard, and I really like the look of it. So no complaints overall for that.

    Now for my planned modifications: Carving the heel joint to help out the upper fret access, shaving away the back of the top horn to make it a little more comfy and less stabby, and a non-standard-for-MBs/LPs wiring scheme (1V, 2T, with Push-Pulls, I originally planned for individual coil taps, but I might make it a Master tap, and either Master Phase or Series/Parallel).

    And for Finishes: I'm going for rattle cans to do the body and headstock, purely because this seems like the simplest, and easiest way to get the painting done, plus I have found the colours I need, and a Tru-Oil finish on the back of the neck, because that also seems like the easiest solution! (As well as apparently being one of the best)

    And I think that's about all I have to say. I've done some work on it before posting anything because I got excited, and also because I didn't have all of my plans with the finish totally sorted, but everything is started now. And finally: here's a bunch of pictures to accompany the text wall

    Click image for larger version. 

Name:	001 The Kit! (Custom).jpg 
Views:	420 
Size:	362.8 KB 
ID:	8177
    Click image for larger version. 

Name:	002 Body (Custom).jpg 
Views:	407 
Size:	292.2 KB 
ID:	8178
    Click image for larger version. 

Name:	003 Neck (Custom).jpg 
Views:	404 
Size:	395.0 KB 
ID:	8179
    Last edited by B'Lark; 16-02-2016 at 04:59 PM.

  2. #2
    Since I can only have 5 attachments per post, here's a couple more:


    Planned curves for the heel and headstock
    Click image for larger version. 

Name:	006 Heel Joint (Custom).jpg 
Views:	395 
Size:	236.2 KB 
ID:	8181
    Click image for larger version. 

Name:	007 Headstock Markings (Custom).jpg 
Views:	406 
Size:	260.0 KB 
ID:	8182

    This is the contour I had planned for the back of the top horn. I didn't need to go as deep as this it turns out, buuuut I don't have pictures of the current state of it
    Click image for larger version. 

Name:	008 Back Edge Back Contour (Custom).jpg 
Views:	390 
Size:	199.8 KB 
ID:	8183

    The heel carve:
    Click image for larger version. 

Name:	010 Heel Joint (Custom).jpg 
Views:	427 
Size:	377.0 KB 
ID:	8184

    I ended up putting a little chip in the heel joint, but no biggie, it'll get filled out.
    Click image for larger version. 

Name:	011 Heel Joint chip (Custom).jpg 
Views:	400 
Size:	273.8 KB 
ID:	8185

  3. #3
    GAStronomist FrankenWashie's Avatar
    Join Date
    Jan 2016
    Location
    Glebe, NSW
    Posts
    5,666
    Super interested to see how this all turns out, there's been a number of MB diaries pop up lately and its always been a body style I found appealing. I shall follow intently!

  4. #4
    Yes! Another build with a really unique twist! I love these knes, and I cannot wait to see your dream become a reality. Looking real nice so far.
    "Sometimes you want to give up the guitar, you'll hate the guitar. But if you stick with it, you're gonna be rewarded"
    - Jimi Hendrix

    My Builds:
    #1: Non-PBG SG - "Purple Flame" (Getting Wired)
    #2: PBG MB-1 - "The Wasp" (Getting Wired)
    #3: PBG IB-1 - "V-Bay at Noon" (90% Done)
    #4: PBG SG-1F - (Getting Cleared)

    My Future Builds:
    PBG ES-1G Custom - "Dave Grohl DG-335 Tribute"

    Find me on Facebook!
    https://www.facebook.com/brodie.west.9

  5. #5
    Mentor Nickosaurus's Avatar
    Join Date
    Mar 2014
    Location
    Adelaide
    Posts
    1,077
    So many mb builds on the go. Sounds cool mate

  6. #6
    Thanks for the encouragement guys I'm really happy to see it.

    No build progress happened today, but I did run around getting supplies for a couple of things, and I contemplated some of my plans, so there was progress in that.

    This all happened a couple of days ago, but I hadn't taken pics and stuff: I drilled the wider holes for my neck ferrules in, but the holes ended up pretty sloppy, had a tapered bottom (on accounts of using a wrong sort of drill bit), and the top-side hole was too close to the edge and chipped off a bit too (I found that chip though, so I'll be able to glue it back in.) I'm definitely filling in that hole completely and moving it in from the edge, but I'll just fill the tops in from the other holes.

    Click image for larger version. 

Name:	012 Massacred neck holes (Custom).jpg 
Views:	398 
Size:	360.6 KB 
ID:	8204
    Click image for larger version. 

Name:	013 part 2 (Custom).jpg 
Views:	399 
Size:	307.4 KB 
ID:	8205
    Click image for larger version. 

Name:	014 New neck chip (Custom).jpg 
Views:	385 
Size:	294.9 KB 
ID:	8206

    On the good side of things: I didn't end up having to carve the top horn in anywhere near as far as I originally planned, so it's nice and comfy now, instead of being a bit stabby!

    Click image for larger version. 

Name:	015 Neck horn carve (Custom).jpg 
Views:	394 
Size:	205.4 KB 
ID:	8207
    Click image for larger version. 

Name:	016 Pt 2 (Custom).jpg 
Views:	372 
Size:	333.9 KB 
ID:	8208

    Hopefully I'll have everything cleaned up over the next couple of days and start making some real progress!!

  7. #7
    Finally some progress. I had a period of not actually having my workspace, then was missing some of the tools I needed, but I've got that all sorted and am moving on.

    I also had some mishaps with filling the neck screw holes. I ended up ripping a pretty big chunk out of the neck join, so I've had another part to fill back in. I also had to drill the larger holes all the way through in order to fill them out and drill them back right. Had no problems with the pot hole, so smooth sailing there.

    Click image for larger version. 

Name:	017 Filled Pot Hole (Custom).jpg 
Views:	384 
Size:	262.4 KB 
ID:	8721
    Click image for larger version. 

Name:	018 Filled Neck holes (Custom).jpg 
Views:	402 
Size:	295.3 KB 
ID:	8722
    Click image for larger version. 

Name:	018 pt 2 (Custom).jpg 
Views:	381 
Size:	247.9 KB 
ID:	8723
    Click image for larger version. 

Name:	019 Filled crack (Custom).jpg 
Views:	369 
Size:	143.4 KB 
ID:	8724

    Going to start filling everything up with woodfiller in about 10 minutes.

    Headstock shaping is also in progress (had to put that off a bit because I needed a break) and the Side dots have been added in. They're a little... off kilter, but they're there and I'm really going to be the only one to notice.

    Click image for larger version. 

Name:	020 Side Dots (Custom).jpg 
Views:	389 
Size:	320.5 KB 
ID:	8725

    Now back to work!!

  8. #8
    GAStronomist wokkaboy's Avatar
    Join Date
    Dec 2012
    Location
    Perth WA
    Posts
    13,555
    well done on fixing the issues B'Lark
    You did rip out a nice size chunk out of the neck pocket !

    Why have you had to put side dot markers in, have you changed the colour ? Edit I just read the start of the diary there were no fret or side dot markers on the neck.
    Last edited by wokkaboy; 16-02-2016 at 02:19 PM.
    Current Builds and status
    scratch end grain pine tele - first clear coat on !
    JBA-4 - assembled - final tweaks
    Telemonster double scale tele - finish tobacco burst on body and sand neck

    Completed builds
    scratch oak.rose gum Jazzmaster - assembled needs setup
    MK-2 Mosrite - assembled - play in
    Ash tele with Baritone neck - neck pup wiring tweaks and play in

  9. #9
    Yea. I requested just no inlays on the neck, but they left off side dots as well. When I was talking to Adam to customize it, he did warn me of a language barrier issue (which is why I opted for no inlays, when I would have ideally liked sharkfins) so I presume that barrier would have lead to misinterpreting what I was wanting. But putting side dots in was a super easy fix, so it's not a big problem in the end. It's actually kind of nice because I know now that I could probably replace side dots if I do ever want to elsewhere.

    Also thanks, as much as it all worried me at the time, it was kind of good to mess things up and work out how to fix them all. And also to know what to avoid in the future. Learning! Huzzah!

  10. #10
    Alrighty, so I may have been forgetting to document a lot of stuff, partially due to being a little disappointed with progress that I'd made, in terms of cocking things up and having to fix them, but we're well underway now.

    For the stuff I haven't got pictures of: I finished drilling all the neck holes in the right spots, and without any splitting (one of my Forstener drilled holes to fit the ferrules is a little wonky because I was a little careless on the first hole I drilled, but it still fits in there), covered it all with filler, and sanded everything back, ready for painting.

    Then got my primer coats down on it:
    Click image for larger version. 

Name:	022 Body Primer (Custom).jpg 
Views:	403 
Size:	149.4 KB 
ID:	9300
    Click image for larger version. 

Name:	021 Headstock Primer (Custom).jpg 
Views:	392 
Size:	260.8 KB 
ID:	9301

    Sanded that all down to smooth it out, and then the colour coats, but that'll be in the next post, because there's a limit of 5 pictures to a post!

Page 1 of 5 1 2 3 ... LastLast

Posting Permissions

  • You may not post new threads
  • You may not post replies
  • You may not post attachments
  • You may not edit your posts
  •