Page 1 of 2 1 2 LastLast
Results 1 to 10 of 20

Thread: Spalted LP, my first kit build.

  1. #1
    Member
    Join Date
    Dec 2014
    Location
    NSW
    Posts
    53

    Spalted LP, my first kit build.

    Hey guys,

    I've been madly reading through threads on this site over the past week since picking up a spalted LP kit. Lots of great info on here! Anyway, it will be a little while before I get properly started on this due to being very busy at work and home at the moment. And I do still have a gfs factory buyout guitar to finish putting together (bolt on flying V, twin humbuckers, recessed Floyd) in what little spare time I have... But by getting a thread up on here I can get some ideas and advice, and hopefully motivate some progress!

    Anyway, as per the title, this is my first kit build, but I have built several guitars from bodys and necks, and have done various modifications and repairs on guitars, both mine and for friends. I actually planned to scratch build a guitar next, but when I came across these kits it seemed like a good stepping stone before jumping into a scratch build. And I have to say that from a cursory look at the kit, I'm very impressed and have to admit I suspect that I will get a lot more guitar for my money than with a scratch build.

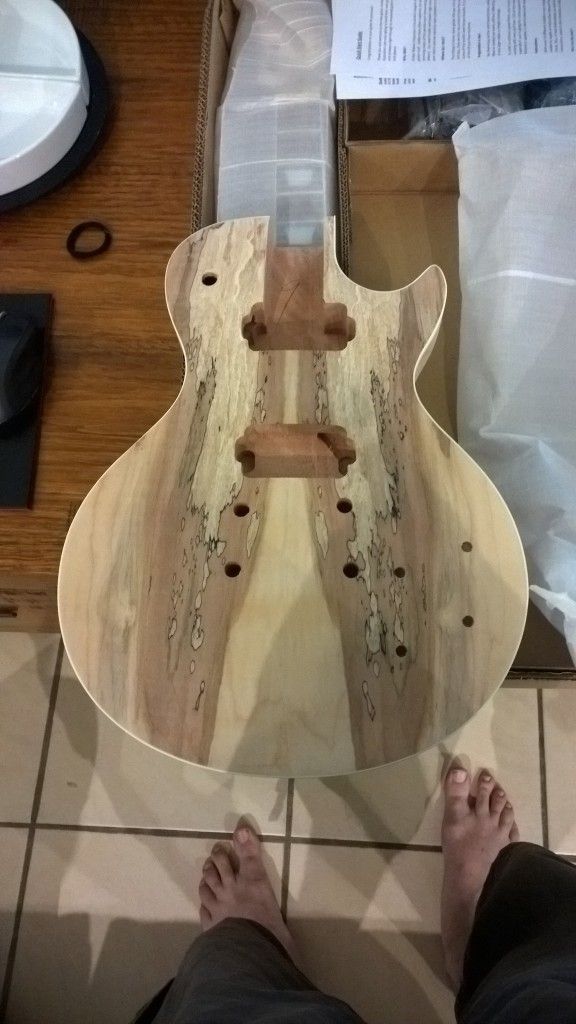
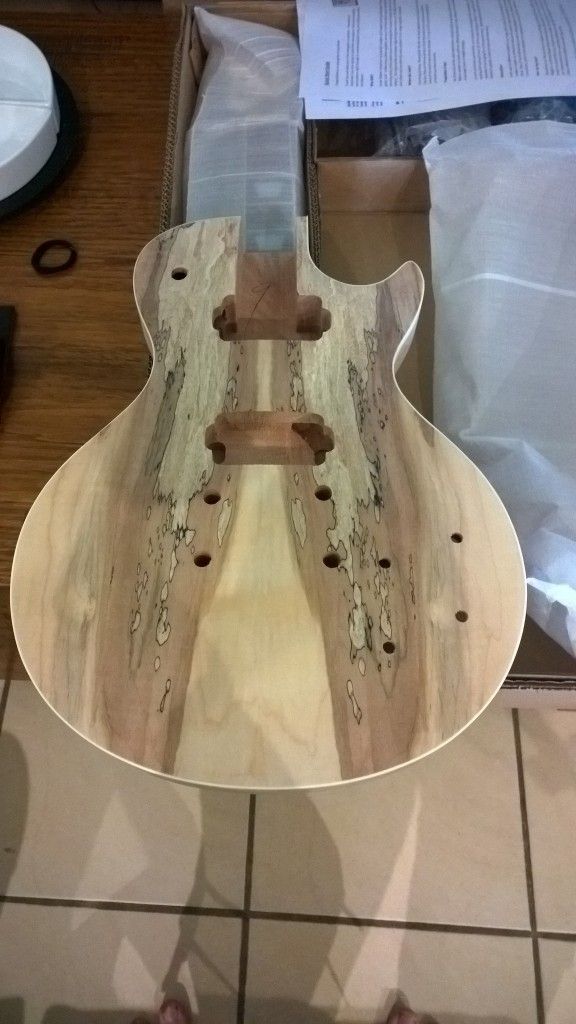
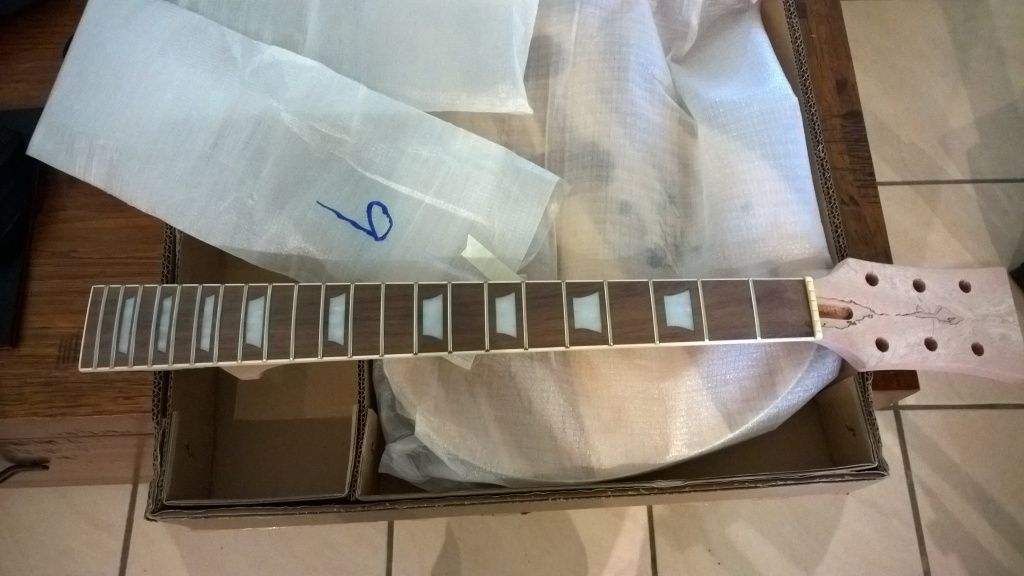
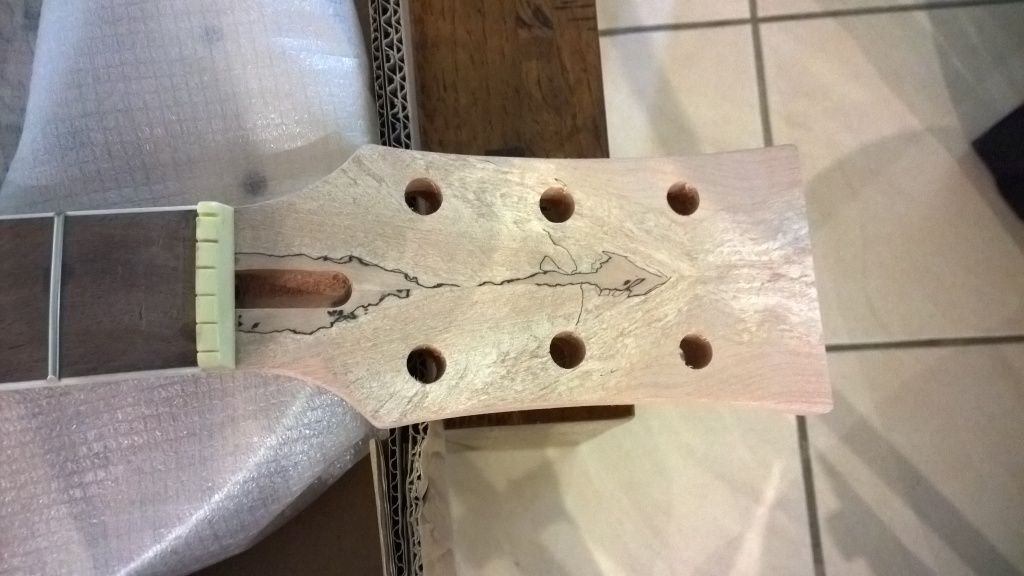
    Anyway, this is the lovely timber that I found in my kit. I have all black hardware and some black Wilkinson pups for it, though I'm wondering about using the gfs redactives that I bought for the V. My plan at this stage is for a bright red dye finish, though I want to make sure I maximise the contrast of the grain and figuring. Anyone have any thoughts on this? I haven't done a dye finish before, but I have some red dye, some black dye, and some ebony timbermate. Just not sure on the best way to proceed. Seems to me that most use one of 3 options:

    1. Dye black, sand back, dye red, finish with clear.
    2. Grain fill black, sand back, dye red, finish with clear.
    3. Dye red, seal with a couple of coats of clear, grain fill black, sand back, finish with clear.

    But I can't find anyone who talks about the pros and cons of each method. Anyone able to give some advice?

    Here's what it looks like, haven't had more than 10 minutes to look at it yet. Lovely timber though.


    Thanks in advance for your help, I've already learnt heaps from reading the other threads on here.

    Cheers,

    Andrew.

  2. #2
    Member
    Join Date
    Dec 2014
    Location
    NSW
    Posts
    53
    Another question (already, sorry!): It seems a lot of people on here do the finish on the guitar before gluing the neck and body together. Not sure why but this seems backwards to me. Certainly most commercial instruments appear to be finished after the neck is attached to the body (set neck only obviously), but that doesn't necessarily mean it's better. Any reasons for doing the finish before or after assembling the neck and body?

    Thanks,

    Andrew.

  3. #3
    Member ultpanzi's Avatar
    Join Date
    Apr 2014
    Location
    Sydney
    Posts
    233
    Man, thats a nice figure. I'd recommend just going straight with the red dye cos the veneer is pretty thin so sanding back has potential to sand through and spalt is already pretty dark so itll come through nicely. You can do either way, but its more that spray on finishes are usually done with the neck attached but wipe on oil ones arent because the pieces need to be individually done and its a little easier to get to the curves without a neck to bang against.

  4. #4
    GAStronomist wokkaboy's Avatar
    Join Date
    Dec 2012
    Location
    Perth WA
    Posts
    13,555
    hey Andrew,
    you got that last LP-1SS that was on FB, good score this is one of the best spalted caps I've seen.
    As Ultpanzi said the caps on these kits are very thin, I've attached I've done the same kit in Dingotone karajini red. Here's pics after 4 coats, its since had another coat.
    Firstly I'd wipe a damp (water) cloth over the cap to see if there is any glue. My kit had about 3 areas with glue on it.
    I didn't put any grain filler in but I think thats a great idea (option 2) put some black grain filler in (no sanding prior), then after it cures give the cap a light sand and start your red dye, sure it will come up a treat.
    Look forward to seeing it progress, when you get time !
    Attached Thumbnails Attached Thumbnails Click image for larger version. 

Name:	2014-10-19 13.04.45.jpg 
Views:	234 
Size:	80.7 KB 
ID:	802   Click image for larger version. 

Name:	2014-10-19 13.04.56.jpg 
Views:	200 
Size:	67.5 KB 
ID:	803  
    Current Builds and status
    scratch end grain pine tele - first clear coat on !
    JBA-4 - assembled - final tweaks
    Telemonster double scale tele - finish tobacco burst on body and sand neck

    Completed builds
    scratch oak.rose gum Jazzmaster - assembled needs setup
    MK-2 Mosrite - assembled - play in
    Ash tele with Baritone neck - neck pup wiring tweaks and play in

  5. #5
    The spalted caps are very thin and easy to sand through, so generally you want to do as little sanding as possible. As such, the dye black and sand back could be risky, but others can provide better advice on that. Andrew has had some good success with ebony Timbermate on his spalts.

    Doing a 'one piece' clear finish with the neck glued in is certainly an option. It looks great and provides a more seamless outcome to the finish. But, once the neck is glued in it is:
    - much more difficult to handle, hang, and manipulate the guitar when finishing.
    - more challenging to use different finishes/topcoats for neck and body.
    - more difficult and damaging to the finish if the neck ever needs to be removed.
    - more problematic if final adjustments are required once the hardware goes on, neck angle tweaks etc.

    But, it depends on the finish you're using, the look you're going for and how confident you are that you'll get everything right. That's just my opinion though.

    By the way, that is a good looking cap. I don't think we've had any roaring red spalts, should be awesome.
    Scott.

  6. #6
    Overlord of Music gavinturner's Avatar
    Join Date
    May 2013
    Location
    HOLGATE NSW
    Posts
    3,057
    Great looking veneer there Andrew! Very jealous mate. Should look amazing with red dye. I would agree with Wokka - get some ebony Timbermate and grain fill before applying the red dye. She'll look amazing.

    cheers,
    Gav.
    --
    Build #01: BC-1
    Build #02: ST-1
    Build #03: JR-1DC
    Build #04: ES-2V
    Build #05: ESB-4 (GOTM July 2014)
    Build #06: RC-1
    Build #07: MK-2
    Build #08: TLA-1
    Build #09: JR-1DC
    Build #0A: LPA-1
    Build #0B: STA-1 (GOTM April 2015)
    Build #0C: MKA-2
    Build #0D: LP-1M
    Build #0E: JB-1
    Build #0F: FS-1

    Find me:
    https://www.facebook.com/firescreek.guitars/
    http://www.guitarkitbuilder.blogspot.com.au/

  7. #7
    Member
    Join Date
    Dec 2014
    Location
    NSW
    Posts
    53
    Quote Originally Posted by ultpanzi View Post
    Man, thats a nice figure. I'd recommend just going straight with the red dye cos the veneer is pretty thin so sanding back has potential to sand through and spalt is already pretty dark so itll come through nicely. You can do either way, but its more that spray on finishes are usually done with the neck attached but wipe on oil ones arent because the pieces need to be individually done and its a little easier to get to the curves without a neck to bang against.
    Quote Originally Posted by wokkaboy View Post
    hey Andrew,
    you got that last LP-1SS that was on FB, good score this is one of the best spalted caps I've seen.
    As Ultpanzi said the caps on these kits are very thin, I've attached I've done the same kit in Dingotone karajini red. Here's pics after 4 coats, its since had another coat.
    Firstly I'd wipe a damp (water) cloth over the cap to see if there is any glue. My kit had about 3 areas with glue on it.
    I didn't put any grain filler in but I think thats a great idea (option 2) put some black grain filler in (no sanding prior), then after it cures give the cap a light sand and start your red dye, sure it will come up a treat.
    Look forward to seeing it progress, when you get time !
    Quote Originally Posted by WeirdBits View Post
    The spalted caps are very thin and easy to sand through, so generally you want to do as little sanding as possible. As such, the dye black and sand back could be risky, but others can provide better advice on that. Andrew has had some good success with ebony Timbermate on his spalts.

    Doing a 'one piece' clear finish with the neck glued in is certainly an option. It looks great and provides a more seamless outcome to the finish. But, once the neck is glued in it is:
    - much more difficult to handle, hang, and manipulate the guitar when finishing.
    - more challenging to use different finishes/topcoats for neck and body.
    - more difficult and damaging to the finish if the neck ever needs to be removed.
    - more problematic if final adjustments are required once the hardware goes on, neck angle tweaks etc.

    But, it depends on the finish you're using, the look you're going for and how confident you are that you'll get everything right. That's just my opinion though.

    By the way, that is a good looking cap. I don't think we've had any roaring red spalts, should be awesome.
    Quote Originally Posted by gavinturner View Post
    Great looking veneer there Andrew! Very jealous mate. Should look amazing with red dye. I would agree with Wokka - get some ebony Timbermate and grain fill before applying the red dye. She'll look amazing.

    cheers,
    Gav.
    Wow, thanks for all the replies guys! I had read previously about the caps being very thin, so am aware of sand through being a concern. I can see why that makes option 1 a bit risky, and perhaps best avoided, though I think I did read a thread on here where someone used that method (with blue dye instead of red).

    ultpanzi: Makes sense what you say about wipe on vs spray. I've done some spray painting before, but bought some wipe on shellac to give a try for this, so might be better doing neck and body separately.

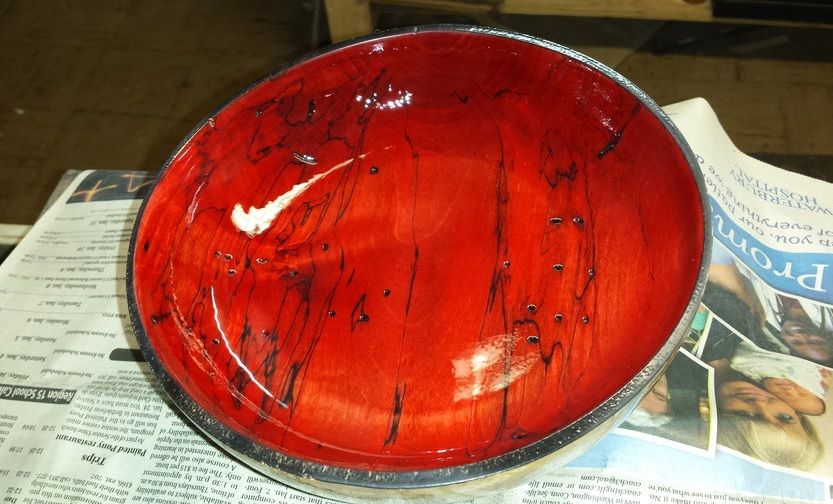
    wokkaboy: Not sure that this was the kit on facebook? But then I don't have facebook! Certainly I am VERY happy with grain and figuring. Thanks for the tip on the glue. I haven't been over the top yet, but there is some sloppy glue around the binding on the body, so I bought some cheap toothbrush wire brushes to clean that up, as I read that being recommended in another thread somewhere on here. Your guitar is looking awesome! Do you have a thread running on it? I'm looking for something similar, but hopefully a brighter red. What finish have you used on the sides and back? I have been trying to decide between more red or a darker finish like it looks like you have gone for. I found this spalted maple bowl which is the kind of effect I would love to get if possible: http://lumberjocks.com/projects/102703 He says he used aniline dyes in red and black.


    Weirdbits: All good points about doing the finishes separately. But I wonder if doing a complete buildup before any finishing would avoid most of these issues? This is how it's normally done with cars (my other hobby/passion/sickness!), you do a complete buildup, make sure everything is working right, then tear it all down again for paint. At least, ideally that's what you do!

    gavinturner: Thanks! Another vote for timbermate and then dye. Duly noted, thanks!

    Any reason anyone doesn't recommend the timbermate after the dye and a couple of coats of clear?

    Thanks again guys, really appreciate it!

  8. #8
    Man, oh man. I'm shuddering with jealousy over here, mate.

    That spalt is simply gorgeous. So darn lucky. I reckon it would look killer with just a really deep natural finish, to bring that incredible grain right out. I'd hate to see it get lost amongst too much colour. But, as with all builds, it's a very personal experience, and I'm sure whatever you choose will turn out awesome. Keen to see this beauty progress.
    "Sometimes you want to give up the guitar, you'll hate the guitar. But if you stick with it, you're gonna be rewarded"
    - Jimi Hendrix

    My Builds:
    #1: Non-PBG SG - "Purple Flame" (Getting Wired)
    #2: PBG MB-1 - "The Wasp" (Getting Wired)
    #3: PBG IB-1 - "V-Bay at Noon" (90% Done)
    #4: PBG SG-1F - (Getting Cleared)

    My Future Builds:
    PBG ES-1G Custom - "Dave Grohl DG-335 Tribute"

    Find me on Facebook!
    https://www.facebook.com/brodie.west.9

  9. #9
    Member
    Join Date
    Dec 2014
    Location
    NSW
    Posts
    53
    Quote Originally Posted by west0288 View Post
    Man, oh man. I'm shuddering with jealousy over here, mate.

    That spalt is simply gorgeous. So darn lucky. I reckon it would look killer with just a really deep natural finish, to bring that incredible grain right out. I'd hate to see it get lost amongst too much colour. But, as with all builds, it's a very personal experience, and I'm sure whatever you choose will turn out awesome. Keen to see this beauty progress.
    Thanks mate! I'm hearing you, and I have similar reservations and don't want to stuff it up. But as much as I like the natural finish kits I've seen, it's just not really me. Hopefully I can do it justice without losing the beauty of the wood.

  10. #10
    GAStronomist wokkaboy's Avatar
    Join Date
    Dec 2012
    Location
    Perth WA
    Posts
    13,555
    Hey Andrew, I do have a build diary but its a bit out of date. I've got about 10 or so builds on the go and have been testing new Dingotone colours so haven't had time to update my build diary but here's the link http://www.buildyourownguitar.com.au...ead.php?t=3073

    the back sides are Feast Watson jarrah prooftint stain, a favourite !

    good luck with the build, that spalted bowl looks insane
    Current Builds and status
    scratch end grain pine tele - first clear coat on !
    JBA-4 - assembled - final tweaks
    Telemonster double scale tele - finish tobacco burst on body and sand neck

    Completed builds
    scratch oak.rose gum Jazzmaster - assembled needs setup
    MK-2 Mosrite - assembled - play in
    Ash tele with Baritone neck - neck pup wiring tweaks and play in

Page 1 of 2 1 2 LastLast

Posting Permissions

  • You may not post new threads
  • You may not post replies
  • You may not post attachments
  • You may not edit your posts
  •