Page 1 of 2 1 2 LastLast
Results 1 to 10 of 14

Thread: GWMusic's First Build

  1. #1

    GWMusic's First Build

    Hi All!

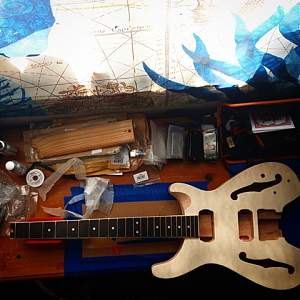
    This is my first post here after being a lurker for many many months. Given the extra time many of us now have on our hand I have decided to do a build I have been planning on for nearly a year now.

    Building a kit is very much a first for me however in my job as a college music technician I regularly set up and repair guitars so I'm hoping not to have too many hiccups.

    I received my GHQ-1 Kit yesterday, took a month to arrive to the UK but that was expected due to current situations. No damage to the packaging or contents which is always a worry with UK customs.

    Upon first inspection, there are a few things that need sorting:

    • There is a tiny part of a fret slot torn out at one end from factory routing- this should be easy and shallow enough to fill with a small off-cut of ebony and superglue.
    • The binding on the contoured cutaway is very rough cut, sanding my sort it, or may need to get a razorblade on the edge to create a cleaner cut.
    • I suspect there may be a large gluespot between the binding and veneer on the bottom side of the guitar.
    • A small chunk of wood missing from the upper horn- this may not be a problem if my finishing idea works!


    I have a planned precess to built the guitar with a slightly experimental finish that I have been planning for quite a while.

    1. Initial Inspection
    2. Repair of any faults
    3. Sanding and shaping -Neck Heel needs contouring
    4. Gold Grain filler on sides, back and neck (maybe fretboard if a tester piece works)
    5. Sanding
    6. Fret Dressing
    7. Drill Hardware screw holes
    8. Front Veneer purple stain (maybe a darker undercoat lightly sanded back)
    9. Finishing Oil Finish to a gloss.
    10. Wiring Harness and hardware installation


    My intention with the finish is that the metallic gold grain filler on the back, sides and neck with show through the gloss oil finish giving the wood a slight glitter effect which may also look quite cool on the fretboard too. The front veneer will be stained in a deep purple finish to hopefully bring out the quilted maple, a darker undercoat sanded back may help this however i am very aware that over-sanding will ruin the veneer.

    I look forward to communicating with you all, hopefully you get some form of entertainment from reading my build diary!
    Click image for larger version. 

Name:	94474163_2862021337243748_8438438279287668736_n.jpg 
Views:	202 
Size:	62.9 KB 
ID:	34675

  2. #2
    Welcome along and your ideas all sound great! I'm sure we will all be following along with interest. What product are you planning to use for the metallic gold filler?

  3. #3
    I have a pot of the Grain Enhancing filler by Crimson Guitars. I use their products at work and have never faulted them! Never used the grain filler however, so it will be a new one for me. https://www.crimsonguitars.com/store...ancing-filler/

  4. #4
    GAStronomist Simon Barden's Avatar
    Join Date
    Oct 2016
    Location
    Reading, UK
    Posts
    10,547
    Hi and welcome.

    Someone on here tried the gold grain filler recently. It's quite a subtle effect, from what I can recall.

    Best of luck with the build.

  5. #5
    So Yesterday was very productive, spend around 5-6 hours sanding and grain filling. I contoured the neck heel to be comfortable in hand when playing the upper registers. The GHQ-1 doesn't seem particularly comfortable to play past 17th fret due to its contoured lower horn however this wont be a problem as I very rarely go up there when playing anyway!

    I sanded down to 240 grit all over and applied the gold grain filler to the back, sides and neck. It dried in around half an hour so I applied a second coat as instructed on the packaging. After drying I began sanding- this stuff clogged up my sand paper like anything so the rest of the day was spend sanding out the grain filler with 240 Grit.

    I discovered halfway through sanding that the effect given by the metallic gold if it isn't sanded all the way back is awesome, almost like a rustic aged gold. So i thought I might try to capture this all over rather than sand all the way down so only the pores are filled.

    I decided to risk it and try the same effect on the fretboard, so i applied grain sealer and began sanding once dry. The effect is amazing and hopefully it will show up once the finish is on!

    I got halfway down the fretboard with sanding and gave up for the night as my arm was tired from sanding for hours!

    Image: Grain sealer on

    Click image for larger version. 

Name:	Webp.net-resizeimage (1).jpg 
Views:	183 
Size:	415.7 KB 
ID:	34699

  6. #6
    Mentor jugglindan's Avatar
    Join Date
    Sep 2019
    Location
    Canberra
    Posts
    1,181
    that gold looks amazing! I can't wait to see how it turns out

  7. #7
    Sanding, sanding and more sanding. Sanded back most of the gold filler off the body now, need to do more passes with finer grits. The fretboard is taking time as i'm having to use at-least 320 grit as to not damage the frets. Loving the weathered gold patterns I'm getting however. Hopefully they will be more visible once I have finished with oil.

    Image is progress on the fretboard, I still need to clean up closely around the frets but it shows the idea of the effect i'm looking for!


    Click image for larger version. 

Name:	95097272_280620256272767_1499095391923077120_n.jpg 
Views:	189 
Size:	43.4 KB 
ID:	34768

  8. #8
    Just applied the first stain to the body and was amazed how it came out! Starting with a dark grey stain to sand back before applying the deep purple!

    Just wondering what grit you guys would recommend sanding back with due to the veneer being so thin? I was thinking around 600.

    Apologies for the potato quality image

    Click image for larger version. 

Name:	94701496_277872506566095_6786414460757082112_n.jpg 
Views:	190 
Size:	44.5 KB 
ID:	34790

  9. #9
    GAStronomist Simon Barden's Avatar
    Join Date
    Oct 2016
    Location
    Reading, UK
    Posts
    10,547
    P600 should be fine. It may take a little longer than with P400 or coarser, but it's safer. Get it where you almost want to be, then I'd roughen up the surface with a final light rub with P240 to open it up to staining. Leaving it with a P600 finish may make it too shiny to accept stain evenly.

  10. #10
    Quote Originally Posted by Simon Barden View Post
    P600 should be fine. It may take a little longer than with P400 or coarser, but it's safer. Get it where you almost want to be, then I'd roughen up the surface with a final light rub with P240 to open it up to staining. Leaving it with a P600 finish may make it too shiny to accept stain evenly.
    Thanks for the suggestion, I took some time with the 600 and almost left it as the grey stain went a gorgeous silver colour in the highlights. Decided to carry on with my original plan and came out with this:

    Really happy with how it came out!

    Click image for larger version. 

Name:	94954317_872548836590631_9151983426922872832_n.jpg 
Views:	198 
Size:	47.2 KB 
ID:	34811

Page 1 of 2 1 2 LastLast

Posting Permissions

  • You may not post new threads
  • You may not post replies
  • You may not post attachments
  • You may not edit your posts
  •