
Hi Muzza, here's hoping DT MkII works out better for you than your first attempt.


Hi Muzza, here's hoping DT MkII works out better for you than your first attempt.
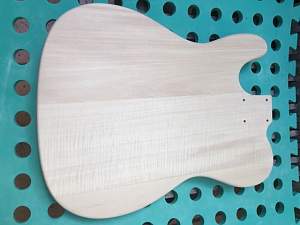
The weekend has finished along with the first lot of sanding of the body with 180 grit. I have removed a few little dents around the edges which is good.
What has shown up is a couple of cracks in the body at the base of the guitar, as per the photo.
The cracks were covered with glue, which I have sanded away. The cracks on the right are pretty smoothed out, but the one on the left is still quite pronounced when you run your finger or finger nail over it. It is not a crack where the timber pieces join, it is in the middle of a piece.
Questions: Should I be concerned about the cracking? Should I keep sanding them back till smooth, which I am concerned will create an uneven spot and possibly damage the binding by making it too thin? Or, should I look at filling them with something (I have some neutral wood filler)?
The edge will be stained with Dingo tone Black Stump.
Last edited by Marze; 15-02-2016 at 06:15 AM. Reason: Further information

Hey,
Good to see you've started the sanding!
That's weird for the cracks, they don't look like the standard cracks between bits of wood, they're more like cracks in the one piece.
With the wood filler I've found it absorbs more stain that the rest, so it may appear as a darker line.
Cheers
#1- STA1M - Completed Jan16 - GOTM Feb16 - Here
#2- IB5 - Completed Aug16 - Here
#3- 335 style 12 strings - 3rd build - Almost done - Here
No #- SG1 'Franck Zappa' - Completed Apr16 for a friend - No build diary (yet?)
#4- 'The Red Plywood Strat' - Completed Aug16 - Here
#5- ST-1JR Star Wars - Completed Dec16 - Here
#6- SG 3 pickups - Almost done - Here
#7- JBA-4M JPJ Bass - Completed Mar18 - Here
Progress update 2:
After 3 weekends of sanding and more sanding I have got the body to the point of being ready to apply the first base coat of Dingo Tone Bondi Blue with a narrow black burst of Black Stump.
I couldn't completely fix the cracks in the bottom of the body. These will have to just remain as a "feature" of a custom build.
The black binding has been annoying to deal with as when sanding the edges the black colour would get blended into the sides of the body and then had to be carefully sanded out (more sanding).
The top I only sanded very lightly with 275 to remove little standup edges from where drilling had been done and then straight to 320 --> 400--> 600 as I didn't want to go through the veneer.
Here is what I ended up with - the grain on the maple top looking quite nice:
#1 TL-1Q - First build ... aborted
#2 TLA-1 - Blue with Black Burst - Complete
#3 NonPB ES-335 - Red Flamed Maple - in progress
#4 ES-1TL - on order
#5 PRS-1 - on order
Now for the base coat ...
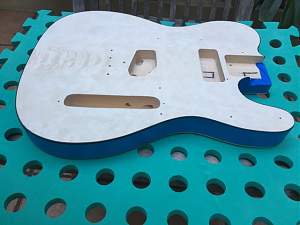
I decided to do the body in two parts. First the top, then then sides and back. I masked off the sides to protect them as they will end up blue, not black.
Prepping the Dingo Tone:
Here is the result of the base coat. I have it drying in a room with a dehumidifier as Sydney was hitting tops of 90% humidity during the last week.
Now, not quite sure if it will need more base coat or just straight into the intensifying coats?
Tomorrow onto the neck and shaping the headstock.
Last edited by Marze; 27-02-2016 at 08:09 PM.
#1 TL-1Q - First build ... aborted
#2 TLA-1 - Blue with Black Burst - Complete
#3 NonPB ES-335 - Red Flamed Maple - in progress
#4 ES-1TL - on order
#5 PRS-1 - on order

Ooh Marze, You want to be careful going that high on the grit before staining. From what some of the other guys have said and posted it is usually recommended to top out at about 300 prior to staining to ensure you get good colour take up.
EDIT: Forget what I said, it looks like it's taking just fine.
Looks good Marze, i like the blue.

Wow he blue looks great. As said before, you can go to about 400 grit when sanding, but looks like yours is fine. I'd personally do another blue coat, but it's your guitar, and it's looking really nice
Stan's LP Build for my Sister: http://www.buildyourownguitar.com.au...ead.php?t=3146
Benson Pickup Strat mod: http://www.buildyourownguitar.com.au...ead.php?t=5229
Epiphone LP headstock fix: http://www.buildyourownguitar.com.au...ead.php?t=3410
Martin Backpacker Repair: http://www.buildyourownguitar.com.au...?t=5038&page=3
'57 Harmony Jazz guitar project: http://www.buildyourownguitar.com.au...ead.php?t=2972
Looking very nice!
For the colour, as the guys said it's really down to personal taste. The intensifying coat/s will also add colour.
Sent from my 0PJA10 using Tapatalk
#1- STA1M - Completed Jan16 - GOTM Feb16 - Here
#2- IB5 - Completed Aug16 - Here
#3- 335 style 12 strings - 3rd build - Almost done - Here
No #- SG1 'Franck Zappa' - Completed Apr16 for a friend - No build diary (yet?)
#4- 'The Red Plywood Strat' - Completed Aug16 - Here
#5- ST-1JR Star Wars - Completed Dec16 - Here
#6- SG 3 pickups - Almost done - Here
#7- JBA-4M JPJ Bass - Completed Mar18 - Here

That looks like it will come up really nice! I reaĺly like the section behind the bridge
Sent from my SM-G900I using Tapatalk
 Posting Permissions

 Reply With Quote