
Thanks WeirdBits. I'm going to give it a try with the clothes iron and see if we can't contour up a miracle or two
Sent from my iPad using Tapatalk


Thanks WeirdBits. I'm going to give it a try with the clothes iron and see if we can't contour up a miracle or two
Sent from my iPad using Tapatalk
So Ive been slowly piecing together the parts I want, to upgrade this build to level I think it deserves. Pickups on the way, upgraded switches and pots and a push pull for coil splitting.
Ive been in two minds about the pretend Floyd Rose that came with the kit. I mean, they dont even spell Rose right!
So I bought myself a Gotoh GE1996t locking trem. When it arrived I realised the posts are quite a bit larger than the kit ones, so to fit them itll require enlarging the holes in the body.
My worry is that it going to leave the body a bit thin around the front of the hole. The new hole will only need to be enlarged around a mm. Has anyone tried this before? If its too risky Ill use the kit bridge , but my new one is soooo pretty, I really want to use it. Maybe its destined for another project. Decisions decisions
Sent from my iPhone using Tapatalk
Last edited by Adamc; 13-06-2020 at 03:47 PM.

Are the kit studs the same thread as the Gotoh ones?
If so, maybe you can use the kit bushes and the Gotoh studs together.
Making the world a better place; one guitar at a time...
No such luck unfortunately. The studs are quite are a bit bigger. At this stage I think I'll roll the dice and drill for the new studs. If it all goes pear shaped it'll end up a solid colour hard tail.
Sent from my iPad using Tapatalk

If its' only 1mm in total, then you are only moving the hole back by 0.5mm. I don't see any real problem. In addition the new post studs are longer, so will have less overall force on the sides per unit area than the kit studs would have. If you can visualise the studs pivoting around an axis half-way down the stud, then the normal force will be towards the front of the hole at the top and towards the rear of the hole at the bottom of the studs, so you are moving the rearward force deeper and further away from that thinner area of wood (at least on the low E side).
Just make sure that the body has enough depth to accommodate the longer studs before drilling the wider longer holes, and if so, carefully measure the stud depth and don't go any deeper!
Thanks Simon. Yeah I figured the half mm should hopefully be safe. The body is deep enough to take the new studs so that's a bonus.
I'd never thought of how the force is distributed. Thanks for explaining it. I think I'll do some measuring today to check the scale length to make sure the bridge placement is spot on. Otherwise I'll probably have to plug the existing holes and redrill. But eyeballing it, it looks like it sits in the same place pretty comfortably.
Here we go!
Sent from my iPad using Tapatalk
Sooooo, today didn't go quite to plan. After much umming and ahhhing, I decided to bite the bullet and drill for the new Gotoh bridge. Lots of checking and double checking. Drilling test holes in a scrap piece of wood and deciding what size drill to use. And i'm ready to rock n roll. I set the body up in the drill press and enlarged the holes.
Lubed up the first stud with some bees wax and started gently tapping it in. "Look at me go!" I'm thinking.
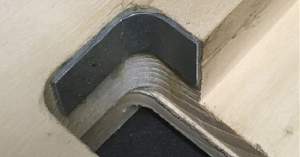
And then I hear this sort of "click", and there's a hair line crack in the body. so i flip it over and there's a slightly bigger crack on the back side.
"oh no no no no!" me thinks. Now i've always said the difference between an apprentice and a tradesman is how they react when things go pear shaped. And for a second I thought this was firewood. Twenty years ago it would have been sent flying, but this time I tried to keep my cool. While the crack was slightly open I filled it with Titebond as best i could. Then inched the stud out and saw a satisfying amount of squeeze out as it settled a little. Ok, walk away and leave it alone says I.
And after a few hours of thinking and cuppas, i decided that i really can't stuff it any more than i have, so why not try to reinforce it a little and see what happens. And enlarge the holes a smidge. Just a smidge, not a full bees dick.
So i made a little stitching piece and glued it in. Tomorrow is a new day. We'll see what happens when i tap that stud in. Ahhh we live and learn i guess
.
That's not good, but congratulations on carrying on and recovering. You really can't do much if the wood's not good.
How wide were the studs and what drill did you use?

Kudos to you. Thats a horrible thing to happen and it sounds like youve kept your cool. Hope the fix can be hidden. If not, do we simply smile and think its all part of the guitars character and history? Another perfectly imperfect guitar?
1) ES-5V
https://www.buildyourownguitar.com.a...highlight=Es5v
2) ES-3 (Custom)
https://www.buildyourownguitar.com.a...ead.php?t=8953
3) GR-1SF (Custom)
https://www.buildyourownguitar.com.a...ead.php?t=9376
4) Non-Pit Bull Travelling Guitar.
https://www.buildyourownguitar.com.a...ad.php?t=10303
5) AES-1 Special (Unwanted Custom)
https://www.buildyourownguitar.com.a...ad.php?t=11118
The studs measure 11.3mm. StewMac recommended an 11mm hole so I drilled a test hole at that and also a 7/16 one as well. The 11mm felt snug, the 7/16 a tiny bit loose so I decided to go with the 11mm. In hindsight I think I should have gone with the 7/16 and given them a little titebond for good measure.
Chalk it up to inexperience. Perhaps modifying the kit to take a different bridge was a step too far on my second kit. I have to work this morning but Im itching to have a go at refitting them.
Sent from my iPhone using Tapatalk
 Posting Permissions

 Reply With Quote


