Page 4 of 4 FirstFirst ... 2 3 4
Results 31 to 36 of 36

Thread: Build Diary: IB-4 (first build)

  1. #31
    Member Pat Rodgers's Avatar
    Join Date
    Apr 2025
    Location
    Edmonton, Canada
    Posts
    21
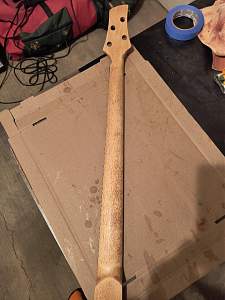
    I followed the instructions for using the polymerized tung oil on the neck that I found on Highliner Guitars's Youtube video. I did a very light staining in cherry (first photo), and then sanded it down to only leave the grain. Initially, I thought I'd made a huge mistake by not putting a coat of sanding sealer on first, but I now like the look of the speckled clusters of grain that really came out. The second photo is after the 5th coat of oil.
    Click image for larger version. 

Name:	IB-4 neck initial staining - back.jpg 
Views:	45 
Size:	95.8 KB 
ID:	45769Click image for larger version. 

Name:	IB-4 neck5thOiling.jpg 
Views:	45 
Size:	116.0 KB 
ID:	45770

  2. #32
    Moderator fender3x's Avatar
    Join Date
    Jan 2016
    Location
    Miami, FL, USA
    Posts
    2,770
    Gives it a nice looking oak-like finish.

  3. #33
    Member Pat Rodgers's Avatar
    Join Date
    Apr 2025
    Location
    Edmonton, Canada
    Posts
    21
    Finished putting on final coat of water based varnish (4 coats of Saman high luster).
    Click image for larger version. 

Name:	IB-4 final coat varnish_front01.jpg 
Views:	13 
Size:	82.6 KB 
ID:	45794Click image for larger version. 

Name:	IB-4 final coat varnish_back.jpg 
Views:	15 
Size:	109.4 KB 
ID:	45795

    Now comes the 1-month wait for the varnish to completely cure before starting the fine grain sanding.

    Anyone with tips and tricks from this point on, please let me know

  4. #34
    Moderator fender3x's Avatar
    Join Date
    Jan 2016
    Location
    Miami, FL, USA
    Posts
    2,770
    That is very cool! How did the Saman do at leveling? Did you end up brushing it on? It looks good!

    I usually put more coats of clear on. I don't know that I need to, but I usually have some brushmarks to get out, so I like to have a bit more built up. That allows me to (carefully) flat sand with 320 or even 220 in very rough places. 400 is the highest I have been going lately with sandpaper--or more lately with sanding mesh. After that I use a maroon, then grey 3M sanding pads. After that I start buffing.

    I formerly went through wet sanding starting at 320-5000 and then buffed at the end. But the sanding mesh and 3M pads allows me to dry sand, and buffing is also dry. I am new to buffing with a wheel, and have only recently figured out a way to do it with my small bench drill press. I am still working out the kinks of this system.

    The problem with wet sending a water based clear is twofold. Any place that water finds it's way under the clear (screw hole, rout, etc) it can cause the wood to swell and bad things happen. The other is that, at least with some H2O based clears, even after 4 weeks it's still possible to activate the finish. The two clears I have used no longer recommend wet sanding (Crystalac [current] and General Finishes [where I have had activation problems--and won't use again]). You may want to correspond with SamaN about sanding and polishing once finished to see if they have any recommendations or reservations. It looks like one of it's recommended uses is floors, so my guess is that it should be pretty tough.

  5. #35
    Moderator Trevor Davies's Avatar
    Join Date
    May 2020
    Location
    Perth
    Posts
    1,775
    Quote Originally Posted by Pat Rodgers View Post
    Finished putting on final coat of water based varnish (4 coats of Saman high luster).
    Click image for larger version. 

Name:	IB-4 final coat varnish_front01.jpg 
Views:	13 
Size:	82.6 KB 
ID:	45794Click image for larger version. 

Name:	IB-4 final coat varnish_back.jpg 
Views:	15 
Size:	109.4 KB 
ID:	45795

    Now comes the 1-month wait for the varnish to completely cure before starting the fine grain sanding.

    Anyone with tips and tricks from this point on, please let me know
    The body looks great and the decal is amazing. Good work.
    PitBull Builds: FVB-4, LP-1SS, FBM-1, AG-2, TB-4, SSCM-1, TLA-1,TL-1TB, STA-1HT, DSCM-1 Truckster, ST-1, STA-1, MBM-1, MBM custom, GHR-1 (Resonator), FH-5V (Acoustic).

    Scratch Builds: Pine Explorer, Axe Bass, Mr Scary, Scratchy Tele's.

    The little voices in my head keep telling me "build more guitars"

  6. #36
    Member Pat Rodgers's Avatar
    Join Date
    Apr 2025
    Location
    Edmonton, Canada
    Posts
    21
    Thanks guys, I really appreciate the feedback.

    fender3x, the leveling of the Saman seemed pretty good, it definitely worked best to be fairly liberal with the amount put on for each coat (without getting too crazy and causing uncontrollable drips). Most of the time, it levelled very well, but there were the occasional channels from the brush, but those got filled in with each successive coat. I applied each coat with the body lying flat, so I only did one side each day. I was very happy that the decal was not too smooth/slick to take the varnish evenly. Like you mentioned, I put enough thick coats that I feel I have a good base to sand. I can't really remember the last time I worked with varnish, so it's hard to say how it compares to normal varnish. I have to say that I'm pretty happy with it, and the ease of cleanup is definitely a bonus.

    As for sanding, I agree that dry sanding is the way to go. From the videos and documentation I've seen, you're right that they seem to recommend dry sanding. Thanks for mentioning the grit levels, that's good to know.

    Thanks again!

Page 4 of 4 FirstFirst ... 2 3 4

Tags for this Thread

Posting Permissions

  • You may not post new threads
  • You may not post replies
  • You may not post attachments
  • You may not edit your posts
  •