
Looks good to me.


Thanks, Simon. I used the masking method you described to spray the edges and burst - it worked a treat.
Doing a burst with a spray can can be a bit risky. The spray mist isnt as fine as from a gun, and some sprays can be a bit spluttery and deposit large blobs where you dont want them. So its worth thinking about getting a mini gun and compressor if you plan to do a lot more of this sort of thing.

100% Simon, Mathew has been picking my brain off forum, it's his 1st try so everything he does is learning for the next one before you know it he's winning GOTMOriginally Posted by Simon Barden

My facebook
126 guitars done so far still going, 34 Starts, 25 Teles, 27 Les Pauls, 11 SGs, 8 Hollow Body, 21 Super Strats
I would not have started a project like this but for this forum, and I would likely have given up were it not the the feedback I've received both public and private. This is my first time doing anything like this, and I can see this becoming a hobby that I'll continue long after this project.
What I'll do next time is:
1) Apply an appropriate finish to best reveal the body, not use the body as a canvas to achieve a finish I want;
2) Look to the forums for inspiration, not use the forums to piece together methodologies which may be incompatible:
3) Invest in the right tools and equipment for the job;
4) Don't panic, because it shows in the finish.
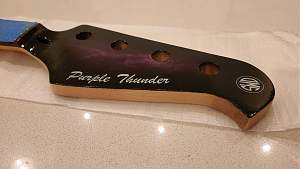
Meantime - I got my decals on this morning. I give thee:
Purple Thunder


Looking good.
+1 for it being a great hobby, +1 for investing in the right tools, and +1 for don't panic. I also go by the belief that you learn by your mistakes, and that most mistakes can be fixed.
PitBull Builds: FVB-4, LP-1SS, FBM-1, AG-2, TB-4, SSCM-1, TLA-1,TL-1TB, STA-1HT, DSCM-1 Truckster, ST-1, STA-1, MBM-1, MBM custom, GHR-1 (Resonator), FH-5V (Acoustic), DMS-1 (Mustang).
Scratch Builds: Pine Explorer, Axe Bass, Mr Scary, Scratchy Tele's.
The little voices in my head keep telling me "build more guitars"

People make mistakes? (I was going to go with the slightly more snarky quote "Only a fool learns from his mistakes, a wise man learns from *other peoples* mistakes.")
I rubbed a little of the purple Angelus dye which I used for the body onto the white edge of the pickguard. Now I have a nice purple halo to match the guitar body.
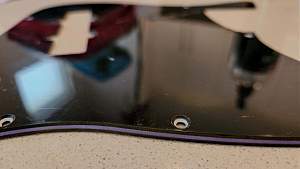
Last edited by Mathew; 28-08-2022 at 09:16 AM.
15 coats of acrylic clear on the body, 3 coats of satin poly on the neck, and 3 coats of gloss poly on the headstock.
The neck feels OK, but not as smooth as I would like. The headstock will need a wet sand and polish I imagine. And the body will also get a wet sand and polish - as soon as I figure out how to do all that!
This is coming together very well! Lots of excellent details.
And great to see bass guitars getting built!

 Reply With Quote