


Or place a flat scrap block of wood underneath, which should also prevent any tear-out. Sharp drill bits also help.


Or place a flat scrap block of wood underneath, which should also prevent any tear-out. Sharp drill bits also help.

Originally Posted by Bakersdozen
 Ah yeah, good call. I'll likely mask both sides and use a sacrificial block. I'd considered a smaller pilot bit, but flexing is always an issue. I have brad points so all good to go.
EDIT: That said, if I use the ferrule "plate" then any tearout on the back isn't an issue since it will be hidden by 30c worth of pot metal.
Last edited by ross.pearson; 29-07-2021 at 05:13 PM.
It's long tear-outs with the grain that you have to be careful of, as even with normal ferrules, you'll be drilling a hole to seat them in that's a lot bigger than the hole for the strings.
I wouldn't go for a string hole drill size that's any bigger than the hole in the bridge baseplate. It makes restringing a lot easier as you won't poke the string against the underside of the baseplate, it should just go straight on up. I'm not sure if you'll get a brad point drill that small. The smallest I have is 3mm.
I'll have to dig through my index but I think I have some pretty small brad points.
Actually, now that I've stripped it back, I'm wondering if I shouldn't contour it. Not just for comfort, but also for some weight reduction.. I can't really think of a good reason why I shouldn't.

Do it.
Sent from my Pixel 4 using Tapatalk
Kit builds: JBA-4M | STA-1M | AIB-1Q | TL-1 (in progress)
Side projects: Artist TC59 | Sheoak Dreaming | Spalted Marri Metal | Randy Vs | Sassafrassin' | St. Vincent
Here's a shot of the top, trying to catch the light to show the finish.
The headstock came up okay, but I went through in two spots on either end of the contour. I'm considering hitting those two small light spots with some black enamel paint to cover them up.
The neck came up really good, I'm quite happy with it.
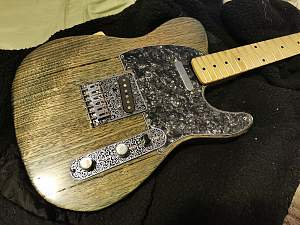
This is the diameter mismatch between the control plate and the current pickguard. The light in this particular room makes the guitar look more green than blue.
Same terrible lighting making the colour look weird, but you can see what I mean about it all being too "busy", nevermind the pickguard needing to be filed out to fit the neck and control plate. I'll sort it out with a new all black guard.
So I ordered a plain black tele pickguard from Pitbull to go with my TL style neck from Pitbull.
It's a cheap guard so I'm not worried about cleaning up the machining on the edges, that's pretty expected. But I wasn't expecting to have to re-cut it to get it to fit. It will just not fit around the neck at all, which is weird as they're both Pitbull TL kit items.
I'll reshape it easy enough and it will look and work fine, but I'm just wondering if this is standard for these kits?
Last edited by ross.pearson; 21-09-2021 at 07:05 PM.
All of the above makes sense, yeah. Don't know what I was thinking! Thanks fellas!
Shielding paint?
Shielding paint.
Everyone is sold out of shielding paint. And it costs a lot anyway. And waiting for shipping sucks.
Let's make some shielding paint!
Is it going to be as good as purpose made stuff? Nope! Is it going to work? Hopefully! Is it going to be easy to do and at least look good? Maybe!
I bought some graphite powder and raided the kids paint box again. This time going for the super vivid gold metallic paint. Thoughts on this were that it would be easier to ensure I got a good mix because the gold will stand out like the proverbials. The second reason was I thought there was a chance it would end up looking rad.
Mixed in a good amount of graphite and got this stodgy, sticky, metallic silver looking hot mess, with some tantalising metallic flakes visible.
First coat done, will definitely need another. Looks pretty flat and graphitey.
And a close up. Will do another coat tomorrow morning.
I think I've convinced myself to completely re-finish the back. The blowthrough on the finish is more than I'm happy with, so I'm going to take it back to wood, re paint and then spray poly rather than wipe.
EDIT: A word on the shielding paint that most of you probably know already. It sticks to eeeeverything, but cleans up easy enough with denatured alcohol (methylated spirits). I'd keep it the hell away from bare wood you don't want it on though.
Last edited by ross.pearson; 24-09-2021 at 06:35 PM.

I second the comfort contours. I have them on 2 of my 3 teles and I really like how they feel. Especially when playing sat down.
I contoured my ash tele (a PBG TL-1) both for comfort and weight relief.
Making the world a better place; one guitar at a time...
 Posting Permissions

 Reply With Quote