Page 5 of 20 FirstFirst ... 3 4 5 6 7 15 ... LastLast
Results 41 to 50 of 196

Thread: Simon's Super Strat Scratch Build.

  1. #41
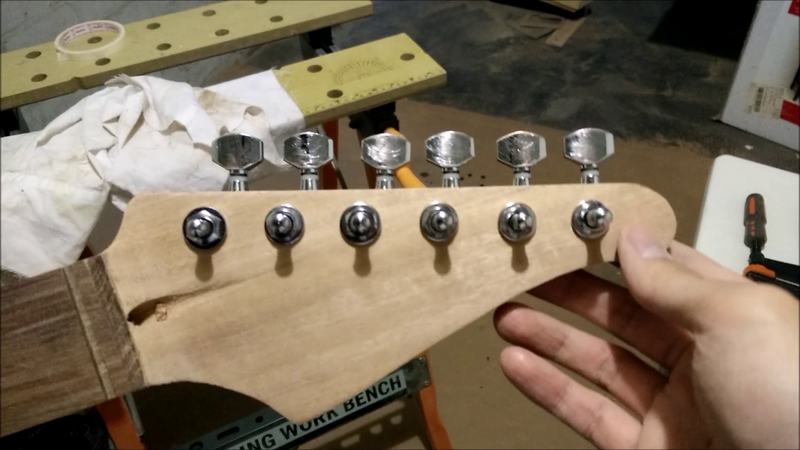
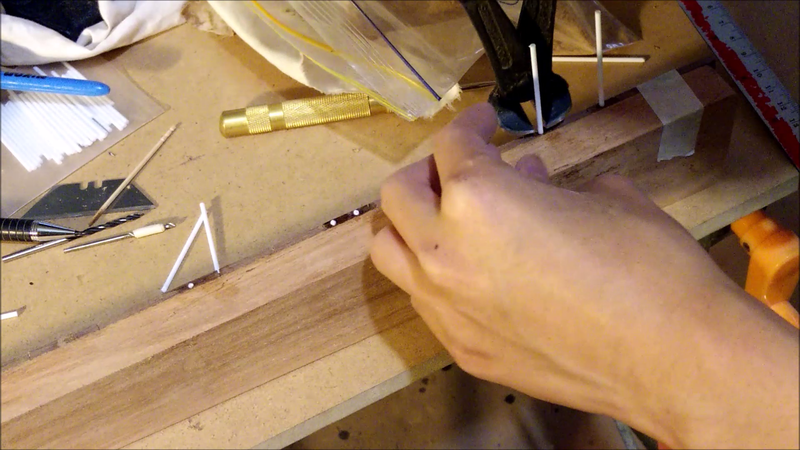
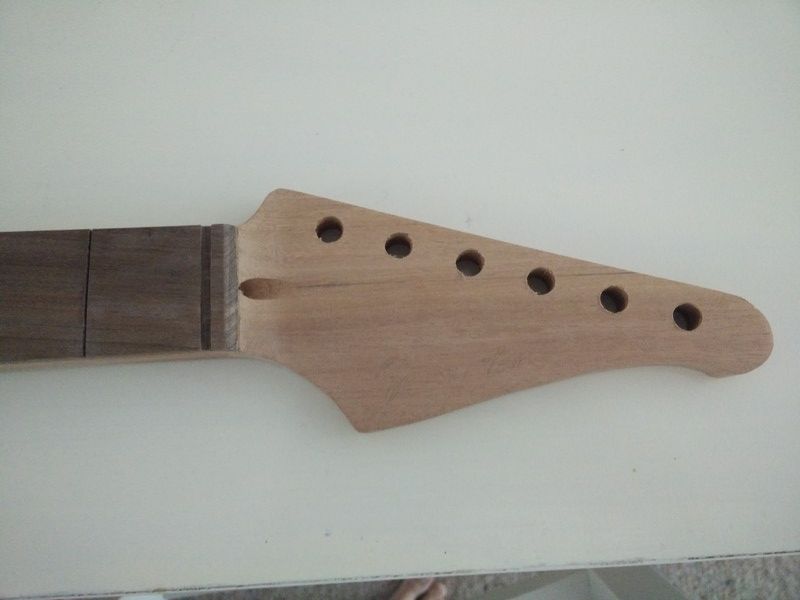
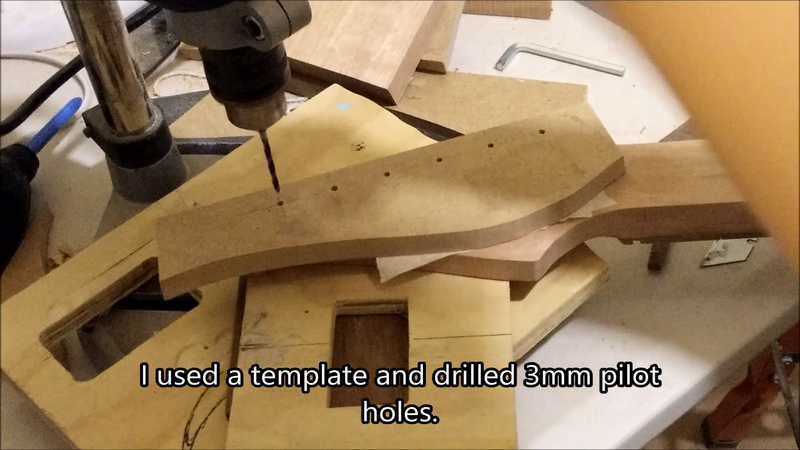
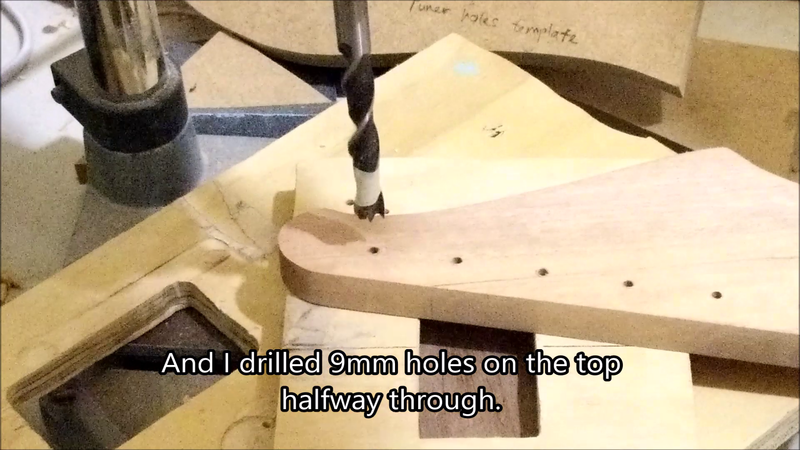
    Then I drilled the tuner holes. I made my own tuner hole template and used it as a guide.


    Then I drilled 9mm holes on the top...


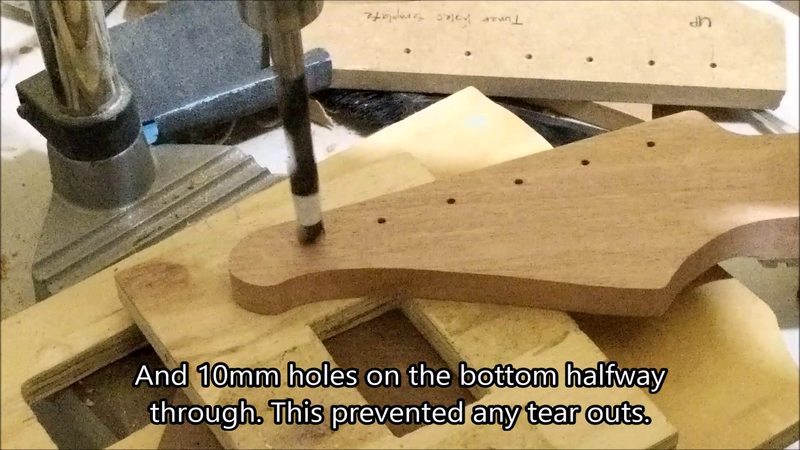
    And 10mm holes on the bottom.

    I had no tear outs like this, but I guess if you used just a 10mm bit and put a piece of scrap wood underneath you wouldn't get tear out too. I did it this way because I wanted the top side where the nut screws into the post to be more snug. 10mm holes made it too loose and I didn't like that.

    In the end, I had perfectly aligned holes. unless someone has a eagle eye and is able to spot a tiny difference, I'm happy with it so far!

  2. #42
    Just a sneak peek on how the tuners would look like when installed.


    If I could go back in time, I would make sure the holes sit 2mm farther from the edge of the headstock. To me they look just a little closer to the edge than I would prefer.

    Then it was time to do the fretboard inlays.

    I used a jeweller's saw to cut out my shape on the abalone blanks.

    It wasn't as hard as I thought, and given my small, thin fingers, I had no trouble gripping onto these small abalone pieces.

    After I cut the inlays out, I refined them with a file.


    Here's the final result.

  3. #43
    Then I marked the outlines on the 12th fret on the fretboard.


    I used a razor blade to clean the edges where the bit couldn't get to. I could also use a smaller bit but I don't have one for now.


    Then I used super glue to glue the inlays in. I wanted to use epoxy at first but CA glue dries much quicker and I used it to fill some tiny pin holes in the fretboard and I liked it.


    And with every inlay work, you probably have to fill in the gaps because it's hard to perfectly route it to the same size.

  4. #44
    I let the inlays dry overnight and came back to file and sand them flush with the fretboard.


    And the last step before fretting would be to install the side dot markers. I didn't bother using a drill press because a hand drill would be much easier to work with. I first measured the centre at the 3rd, 5th, 7th, 9th, 12th and so on, then centre punched it, and drilled with a 2mm bit.

  5. #45
    Glued the white plastic dots with CA glue.


    Then trimmed them flush with my flush cutters.


    I also sanded the fretboard up to 600 grit and I couldn't resist but put some lemon oil so see how it would look like. I was very pleased with the result, BUT I later realised I had measured the 12th fret inlay wrong! It was slightly off-centre; about 1mm more to the bass side. I was pretty sad after I discovered it, but oh well! I could redo it but it's a lesson to learn!

    MEASURE, MEASURE, CUT! The one time I didn't follow this rule I screwed up!

    Anyway, here's an image of the inlay. I'm still deciding if I should put some 6mm abalone dots on the other fret positions. The figuring of the fretboard isn't breath-taking and the simplicity of a 12th fret inlay is nice, but then again I think the usual 6mm abalone dots will make it stunning too.

  6. #46
    Here are some pictures of the neck so far. The lemon oil really gives life to the fretboard.


    And I'll start working on the headstock logo. I'll be using abalone inlays again, since the first time it worked out well.


    I'm also waiting for my new frets to come. It turns out that the frets I had bought couldn't fit the slots. My saw had a kerf of 0.53mm and the fret tangs were 0.60mm. I thought I could get away with a 0.07mm difference but the rosewood was too dense and I knew I would be in trouble if I were to keep banging in 22 frets!

  7. #47
    Mentor FredA's Avatar
    Join Date
    Sep 2015
    Location
    Surry Hills, NSW
    Posts
    500
    Simon, this is looking amazing!
    Thanks for documenting your build to such a level of details, it is extremely inspiring!
    #1- STA1M - Completed Jan16 - GOTM Feb16 - Here
    #2- IB5 - Completed Aug16 - Here
    #3- 335 style 12 strings - 3rd build - Almost done - Here
    No #- SG1 'Franck Zappa' - Completed Apr16 for a friend - No build diary (yet?)
    #4- 'The Red Plywood Strat' - Completed Aug16 - Here
    #5- ST-1JR Star Wars - Completed Dec16 - Here
    #6- SG 3 pickups - Almost done - Here
    #7- JBA-4M JPJ Bass - Completed Mar18 - Here

  8. #48
    Quote Originally Posted by FredA View Post
    Simon, this is looking amazing!
    Thanks for documenting your build to such a level of details, it is extremely inspiring!
    Thanks Fred! I do wish the rainy weather here in Sydney will go away soon so I can start working on the body!

  9. #49
    GAStronomist wokkaboy's Avatar
    Join Date
    Dec 2012
    Location
    Perth WA
    Posts
    13,555
    awesome build diary Simon and the build is looking really good. Hopefully the detail you have shown will inspire other kit builders to attempt a scratch build. The 12th fret inlay looks unreal, I wouldn't worry too much about it not being perfectly centred. The 6mm dot markers will look excellent.
    You really are a natural builder and love the safety boots haha
    Current Builds and status
    scratch end grain pine tele - first clear coat on !
    JBA-4 - assembled - final tweaks
    Telemonster double scale tele - finish tobacco burst on body and sand neck

    Completed builds
    scratch oak.rose gum Jazzmaster - assembled needs setup
    MK-2 Mosrite - assembled - play in
    Ash tele with Baritone neck - neck pup wiring tweaks and play in

  10. #50
    Quote Originally Posted by wokkaboy View Post
    awesome build diary Simon and the build is looking really good. Hopefully the detail you have shown will inspire other kit builders to attempt a scratch build. The 12th fret inlay looks unreal, I wouldn't worry too much about it not being perfectly centred. The 6mm dot markers will look excellent.
    You really are a natural builder and love the safety boots haha
    Yes I do hope to encourage some more experienced kit builders to take the leap of faith and try building from scratch. Not as hard as you'd think!

    Haha yes wokka I'll look for safety boots soon! I can't seem to find any easy to slip on one's though!

Page 5 of 20 FirstFirst ... 3 4 5 6 7 15 ... LastLast

Posting Permissions

  • You may not post new threads
  • You may not post replies
  • You may not post attachments
  • You may not edit your posts
  •