Page 1 of 16 1 2 3 11 ... LastLast
Results 1 to 10 of 152

Thread: Here we go... Muzza's first build. Non PBG PRS-1TS

Hybrid View

Previous Post Previous Post   Next Post Next Post
  1. #1
    Member Muzza's Avatar
    Join Date
    Jan 2016
    Location
    Sunshine Coast
    Posts
    487

    Here we go... Muzza's first build. Non PBG PRS-1TS

    OK, the first 2 posts are my initial thoughts - a bit of an 'unboxing' and 'review'. I want to reiterate that this is NOT a PitBullGuitars kit. (It may have come from the same factory... I hope not, as you'll soon understand...)

    So...not too impressed with the kit straight off the bat. First up, I thought I was buying this kit...
    Click image for larger version. 

Name:	non pitbull.jpg 
Views:	705 
Size:	46.8 KB 
ID:	8209

    But got this kit...
    Click image for larger version. 

Name:	pitbull.jpg 
Views:	689 
Size:	134.2 KB 
ID:	8210

    And with all the crap going on in my life at the moment, I only just realised tonight...

    I paid an extra $110 to upgrade to 4 wire wilkinsons and gold hardware. I got a nice surprise when I saw the gold faces for the humbucker mounts in the kit. I wasn't expecting that.
    Click image for larger version. 

Name:	Screen-Shot-2016-02-01-at-8.42.16-PM.jpg 
Views:	697 
Size:	73.5 KB 
ID:	8211

    Click image for larger version. 

Name:	Screen-Shot-2016-02-01-at-8.42.53-PM.jpg 
Views:	689 
Size:	60.6 KB 
ID:	8212

    Makes up for the missing 3 way switch cover. ($1.20 from my local brick and mortar music store.)
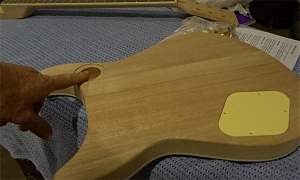
    Click image for larger version. 

Name:	Screen-Shot-2016-02-01-at-8.39.06-PM.jpg 
Views:	714 
Size:	57.3 KB 
ID:	8213
    Last edited by Muzza; 05-02-2016 at 03:23 PM. Reason: I re-worded the title

  2. #2
    Member Muzza's Avatar
    Join Date
    Jan 2016
    Location
    Sunshine Coast
    Posts
    487
    I was REALLY disappointed with the headstock though. The neck itself looks OK. I guess I won't know for certain until it's finished and strung up.

    When I placed the truss rod cover in position, as you do, it didn't look right. I thought I had the wrong glasses on. So I put the hardware on the headstock and yep... centreline to E machinehead hole was 3 mm different to centreline to e hole. Look at the space between the machine head washer to the edge of the headstock. 3mm doesn't sound like a lot, but look at the picture.
    Click image for larger version. 

Name:	Screen-Shot-2016-02-01-at-8.34.25-PM.jpg 
Views:	690 
Size:	98.7 KB 
ID:	8214

    And the machineheads? If this is an upgrade, I'd hate to see the quality of the standard hardware. Of the 6, I could only hand tighten ONE to about 75% of its total travel. That's not a quality fit. I had to get a 10mm ring spanner on to them to get the rest of them past 2 turns.

    However, once they're on, I shouldn't have to worry about them. The machine head action seemed very precise - no wobble and that part of them feels 'right'.
    Click image for larger version. 

Name:	Screen-Shot-2016-02-01-at-8.41.07-PM.jpg 
Views:	689 
Size:	70.5 KB 
ID:	8215

    Here you can see how far off centre the holes were.
    Click image for larger version. 

Name:	Screen-Shot-2016-02-01-at-8.48.42-PM.jpg 
Views:	662 
Size:	48.0 KB 
ID:	8217

    The other poor quality thing about the headstock is that it looked like somebody got a little over-enthusiastic about hand sanding the front face and left a visible dip on both sides just in front of the nut.
    Click image for larger version. 

Name:	Screen-Shot-2016-02-01-at-8.47.20-PM.jpg 
Views:	690 
Size:	35.5 KB 
ID:	8216

    Overall I'm pretty disappointed, but... I love the flame maple. I wish I'd discovered PBG and this forum a week before. As it is, the PRS I THOUGHT I was buying is winging itself over from WA as I write this.

  3. #3
    GAStronomist wazkelly's Avatar
    Join Date
    Aug 2015
    Location
    Caloundra West, Sunshine Coast Qld
    Posts
    6,631
    Hi Muzza, bit of a bummer however being a first build use it as such to fine tune your skills before starting on your dream guitar that way hopefully any mistakes are made or discovered on this one and not on the next.

  4. #4
    Member Muzza's Avatar
    Join Date
    Jan 2016
    Location
    Sunshine Coast
    Posts
    487
    Quote Originally Posted by wazkelly View Post
    Hi Muzza, bit of a bummer however being a first build use it as such to fine tune your skills before starting on your dream guitar that way hopefully any mistakes are made or discovered on this one and not on the next.
    Yep, we're on the same page there Waz...

  5. #5
    Member Muzza's Avatar
    Join Date
    Jan 2016
    Location
    Sunshine Coast
    Posts
    487
    First up, I got stuck into that appalling headstock. Some of you may have caught my post about not pre-drilling the headstocks. I hate the Gibson type headstocks, so a redesign was always on the cards, regardless of a drunken Chinese 'craftsman's' inability to accurately locate a drilling template.
    Click image for larger version. 

Name:	Screen-Shot-2016-02-01-at-8.51.53-PM.jpg 
Views:	677 
Size:	33.3 KB 
ID:	8219

    First thing I had to do was cut some 'plugs' from the excess headstock material. I needed 6, but there was only enough for 3.
    Click image for larger version. 

Name:	Screen-Shot-2016-02-01-at-8.52.21-PM.jpg 
Views:	667 
Size:	37.3 KB 
ID:	8218

    So I've decided to put some flame maple veneer on the face of the headstock (from guitaraust.com.au -$7.95 for a headstock) This enables me to cut some plugs from any old timber for the top, and cut the 3 maple plugs in half for the underside.

    This is where I came a little unstuck, and I unreservedly blame the Americans for not following the rest of the world in adopting the Metric system.

    My plug cutters are imperial. Try and find an imperial clean cut auger bit... Well, I found one, but it's quite long.
    Click image for larger version. 

Name:	Screen-Shot-2016-02-01-at-8.53.19-PM.jpg 
Views:	637 
Size:	63.2 KB 
ID:	8222

    So to cut a loooong story short... it wasn't a very pleasant experience and the plugs didn't work as well as I'd liked. (Better late than never, I'm now the proud owner of a Carbatec 8 piece Forstner/Plug cutter set...)

    Luckily, the back of the headstock and neck are going to be solid 'Black Stump', so I can fix the f@%kups with wood filler, and the veneer will cover all sorts of evil on the top.

    Click image for larger version. 

Name:	IMG_1298.jpg 
Views:	672 
Size:	146.1 KB 
ID:	8220 Click image for larger version. 

Name:	IMG_1299.jpg 
Views:	692 
Size:	142.2 KB 
ID:	8221

    (Yes, I've got a Rockerverb MKII. Cool huh?)

    I've still got a bit of final shaping to do on the headstock, but for a first go with dodgy equipment, I'm satisfied I won't make the same mistake on the NEXT PRS.

    And I learned something very valuable... Never do any critical work on your guitar build if you've had a couple. No matter HOW impatient you are...!

    Actually, let me re-phrase that... never do ANY work on your guitar build if you've had a couple.

  6. #6
    Quote Originally Posted by Muzza View Post
    And I learned something very valuable... Never do any critical work on your guitar build if you've had a couple. No matter HOW impatient you are...!

    Actually, let me re-phrase that... never do ANY work on your guitar build if you've had a couple.
    I think that might include purchases for a build after having a couple. I was browsing stewmac after going to a gig and made a purchase for a build that I didn't entirely think through

  7. #7
    Member Muzza's Avatar
    Join Date
    Jan 2016
    Location
    Sunshine Coast
    Posts
    487
    So, after all that crap, I guess I'm happy with how the headstock is going. Nobody will see the learning curves.

    Now on to the bits where I ask for advice. When I first did my dry test fit, to my eye the neck looked to be dead straight, lining up perfectly with the body. But when I put the straight edge on it tonight I found that I DO in fact need to straighten it out a tad. Do I take material off the neck's heel, or from the socket? Uber, sooper dooper, mega sharp chisel, or more f@%king sanding???
    Click image for larger version. 

Name:	IMG_1295.jpg 
Views:	676 
Size:	69.3 KB 
ID:	8223

    The bottom of the heel doesn't quite sit snugly on the bottom of the socket. I reckon I might just put the eensy weensy tiniest of shims in there to fill the gap. Or will the Titebond fill it up?
    Click image for larger version. 

Name:	IMG_1297.jpg 
Views:	638 
Size:	76.2 KB 
ID:	8224

    I measured from the face of the nut to the centre of the 12th fret and (I think) it was 314mm. It was also 314mm from the centre of the 12th fret to the centre of the hole for the bridge on the treble side. I'm assuming the hole will be in the correct spot for the bass side. (Unless the same guy that drills the headstock also drills the bridge holes... ) Any advice on the correct location of the bass side bridge hole?

    Then I put the straight edge along the fretboard (after straightening the neck with the truss rod) and measured the height at the bridge location. It's 18mm. Is that about right for a Tune-0-Matic bridge?
    Click image for larger version. 

Name:	IMG_1303.jpg 
Views:	689 
Size:	108.2 KB 
ID:	8225

    LAST QUESTION! (Well, for tonight, anyway...) Where the neck sits in the socket, it partly obscures the hole where the wires are going to pass. Should I remove a bit of material from the corner in front of the hole, or should I just get over it???
    Click image for larger version. 

Name:	IMG_1296.jpg 
Views:	697 
Size:	75.4 KB 
ID:	8226

    Thanks in advance, and thanks for having me Adam.
    Last edited by Muzza; 01-02-2016 at 07:40 PM.

  8. #8
    Member Swanny's Avatar
    Join Date
    Sep 2015
    Location
    Morayfield, Qld
    Posts
    482
    With the neck, I reckon it's be easier to take from the neck heel.

    The pickup wire route, wouldn't hurt to take the back corner from the neck, depends which way you have to feed the wires as to whether you need to put in a feeder ramp or not.
    1st build - Blue ES-12G ->-Build Diary-<-

    2nd build - Father/Son collaboration MB-1 ->-Build Diary-<-

    3rd build - GR-SF1 ->-Build Diary-<-

    4th build - FS-1 ->-Build Diary-<-

  9. #9
    Member Muzza's Avatar
    Join Date
    Jan 2016
    Location
    Sunshine Coast
    Posts
    487
    I got this on Friday. Should avoid any more plugging dramas. I'll probably end up plugging and veneering all my future headstocks.

    Click image for larger version. 

Name:	IMG_3344.jpg 
Views:	664 
Size:	126.3 KB 
ID:	8232


    My current build has 4 holes for the pots, (potholes???) but I only need 3. So I'll either cut a plug from the flame maple veneer I've ordered for the headstock, or use a Strat style output jack. (could prove awkward as the PRS has an arched top.)

    Anyway, I just did a rushed example using all 4 sizes (8mm, 10mm, 12mm & 15mm) using a bit of cheap pine. Normally I would take measures to prevent tearout, but as this is just a quick trial, I didn't bother. (Note to self... wash your hands!)

    The maple veneer shouldn't tear out like this. I would imagine that if done properly and carefully, it would be damn near invisible - especially so with clean fingers.

    Here are the plugs drilled out and the guinea pig holes.

    Click image for larger version. 

Name:	IMG_3345.jpg 
Views:	676 
Size:	115.9 KB 
ID:	8233


    Here are the plugs ready to go in and the roughly finished end product. The grain on this bit of pine fell away at a very acute angle, which is why the two tone grain doesn't line up on a couple. Shouldn't be a problem with the veneer as I'd be working with gnat's testicle thicknesses.

    Click image for larger version. 

Name:	IMG_3348.jpg 
Views:	679 
Size:	64.3 KB 
ID:	8234
    Last edited by Muzza; 02-02-2016 at 08:35 AM.

  10. #10
    You could also try using a file to create some clean grit-free super fine saw dust from an edge piece of your maple veneer and rub that into the plug cap seams when you glue them in. That may help to hide any glue line and allow some stain to take.
    Scott.

Page 1 of 16 1 2 3 11 ... LastLast

Posting Permissions

  • You may not post new threads
  • You may not post replies
  • You may not post attachments
  • You may not edit your posts
  •