Page 1 of 3 1 2 3 LastLast
Results 1 to 10 of 22

Thread: Hot Rodding an old Strat Copy

  1. #1
    GAStronomist wazkelly's Avatar
    Join Date
    Aug 2015
    Location
    Caloundra West, Sunshine Coast Qld
    Posts
    6,631

    Hot Rodding an old Strat Copy

    Getting closer to wiring up my PBG kits Build #1 and #2 and volunteered to do some upgrades on a couple of my Son's guitars to practice on.

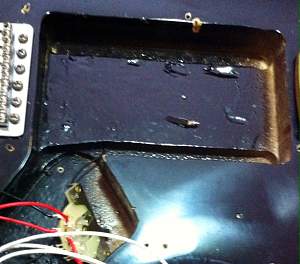
    The donor guitar in this instance is a late 90's Korean made Magnum Strat Copy that originally looked like an Eric Clapton version with white scratch plate and maple fret board. First mods were to replace machine heads with Schallers as one of the stock units fell apart whilst tuning and they never stayed in tune anyway. Gave the neck a once over by lowering the action and proper intonation and was quite impressed with this bit of timber bolted onto a rather dull sounding body. Reason for the dull sound was more to do with a massive rectangular cavity routed for pickups and the PUP's just floating from the pick guard. Functional for a primary school student to learn on.
    Click image for larger version. 

Name:	photo back of body.jpg 
Views:	356 
Size:	342.6 KB 
ID:	8421Click image for larger version. 

Name:	photo tuners.jpg 
Views:	525 
Size:	741.0 KB 
ID:	8422Click image for larger version. 

Name:	photo tuners rear.jpg 
Views:	353 
Size:	760.2 KB 
ID:	8423Click image for larger version. 

Name:	photo pickup route.JPG 
Views:	310 
Size:	443.8 KB 
ID:	8424

  2. #2
    GAStronomist wazkelly's Avatar
    Join Date
    Aug 2015
    Location
    Caloundra West, Sunshine Coast Qld
    Posts
    6,631
    About 5 or 6 years on I went looking for a 4 conductor humbucker to put in the bridge position to give this thing a bit more grunt. At the local Noosa Music store the sales assistant showed me a Cort Strat that had a twin blade looking single coil sized humbucker and when he played it the sound was amazing so I bought one of those and a dimarzio mini dpdt switch to play around with series/parallel/coil splitting. Also bought a mirror scratchplate as the kid now needed his guitar to look cool too. Unfortunately those mirror scratch plates do not stand up well to poor cleaning and maintenance from pre pubescent teens. Also found a stacked single coil 4 wire PUP from same manufacturer and installed that too in middle position but still found stock PUP's sounding better.
    Attached Thumbnails Attached Thumbnails Click image for larger version. 

Name:	photo WSC.jpg 
Views:	237 
Size:	361.5 KB 
ID:	8425   Click image for larger version. 

Name:	photo WSC wiring.jpg 
Views:	244 
Size:	558.1 KB 
ID:	8426   Click image for larger version. 

Name:	photo mirror scratch.JPG 
Views:	237 
Size:	336.2 KB 
ID:	8427  
    Last edited by wazkelly; 08-02-2016 at 07:19 PM. Reason: photos

  3. #3
    GAStronomist wazkelly's Avatar
    Join Date
    Aug 2015
    Location
    Caloundra West, Sunshine Coast Qld
    Posts
    6,631
    Click image for larger version. 

Name:	photo old blades (2).jpg 
Views:	298 
Size:	430.6 KB 
ID:	8433Once he had finished school and out in the wide world decided it needed a facelift and bought a couple more blade style pickups. Unfortunately I could not find the same one used in Bridge position and bought a couple of Chinese lookalikes on eBay plus some non-genuine mini DPDT switches. The yellow on Black looked good but sadly the coil splitting did not work and the fresh blades didn't even sound as good as the original stock PUP's.
    Click image for larger version. 

Name:	photo last scratch colour.JPG 
Views:	295 
Size:	382.2 KB 
ID:	8431Click image for larger version. 

Name:	photo old blades (1).jpg 
Views:	287 
Size:	393.5 KB 
ID:	8432
    Last edited by wazkelly; 08-02-2016 at 07:22 PM. Reason: photos

  4. #4
    GAStronomist wazkelly's Avatar
    Join Date
    Aug 2015
    Location
    Caloundra West, Sunshine Coast Qld
    Posts
    6,631
    Bought a couple more dimarzio mini dpdt switches to see if that would fix the coil splitting only to have Junior move away from home for a while before I could finish the job. Now that he is back on the Coast staying with his Girlfriend I convinced him to let me have my way with it one more time and promised him he would not be disappointed. As I had a couple of spare stock PBG humbuckers thought that may be the better way to go and move Bridge blade style PUP to middle in a H-S-H configuration. This required a new scratch plate and this time ordered a brushed aluminium finished one as that would have the shine of the former mirror but stand up to neglect much better. Put it all together a few weeks ago however the upgrades also introduced an earth leak issue when switching between neck and middle PUP's. Grrrrrr, frustrating stuff.
    Click image for larger version. 

Name:	photo PGB front.JPG 
Views:	293 
Size:	329.4 KB 
ID:	8434Click image for larger version. 

Name:	photo PBG front & back.JPG 
Views:	295 
Size:	329.3 KB 
ID:	8435Click image for larger version. 

Name:	photo 1 (Before).jpg 
Views:	319 
Size:	428.7 KB 
ID:	8436Click image for larger version. 

Name:	photo 2 (Before).jpg 
Views:	308 
Size:	462.2 KB 
ID:	8437
    Last edited by wazkelly; 08-02-2016 at 07:33 PM. Reason: spelling

  5. #5
    GAStronomist DrNomis_44's Avatar
    Join Date
    Dec 2014
    Location
    Darwin,NT Australia
    Posts
    5,513
    Looking cool so far.

  6. #6
    GAStronomist wazkelly's Avatar
    Join Date
    Aug 2015
    Location
    Caloundra West, Sunshine Coast Qld
    Posts
    6,631
    Stock PBG PUP's sounded OK but as I was going to have to re-wire this thing, what the heck, went and ordered some 4 conductor Entwistle Darkstars so that I could finish Frankensteining this thing into a meaner sounding beast with a multitude of sound combinations to muck around with. Looking closer at the old twin blade and the entwistles you would swear they were made in the same factory as they have exactly the same coloured wires for each of the coils and therefore wiring the mini dpdt's was much simpler. From the short sound check they also have a similar sounding voice too?
    Click image for larger version. 

Name:	photo replaced wiring.JPG 
Views:	294 
Size:	355.4 KB 
ID:	8438Click image for larger version. 

Name:	photo entwistle wiring.jpg 
Views:	285 
Size:	634.3 KB 
ID:	8439Click image for larger version. 

Name:	photo pickups loaded.jpg 
Views:	299 
Size:	371.0 KB 
ID:	8440Click image for larger version. 

Name:	photo mini dpdt (1).jpg 
Views:	310 
Size:	518.0 KB 
ID:	8441
    Last edited by wazkelly; 08-02-2016 at 08:16 PM. Reason: add content

  7. #7
    GAStronomist wazkelly's Avatar
    Join Date
    Aug 2015
    Location
    Caloundra West, Sunshine Coast Qld
    Posts
    6,631
    Thought I had bought a 24 pole oak grigsby styled 5 way switch from PBG and discovered it was more of a standard 5 way design with lesser number of lugs. No probs, saved me a few more hours trying to figure out all the alternate wiring combinations, and let me tell you the are plenty of Strat wiring mods available on the net. More shots here of the new parts going in.
    Click image for larger version. 

Name:	photo 5 way switch.jpg 
Views:	303 
Size:	558.7 KB 
ID:	8442Click image for larger version. 

Name:	photo mini dpdt (2).JPG 
Views:	293 
Size:	463.5 KB 
ID:	8443Click image for larger version. 

Name:	photo orange drop tone pot.JPG 
Views:	280 
Size:	423.7 KB 
ID:	8444Click image for larger version. 

Name:	photo tone pot.JPG 
Views:	283 
Size:	339.2 KB 
ID:	8445Click image for larger version. 

Name:	photo volume pot.JPG 
Views:	295 
Size:	582.8 KB 
ID:	8446
    Pots are bourns mini 500K audio taper with 0.022 Orange Drop Cap being the best match of these components for humbuckers. Pity the bourns only came with one retaining nut and stuff all washers as the pots post are sitting pretty high when looking at things from above.

  8. #8
    GAStronomist wazkelly's Avatar
    Join Date
    Aug 2015
    Location
    Caloundra West, Sunshine Coast Qld
    Posts
    6,631
    Here it is all put back together after testing for earth leaks and any other buzzes that shouldn't be there. Strung it up and had a bit of a play before Minister for War and Finance asked me to kill the noise. From the relatively low volume and short playing duration quite pleased with the depth and clarity of sound coming out of the darkstars. The mini dpdt switches work the same way on each of the 3 PUP's by having full humbucker to out of phase with itself to split coil, and really impressed with the neck darkstar in particular as it has a lot of warmth without the muddiness. Positions 2 & 4 on the 5 way switch produces some truly unique sounds and need more time to figure which combinations sound best. Easier to say I can now replicate a lot of the thin Red Hot Chilli Peppers Strat sounds. All up these mods came in at just under $120 and dramatically improved the sound. When the missus is out one day I will have to fully crank things up to see what personality this beast really has. Meanwhile I will need to figure out how to get a video or soundclip done to post next time.
    Click image for larger version. 

Name:	photo full guitar.jpg 
Views:	314 
Size:	441.7 KB 
ID:	8447Click image for larger version. 

Name:	photo top brushed surface.jpg 
Views:	305 
Size:	374.5 KB 
ID:	8448Click image for larger version. 

Name:	photo top brushed surface (2).jpg 
Views:	291 
Size:	377.6 KB 
ID:	8449Click image for larger version. 

Name:	photo strung close up.jpg 
Views:	278 
Size:	381.5 KB 
ID:	8450Click image for larger version. 

Name:	photo strung close up (2).jpg 
Views:	624 
Size:	346.5 KB 
ID:	8451

  9. #9
    Member Swanny's Avatar
    Join Date
    Sep 2015
    Location
    Morayfield, Qld
    Posts
    482
    Come on, Waz, were you doing it for him, or really because you wanted to see how good you could make it?

    Great result, though!
    1st build - Blue ES-12G ->-Build Diary-<-

    2nd build - Father/Son collaboration MB-1 ->-Build Diary-<-

    3rd build - GR-SF1 ->-Build Diary-<-

    4th build - FS-1 ->-Build Diary-<-

  10. #10
    GAStronomist wokkaboy's Avatar
    Join Date
    Dec 2012
    Location
    Perth WA
    Posts
    13,555
    looks cool Waz, I'll have a good read when I get spare time
    Current Builds and status
    scratch end grain pine tele - first clear coat on !
    JBA-4 - assembled - final tweaks
    Telemonster double scale tele - finish tobacco burst on body and sand neck

    Completed builds
    scratch oak.rose gum Jazzmaster - assembled needs setup
    MK-2 Mosrite - assembled - play in
    Ash tele with Baritone neck - neck pup wiring tweaks and play in

Page 1 of 3 1 2 3 LastLast

Posting Permissions

  • You may not post new threads
  • You may not post replies
  • You may not post attachments
  • You may not edit your posts
  •