IB-1S (to round me out to three unfinnished guitar projects)

wcieslik

Member
So...
To come up to date, the Ricky had to have a retro fit neck sanding due to the 'poly' I used earlier, staring to peel off in spots, and a decent fret levelling as I fairly buggered my first go this ...
Also want to change out the stock PUs with something else (maybe tone rider generators ?)
Learned a decent lesson in NOT mixing paint types on this one !

The Mossie is in 'stasis as we work out how to apply the acrylic 'swipe' finish I desire on this one..
Also still trying to make a new scratch plate to accomodate neack and BRIDGE humbuckers instead of the slanted SC at the bridge. (two attempts down and a third in progress) Oh ... swapping out the stock PUs for Tonerider RockSongs
(At least all the paint types are compatible acrylics on this one, and no 'additional' gloss coat over the neck varnish!!)

And so behold... the IB-1Q has arrived.
So far this is going along fairly well. Already stumbled over the same 'rough finnish' issues other builders had with this one.
Just sanded, stained and varnished so far ...
 
what the hell did I do with my free time before all these guitars started cropping up ?!?!?

I think I need a flying-V.. Maybe just before xmas ?
 
6E500467-AD91-4AB1-8E33-ED3E4BDF58A0.jpeg
Mwa ha ha ha ha!
 
I think I'm going to name this one the "disaster blaster"...
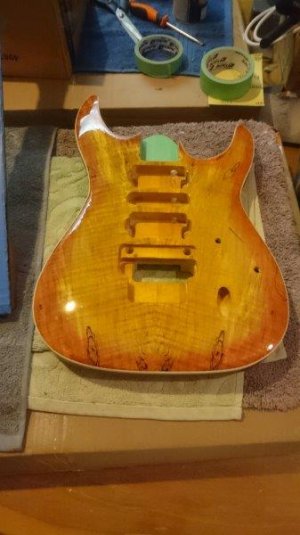
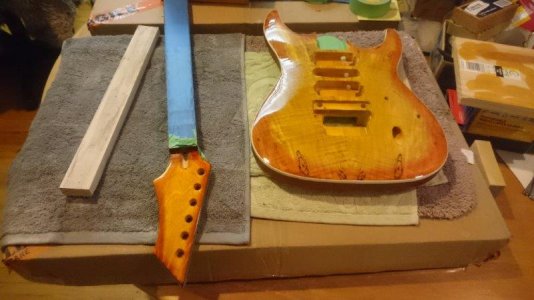
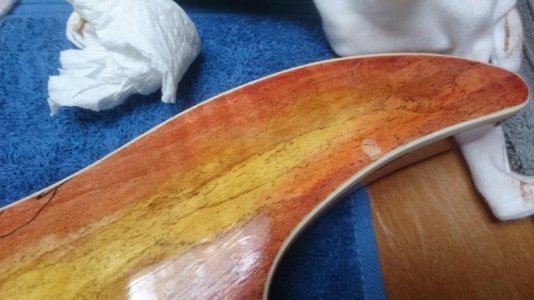
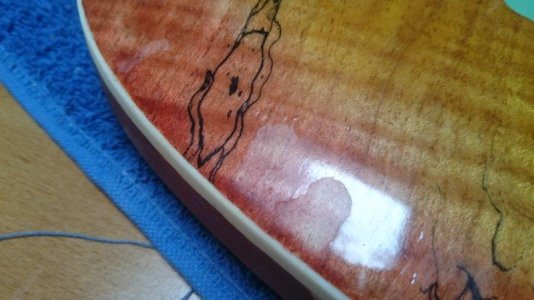
Problems with streaky and beading varnish.. and ultimately, peeling off, of entire layers ...

Oh well ... at least now I get to do it all again !

I discovered that isopropyl alcohol helped me take all the varnish (and stain) off from the spalted maple without much risk of rubbing through...

(I also suspect that using the same as a cleaner between varnish coats is what lead to the issues in the 1st place...)

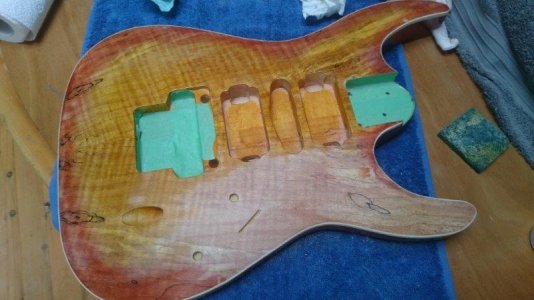
image 1 and 2... The problem!
DSC_4053.jpg

DSC_4055.jpg

image 3 ... The long road to recovery ...
DSC_4052.jpg

Using the ispropyl alcohol and rough plastic scouring pads brought me back to the raw finnish.
I've also sanded the back and sides back to raw wood too .... back to square one !
 
well ain't that a kick to the crotch. Chin up bro, we've all had similar finish fails.
Was disappointed to start with, but glad it all came off without ruining the veneer. I think my three coats of sanding sealer saved my bacon. Almost ready to take a deep breath and stain again..

Sent from my D6653 using Tapatalk
 
"Dog nuggets" more like.
At some point you'll be glad that it happened as the second attempt will no doubt be an improvement.
I'm always happier after having a second go at something.
cheers, Mark.
 
OK...
for the stain I used Feast Watson Prooftint (which is I think, spirit based) kind of explains why the Isopropyl Alcohol worked so well in cleaning it up.

I'm NOT going to try the varnish again ....
So my question is ....
Clear Acrylic top coat, clear Nitro, or something else ?
(I do want a glossy finnish...)
 
"Dog nuggets" more like.
At some point you'll be glad that it happened as the second attempt will no doubt be an improvement.
I'm always happier after having a second go at something.
cheers, Mark.

Yeah... some of it has definitely been improved, but I have made few different blunders 2nd time around ...
Still moving forward though.
 
Well here we are in a new year and the Mibanez is still hanging up in pieces.
I decided to, (rattle can), nitro the body, and have been going at it disparately, since before Xmas....
Eventually I felt it was good enough to start polishing, but on close inspection (and thought), have decided another couple of coats of nitro would be wise. Surprised at how thin it goes on !! Very conscious about sanding or polishing through.

Hopefully I'll get the extra coats on over the next w/end or so, and then let it air for another week or two... then start the polishing.
Once again... looking forward to just finishing this one, and assembling it to play.
I'm planning to dry sand, very careful and VERY lightly before the cut and polish.
(My sloppy and far too wet sanding on the Mossie led to some unfortunate blemishes. Definitely not letting that happen to the 'Nez) !

Don't tell my Missus, I've already ordered a 'tele, with plan in mind, to stain and oil.
Although I am going to hold off on the Flying Vee for now ... (for now...)...
 
I've run into two issues with the jack socket on the 'nez and am looking for a little reassuring....

The socket doesn't take the whole plug...
The photo shows how far it sticks out. It does actually work OK like this.. Is this normal with that type of socket?

The other issue is that the socket appears to seat nicely in the body, but doesn't protrude out into the control cavity. So I can't get the nut onto it, to hold it in. Wondering how everyone else dealt with this?

Sent from my D6653 using Tapatalk
 
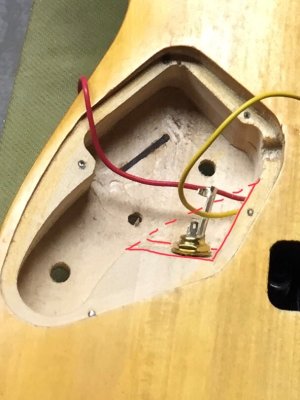
I found that i had to actually perform some surgery on the control cavity wall to:
1. Get the nut over the end of the Jack thread
2. angle the control cavity wall so that the nut would sit flat against it and pull straight on the thread

See below, your cavity shape may differ as this was an earlier version of the kit

IB-1 Cavity.jpg

the red lines are the material i had to remove to get the jack end exposed and the angle on the wall i introduced.

All I did was get a similar sized dowel to the through hole, allow that to protrude though the cavity and measure off a 90 degree angle to that dowel. Then you just measure how long your jack is, and pare away the wall to get to the appropriate length. I did this with some careful chisel work as there is not a flat plane to set a router on, though you may be able to do similar with a dremel sanding drum or cutting wheel, or perhaps a multitool flat blade.

I also found that the flange on the jack was almost size on size with the outer part of the hole, you might be able to get around this by trimming down the rubber washer behind the flange, or, you may need to run a dremel 80 grit barrel sander bit around the inside of the outer hole in as deep as you can.
if you do it that way, keep the dremel moving and don't let it sit on one spot or you'll create a groove. You need to go carefully so as not to bash the dremel into your guitar face or sand through the thin edge of the jack hole.

Hope this helps!
 
Back
Top