I was gifted an aucustic ibanez 12 string guitar, help me treat it right

Manisk

Member
Restoring 30 year old acoustic 12 string Ibanez

[NOTE; i dont know what i am doing, never even owned an acoustic guitar before]

I changed the title because this is quickly becoming a restoration


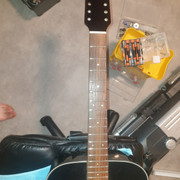
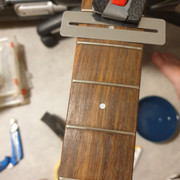
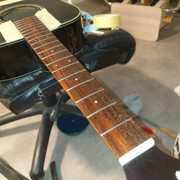
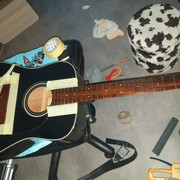
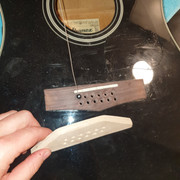
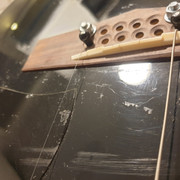
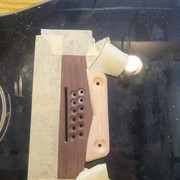
Took some pictures to show the problems, the bulging of the top was bad causing high string action, i am going to attempt to fix it by myself and some help from you guys

 
Last edited:
i have two packs of ernie ball regular slinky, are these okay to re-wire with or should i wait until i get the right stuff?
 
Given it has been sitting for a while it might be worth getting a guitar tech to do a full setup.
The nut may need a bit of work apart from truss rod adjustments.
Lemon oil is probably the best to use on the fret board. It helps to clean gunk off as well as nourish the fretboard which is probably rosewood.
12 string guitars do not have pairs strung to the same pitch. Only top E and B are tuned the same, the other four are tuned one octave apart so regular strings are not usable
 
Given it has been sitting for a while it might be worth getting a guitar tech to do a full setup.
The nut may need a bit of work apart from truss rod adjustments.
Lemon oil is probably the best to use on the fret board. It helps to clean gunk off as well as nourish the fretboard which is probably rosewood.
12 string guitars do not have pairs strung to the same pitch. Only top E and B are tuned the same, the other four are tuned one octave apart so regular strings are not usable

thanks for your time, although it might require a guitar tech to reclaim the guitar fully i do feel confident that i am able to get close by myself since i've had 2 electric builds so far
i couldnt get ahold of lemon oil so i used the linseed, the fretboard was extremely dry and is still soaking up the oil
i also spent some time to freshen up the frets, removing small nicks and polishing with a leather strop


can i oil inside the guitar aswell? and what if any information can get from the serial number?
 
Last edited:
current state of the fretboard, still thirsty ;D


I also disassembled all the tuners, perhaps some very light oil ought to do them well?


This might be a problem tho, i did a dry-fit with a new 42 gauge string, the action is absolutely far too high, will my truss rod really remedy this?
 
Last edited:
I would not oil the inside of an acoustic. That would cause the wood to swell and a whole new range of problems. Best to leave the inside alone.
The neck appears to have a bit of a bow. I have put together 9 solid bodies, number 10 is waiting in its box. Electric necks are easy to take off and replace. Acoustic necks are not.
12 strings have a lot of tension with 12 strings pulling on them. I would be inclined to get a tech to look at it as the nut probably needs some work on it as well. If you attempt to adjust the truss rod, do it in small increments withe strings very loose and tighten them again after each small increment then loosen again etc.
 
It's very hard to say whether the guitar can be made playable without having it in one's own hands.

First off I'd say go easy on the boiled linseed oil. Yes, a lot of people do use it for oiling fretboards, but for them, it's a case of wiping it on, leaving it for a few seconds and then wiping off the excess. Boiled linseed oil makes up a large proportion of TruOil, and is a glossy wood finish in its own right. Put too much on and you'll end up with a lacquered fingerboard. I'd stop putting it on now.

Alternatives are lemon oil or mineral oil (chopping board oil). These are proper oils, and just stop the fretboard from drying out.

I'd have scraped the fretboard first with a single sided razor blade. This is very good for removing the worst of fingerboard gunk and smoothing out the board.

The serial number says it was made in January 1991 at the FujiGen Gakki factory, Japan.

I've just repaired an 80's Yamaha 12-string that also had a very high action, and got it to be a really low action and easy playing guitar. It took a bit of work but the basic guitar sound.

Two things generally happen on 12-strings over time.

1) The top 'bellies' up, so instead of having the top almost flat as when originally built, there is now a pronounced arch to it and the bridge now sits 2-3mm higher than it should do. The bridge may also be angling forwards.

2) The internal neck block is squashed over time under the string tension, so the neck angle changes and the neck points down towards the body instead of at the bridge.

And of course you can get a combination of 1 and 2.

The Yamaha 12-string's neck angle was fine, but the top was bellying a bit and the saddle was high off the top.

I cured the bellying by fitting a JLD Bridge Doctor (screw-mount version). This works remarkably well at keeping the top flat. But the pin-mount version may be better if you haven't got enough space behind the bridge pins to drill a mounting hole. It all depends on the bridge design, though I think you could just about do it on the Ibanez.

The bridge block was quite chunky, but the saddle was only poking out of the slot by 2mm, so there was no way to simply lower the saddle itself without having zero break angle for the strings. So I took about 2mm off the height of the bridge block (known as a 'bridge shave') so I could take off 2mm from the bottom of the saddle.

I just taped up around the bridge, marked on how much I wanted to take off and then used an electric sander to remove the wood (other methods to do this are available, though I found it very controllable). Then some hand sanding with finer grits to get it level and smooth, and in this case painting it black as before, though you can just finish with linseed oil or lemon/mineral oil.

The limiting factor to doing this is the depth of the existing saddle slot. You'll want at least 50% of the saddle sitting in the slot, and it can't be too shallow or the saddle will angle-over regardless. I was lucky in that the 12-string was an electro-acoustic, and had a really tall piezo element in a metal enclosure sitting under it. I swapped this for a much lower profile piezo element, which gave me my extra slot depth.

If the slot isn't that deep to start with, then you'll have to rout it deeper, which required a very good routing jig and using a Dremel as a router rather than a standard router as you'll need a very thin router bit and a small router footprint. Lots of YouTube videos on this, but start with StewMac. But you don't want to go any lower than just above the top of top itself, so measuring with callipers is important here to work out just how far you can go.

My first attempt to make up a jig ended up with a very wonky line in my template, so I gave up and used the lower piezo element trick (as well as removing a few plastic packing pieces in the slot).

But if the neck is pointing down below the bridge, it is really a lot of hard work to remedy and the neck needs to come off and be reset (with probably some extra strengthening of the neck block). So before doing anything else, you need to use a notched straight edge and the truss rod to get the neck flat, then run a straight edge along the neck to see where it hits the bridge (a 600mm steel rule is ideal for this as you don't need to remove the nut as you would with a 1m rule).

From your pictures, it looks like the last few frets slope down a bit, so ignore those (as they are beyond the neck join so pretty much unplayable), and get the main part of the fretboard level.

Note that a neck reset is a luthier job (not something I'd like to attempt), will take a fair amount of time, and time is money. So it's almost certainly going to cost more than the guitar is currently worth in that condition, and probably as much as it is worth when fixed.

If it looks like the top has bellied, you need to be able to envisage where the top of the saddle would sit if you made the mitigating measures described above and you were able to lower the saddle height. If it's still hitting below the top of the 'virtual' saddle, then you are never going to get a good action over all the neck and its always going to be hard to play. Probably best to either walk away from it or set it up using the truss rod and cutting the nut slots, so that its playable up to say the 5th fret, even if this means setting it up with some back-bow.

If it's hitting level with the top of the virtual saddle, then all is good and you won't need to lower the saddle by so much, and probably just the Bridge Doctor will do it, as well as some truss rod adjustment and cutting the nut slots.

If you are unsure about the above, take some more photos from the side showing the top and any bulge (which will be far less with no strings on) and where a straight-edge hits the bridge after the neck is straightened.

And finally, yes, you need a proper acoustic 12-string set of strings, not electric guitar strings. 10s are normally the lowest gauge strings they do for 12-strings and I'd get those, to minimise string tension.
 
It's very hard to say whether the guitar can be made playable without having it in one's own hands.

First off I'd say go easy on the boiled linseed oil. Yes, a lot of people do use it for oiling fretboards, but for them, it's a case of wiping it on, leaving it for a few seconds and then wiping off the excess. Boiled linseed oil makes up a large proportion of TruOil, and is a glossy wood finish in its own right. Put too much on and you'll end up with a lacquered fingerboard. I'd stop putting it on now.

Alternatives are lemon oil or mineral oil (chopping board oil). These are proper oils, and just stop the fretboard from drying out.

I'd have scraped the fretboard first with a single sided razor blade. This is very good for removing the worst of fingerboard gunk and smoothing out the board.

The serial number says it was made in January 1991 at the FujiGen Gakki factory, Japan.

I've just repaired an 80's Yamaha 12-string that also had a very high action, and got it to be a really low action and easy playing guitar. It took a bit of work but the basic guitar sound.

Two things generally happen on 12-strings over time.

1) The top 'bellies' up, so instead of having the top almost flat as when originally built, there is now a pronounced arch to it and the bridge now sits 2-3mm higher than it should do. The bridge may also be angling forwards.

2) The internal neck block is squashed over time under the string tension, so the neck angle changes and the neck points down towards the body instead of at the bridge.

And of course you can get a combination of 1 and 2.

The Yamaha 12-string's neck angle was fine, but the top was bellying a bit and the saddle was high off the top.

I cured the bellying by fitting a JLD Bridge Doctor (screw-mount version). This works remarkably well at keeping the top flat. But the pin-mount version may be better if you haven't got enough space behind the bridge pins to drill a mounting hole. It all depends on the bridge design, though I think you could just about do it on the Ibanez.

The bridge block was quite chunky, but the saddle was only poking out of the slot by 2mm, so there was no way to simply lower the saddle itself without having zero break angle for the strings. So I took about 2mm off the height of the bridge block (known as a 'bridge shave') so I could take off 2mm from the bottom of the saddle.

I just taped up around the bridge, marked on how much I wanted to take off and then used an electric sander to remove the wood (other methods to do this are available, though I found it very controllable). Then some hand sanding with finer grits to get it level and smooth, and in this case painting it black as before, though you can just finish with linseed oil or lemon/mineral oil.

The limiting factor to doing this is the depth of the existing saddle slot. You'll want at least 50% of the saddle sitting in the slot, and it can't be too shallow or the saddle will angle-over regardless. I was lucky in that the 12-string was an electro-acoustic, and had a really tall piezo element in a metal enclosure sitting under it. I swapped this for a much lower profile piezo element, which gave me my extra slot depth.

If the slot isn't that deep to start with, then you'll have to rout it deeper, which required a very good routing jig and using a Dremel as a router rather than a standard router as you'll need a very thin router bit and a small router footprint. Lots of YouTube videos on this, but start with StewMac. But you don't want to go any lower than just above the top of top itself, so measuring with callipers is important here to work out just how far you can go.

My first attempt to make up a jig ended up with a very wonky line in my template, so I gave up and used the lower piezo element trick (as well as removing a few plastic packing pieces in the slot).

But if the neck is pointing down below the bridge, it is really a lot of hard work to remedy and the neck needs to come off and be reset (with probably some extra strengthening of the neck block). So before doing anything else, you need to use a notched straight edge and the truss rod to get the neck flat, then run a straight edge along the neck to see where it hits the bridge (a 600mm steel rule is ideal for this as you don't need to remove the nut as you would with a 1m rule).

From your pictures, it looks like the last few frets slope down a bit, so ignore those (as they are beyond the neck join so pretty much unplayable), and get the main part of the fretboard level.

Note that a neck reset is a luthier job (not something I'd like to attempt), will take a fair amount of time, and time is money. So it's almost certainly going to cost more than the guitar is currently worth in that condition, and probably as much as it is worth when fixed.

If it looks like the top has bellied, you need to be able to envisage where the top of the saddle would sit if you made the mitigating measures described above and you were able to lower the saddle height. If it's still hitting below the top of the 'virtual' saddle, then you are never going to get a good action over all the neck and its always going to be hard to play. Probably best to either walk away from it or set it up using the truss rod and cutting the nut slots, so that its playable up to say the 5th fret, even if this means setting it up with some back-bow.

If it's hitting level with the top of the virtual saddle, then all is good and you won't need to lower the saddle by so much, and probably just the Bridge Doctor will do it, as well as some truss rod adjustment and cutting the nut slots.

If you are unsure about the above, take some more photos from the side showing the top and any bulge (which will be far less with no strings on) and where a straight-edge hits the bridge after the neck is straightened.

And finally, yes, you need a proper acoustic 12-string set of strings, not electric guitar strings. 10s are normally the lowest gauge strings they do for 12-strings and I'd get those, to minimise string tension.

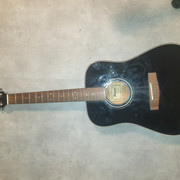
Thanks a lot simon for your input, very informative - i can respond to you with a little video where you can see a lot more, furthermore i have been sanding the neck to add some character to it, i've been intentionally wet sanding at the later grits, all the while working the truss rod nut a couple of degrees now and then - the neck has certainly moved the right way without any creaking noises and i cant see any obvious fatigue of the wood

Its difficult to see in the video as i dont have the right tools at hand, but the action is within a reasonable height if you consider the adjustment possibilities at the bridge


dont mind the partly sanded neck, im experimenting with a weathered look ;D
 
Last edited:
I sanded down the tailpiece a lot today, i also cut away the bottom in the bridge slot to give more room for adjustment
Here you can see i placed a straight edge over the entire guitar, the straight edge rested on the nut in front and almost touched the last fret before resting on the back end of the tailpiece

The truss rod is not engaged


Also since i removed so much material from the original tailpiece i made this from a piece of ash, to mount from within the guitar

I know its thick (9mm) but is it way too thick to use under the tailpiece?
 
Test fitting some strings, dont mind the nuts and bolts, its just to hold the support piece in place


I can deepen the peg holes to get a bit more of a string angle, the two strings you see are tuned up and the action is very low, that'll be a different story with 10 more strings tuned in place - but i think i have a solution to mitigate the bulging of the top (not the JLD Bridge Doctor as Simon Barden greatly suggested, but it gave me an idea, i will do a mock-up and see what you think
 
You want the flat edge to just rest on the neck,/frets, not touching the nut at all. You may now have taken too much height off the bridge, though if the string tension lifts the top up, then things may balance out.

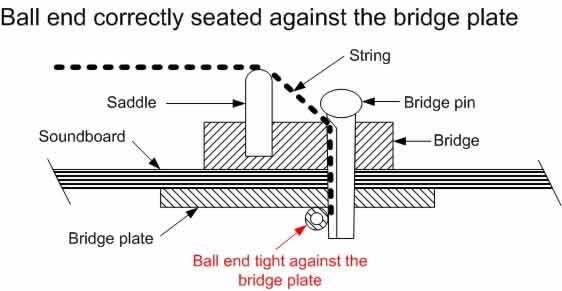
9mm is probably far too thick if you are sticking the block under the bridge on the inside of the guitar. Think about how the strings are actually held in place by the bridge pins. The bridge pin pushes the ball end forwards, so that it is half-resting on the underside of the top. It's this that keeps the string in place, not friction from the bridge pin.

Bridge Pins.jpg

So you don't want the depth from the top of the saddle to the bottom of any bridge plate underneath the saddle to be too deep, otherwise the bridge pin won't be long enough to push the ball end forward and the string will keep pulling out. You ideally want that overall depth to be about the length of the twisted section of the string above the ball-end, so roughly 15mm. A bit deeper is OK, but probably no more than 20mm as you want the bridge pin to extend beyond the ball end.

You don't want it too shallow either, as you don't want the thick twisted end of the string to extend above the top of the bridge as it won't bend easily and so (especially on the wound strings) you'll end up with a much shallower break angle over the saddle. So 14-15mm is probably the shallowest overall depth you want.

You should be able to stick something through the hole and mark up on each end where it emerges to see what depth you currently have, and work out what the thickest base plate you can use is.

You can certainly make your own Bridge Doctor style support, but note that you really do need the ability to adjust the length under stress of the post running to the rear block, rather than having a fixed length that just rest against the back (which may also cause buzzing if the top lifts and pulls that post away from the block slightly).

It's the ability to screw in the thread that presses on the rear post that makes the Bridge Doctor work, so anything you do needs to have that ability, and you need to be able to adjust that from the sound hole.
 
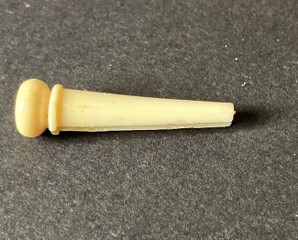
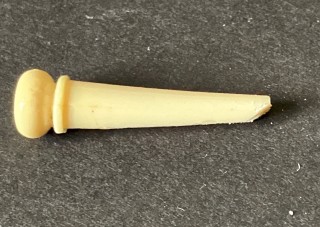
It's also a good idea to sand an angle onto the forward facing end of the bridge pins. This stops the ball-ends being caught so that they sit on the bottom of the bridge pin and not against the top. This either results in the bridge pin being pulled up by the string when you start tensioning the string, or the string slipping as it gets pulled off the end of the bridge pin once there is some tension applied.

The angle pushes the ball end forwards as it's inserted, so ensures it starts in the right position.

It takes seconds to do with a piece of sandpaper on a flat surface.

Before:
PLCORs.jpg


After:
A9n75P.jpg
 
Thanks a lot simon for your constant useful inputs - i did have some suspicions about the pegs that the added thickness would give me problems, i havent finalized the install of anything yet, so there is still time to either reduce its entire thickness or use drillbit to increase the depth of the holes

Note ; Since i did remove a lot of material from the top of the tailpiece- the pins have dropped 6-7mm and i will be adding 10mm of total thickness, so it is more of a fine tuning

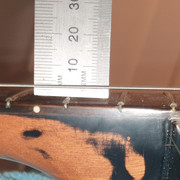
And yes it was poor placement of the straight edge but when i did string up two strings and they both held good action, so 10 more will certainly increase the action, here is a picture of when i test mounted low and high E and tuned them up


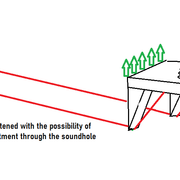
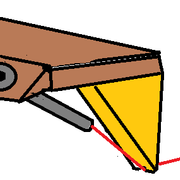
Oh yeah about the stewmac hardware, i loved the concept but i really want to do my own thing in that case, just want to get a heads up here if it appears reasonable, its a sketch and only displays what hardware it will interact with, so imagine it inside of the hollow

Those triangles mounted to the plate is just to move the point of rotation further away from the base and give more leverage
I hope it makes sense, to me it would be reasonable that you can mitigate most of the torque caused by the strings and thus put a stop to the bulging of the top, btw reckon steel wires under tension within the sound chamber of a guitar will affect it a lot?

What do you think? Is my plan waay over the top or am i gonna have greater success with the guitars stability in the future and not having to worry about string gauge and half steps up etc? and since its running 12 strings i reckon the problem is liable to reappear if not done right
 
Last edited:
For me, that would still be a high action, though I expect it might come down a bit with lower nut slots.

If the top stays as it is but just the neck bends, then that should be able to be straightened out by the truss rod. If the top is pulling up, then you need to do something to stop that.

Your idea is certainly working along the right lines, though I'm not quite sure just how you could tension the wires. I think the tips of your triangles, if made of wood, are going to be fairly weak and may be prone to breaking.

You may be able to rig up a Strat-style trem claw arrangement, with the wire attached to the claw and you can screw that into the neck black and adjust the tension via the screw, but even so, the practical access for screwdrivers and drills in the soundhole isn't easy. Looks OK in theory, but you can't grip things well once they are inside the guitar.

There is also the distinct possibility that the tension wires will vibrate and be audible when you play.

What about making a Bridge Doctor type wood block, but with a metal threaded insert and use a length of say M6 threaded rod (instead of the plastic rod and metal screw)? You could either slot the soundhole end of the rod so you can screw it against the rear block, or maybe glue/solder/weld a nut on the rod, so you can turn it with a spanner/socket wrench.
 
When i took the picture displaying action height, the bridge was set 3mm too high, not much but i need all i can get :D

Yes the triangles are made out of maple and my intentions are to cover the tips with some thin copper sheet

And yes you are right about the method of how to go about adding tension to the wires through the soundhole especially with 12 strings in the way, will be difficult, if i dont come up with a really elegant solution (because i am stubborn and its a fun learning process)

If all my plans fail ill take your advice on making a bridge doctor style block instead =)
 
I'm no expert on this, I'm only making (what I think are reasonable) suggestions, so please go ahead and do what you think reasonable.

I'd just suggest having a bit of a flat top to the triangles instead of the thin point.

You could always look at it that if you fail, you haven't lost anything. If you get it to work, you have a playable 12-string.

You should only have to set the tensioning up once. You can always slacken the strings off to get tools in the soundhole. I often put tape round the strings or use a capo up by the nut to keep the strings on the tuners and then slacken the strings off so I can remove the saddle to work on the height.
 
I'd also note that the bridge doctor has a screw at the back of the bridge to hold the block in place. That might be an idea, as it could be hard to hold the rear of your under-top block on firmly enough with glue as its not in the easiest position to clamp firmly and the action of the wire tension is to pull the rear away from the top.

I have some bridge clamps which would certainly do the job, but if you haven't already got any, they aren't that cheap unless you get them from China - and then you have a long wait for delivery.
 
Good points Simon and it got me thinking, if the 'underblock' was to fail due to the pulling forces you are referring to, thats a disaster.
It made me rethink my plans, to this

(Drawing not fully accurate, that little angled piece to the left should really be 10mm higher, visible, on the guitar top right behind the tailpiece)

I make a suitable piece out of walnut or maple, to fit nicely against the existing tailpiece, with a 45 degree back face on which i drill all the way through the body of the guitar and backplate, i will end up quite nicely in line with the "sharp triangles" on the backplate

I can then use some m6 machine screws with internal hex heads to run through and connect to the wire
I realise as it is drawn in the picture the wire is gonna spin with the bolt, but i have a plan to fix that


And the main point is of course to be able to adjust the tension without anything in the way!
Also to reduce much of the strain on the 'pulling' side of the backplate
 
Last edited:
I wonder if a curved - semi-circular or semi-elliptical (or at least with a rounded low point) - pivot block wouldn't be a more durable implementation of the idea ...

Peter
 
Last edited:
Update!

I made a support bracket out of maple to mount behind the bridge in order to counteract the belly-ing


I drilled through the soundboard and also found two copper ferrules that happened to fit perfectly
I stained the maple but i think it went way too dark, gotta do some sanding


This is how its gonna end up looking, the tension wire is going to loop around the support bracket and be visible but recessed into the maple

The dirty and scratched top is very distracting, any tips to get it looking a little better?
 
Back
Top