Best way to conceal wood filler after staining

ThatCluelessGerman

Active member
Hey folks,

is there a better way than sharpies to even out/conceal spots that have been filled or glued?

I stained this with Minwax oil based stain (which is very nice imho), but the spots where the body/neck heel has been glued together sticks out like a sore thumb even though I've been sanding these a dozen times. Also, there were a few scratches that I filled, as well as the rough cut neck pocket. The filler does take stain but it turns very bright red and also doesn't match at all.

I have a box of felt pens that I can try, but if there is any smarter way, I'd be grateful for advice.
I thought maybe mixing wipe on poly with a bit of stain and apply on these spots? Or any better ideas?
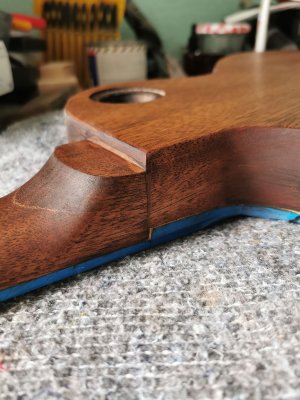
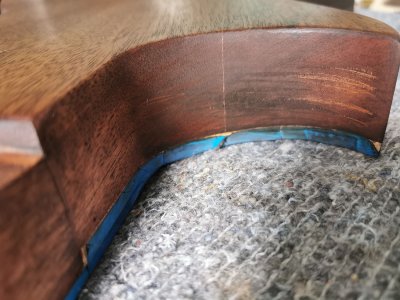
IMG_20200723_151334.jpg

IMG_20200723_151623.jpg

Thank you and kind regards! :-)
 
I've got some 'wood repair' spirit-based marker pens for furniture that I've used in situations like this, though as they are thick pens I do try and use a similar colour Sharpie first. But its never easy. As the filler is light, the lightness will always show through unless you can darken the filler first. Which is why stained poly isn't going to help much as you'll get a darker main wood colour but still with lighter areas where the filler is.

I have also used artist acrylic paints to try and mix up a suitable colour and paint that on using a thin brush, then clear coat it for protection once its dried. But, it's not easy guessing quite what shade the paint will be once dried even though it matches when wet. I generally use this method for neck joints if I need to fill gaps there, rather on exposed areas, but I have done so in the past.

Otherwise you just have to go a lot, lot darker in body shade, in the hope the filler will eventually get hidden.
 
I've had decent luck mixing stain into sawdust then glue it into the gaps. This was all done pre-stain however and I've never tried it on a finished piece.
 
I found a felt pen that matches very well, but I guess it is water based. Have wiped a layer of Minwax over it and it didn't budge, so I have hopes of sealing it with wipe on poly tomorrow. It will not be invisible but hopefully much less obvious than now. The inside of the horn got a lot darker with the second coat of stain, tho. Hope it's not too distracting, let's see when it's dry tomorrow.

Sidewinder, what kind of glue did you use? I actually planned on doing exactly this and even saved some sawdust, but I didn't know about how the glue would take the stain. After spending so much time actually removing glue stains on this guitar, I didn't want to mess it up again with some fresh glue that doesn't take the stain... Which is funny, because actually that's just what happened with the wood filler... Ironic...
 
I used thin CA and used wax paper to force it into the gaps with my fingers before hitting it with activator. I had to wait until the stain / sawdust mix was completely dry first or it was a mess.

Again this was always pre-finish and I had a chance to sand it back so I was essentially making a color matched powered wood filler. I used this technique a lot on tables, bookshelves, entertainment centers, etc., where I had large straight grained joints.
 
Okay, cool! Not sure if totally can follow, because when I made fillings with CA and copper powder, it became a hard mass, like epoxy, would the wood dust not also be enclosed in the CA? Or did you make sure to have a layer of dust on top that then took the stain?
 
I put the CA in the gap then cram in the sawdust. If you mix them first it becomes a rock. I use wax paper to keep my finger from getting messy.
 
Back
Top