
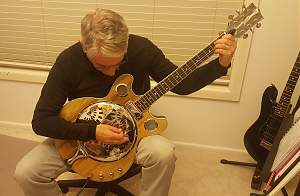
Just received the kit, here we go!


Just received the kit, here we go!

Hi Trev and welcome to the forum.
I think there have been 3 of that kit built or still under construction and best to check them out with it being a fairly new and unique addition. You will find them under My Build Diary.... here is a link... http://www.buildyourownguitar.com.au...splay.php?f=56
Cheers, Waz
# 1 - EX-5 https://goo.gl/fQJMqh
# 2 - EX-1 https://goo.gl/KSY9W9
# 3 - Non PBG Tele https://goo.gl/W14G5g
# 4 - Non PBG J Bass https://goo.gl/FbBaFy
# 5 - TL-1AR GOTM Aug 2017 https://goo.gl/sUh14s
# 6 - MMB-4 Runner-up GOTM Oct 2018https://goo.gl/gvrPkp
# 7 - ES-1 Runner-up GOTM Aug 2018https://goo.gl/T9BEY8

Welcome and congratulations on taking a resonator on.
A couple things to look out for are fitting the mini-humbucker under the neck, I had to remove timber. Also had to cut the bottom of body out to give clearance for the cone. Also drilling all holes for wiring was another thing not done that normally is expected. My cone hole was not central to the neck, had to mount bridge off centre. Silly little things that are easy to correct as long as you don't rush it.

good luck with the build, I don't think I have the nerves to attempt to build that one, love the look of them though
Hi Waz, thanks for getting in touch. Will be picking your brains with this one for sure! Luckily I have built a few Teles, a Strat, an SG, and an LP Junior is in progress, all from scratch no kits. would not tackle this one as a first up. Did a quick mock-up last night and it looks like the bridge may be too low, the cone seems ok but the neck pickup will be tight, the wood provided for the bridge is a bit iffy, and the face of the guitar has quite a few very low spots where the grain goes a bit funny. This bit is disappointing as there will be a heap of sanding to get it out or it needs to be filled which will mean a solid colour and not the cherry I was thinking about. Oh well, will see.Originally Posted by wazkelly

The piezo pickup seems a bit weird. Has a jack fitting on the cable but nothing to plug into and I'm not really sure where to place it. Where did you put yours?
Cheers, Trev.
Thanks Hard, looks like its going to be a tricky one but hopefully worth it. Cheers, Trev.
Corksniffer, Frankenwashie & Singing Frog are the only forum members I am aware of who have either built or made a start on one of these resonator kits.
As a humble observer the Resonator kit would appear to have a few common challenges that either one of those 3 forum members have encountered.
Corksniffer posted above and maybe there is a link on his signature to the build diary?
Sent from my SM-A520F using Tapatalk
# 1 - EX-5 https://goo.gl/fQJMqh
# 2 - EX-1 https://goo.gl/KSY9W9
# 3 - Non PBG Tele https://goo.gl/W14G5g
# 4 - Non PBG J Bass https://goo.gl/FbBaFy
# 5 - TL-1AR GOTM Aug 2017 https://goo.gl/sUh14s
# 6 - MMB-4 Runner-up GOTM Oct 2018https://goo.gl/gvrPkp
# 7 - ES-1 Runner-up GOTM Aug 2018https://goo.gl/T9BEY8
Thanks, looks like there are similar things with this one too. The neck pickup will be tight but it looks like the cone etc will be ok. Quick look last night shows that the bridge looks like it is going to be a bit low and the piece of wood supplied is a bit ragged. How did you go with the piezo? Not sure where it goes and it has a connector but nothing to connect to. The kit seems basically ok but overall not really well thought out, maybe bits added as they went along. Timber front has lots of deep grain imperfections which will need lots of careful sanding out but filling if too deep and there goes a nice stain / clear finish. Stay tuned!. Cheers, Trev.
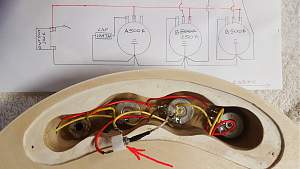
I drilled a hole through the spider (red arrow) to allow the piezo to sit correctly. Purchased an inexpensive female jack to accept the supplied piezo connector and plugged it in within the pot cavity. Did the same for the humbucker but plugs together under the cone. I can now upgrade the piezo and humbucker without soldering. A friend planned this wiring and it works well. I upgraded my pots and made new all new wire.
EDIT. The piezo sits under the bridge, string pressure onto the wooden bridge transfers vibration into the piezo. Hope this helps.
2nd EDIT. This may help.
http://www.buildyourownguitar.com.au...ead.php?t=8512
http://www.buildyourownguitar.com.au...ead.php?t=8487
http://www.buildyourownguitar.com.au...t=singing+frog
Piezo connection.
Last edited by cork sniffer; 03-07-2018 at 12:16 PM.
Ahah she said! Thanks heaps, makes a whole lot of sense now. I was thinking along those lines but (silly me probably) thought that it might be a bit more clear in the kit! Since starting the thread I found a few references to line pre-amps being used with these pickups and guess that is the idea of the plug. I like your solution, very neat and well thought out. Thanks also for the wiring diagram. Found a few suggestions where either two vol pots used or one vol and and a blend pot. Decisions decisions! Cheers, Trev.
 Posting Permissions

 Reply With Quote