Results 1 to 7 of 7

Thread: My first LP 1M

  1. #1
    Member
    Join Date
    May 2016
    Location
    Perth
    Posts
    44

    My first LP 1M

    Hi guys!

    I have already develop some GAS and bought a second kit while I wait for the clear coat on my first kit to cure.
    I pick a LP 1M and I am trying to stain it in red whit DT.

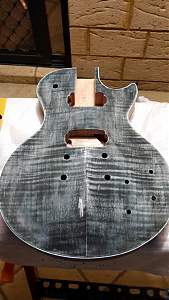
    I've just finished to apply the black ink on the top to pop up the flames. Is it ok or should I sand it more? What about that shiny spot in the middle of the guitar?
    I've sanded it down whit 320 grid but I didn't sand it too much because I was scared to go trough the thin cap.

    I've got also some spot of glue (I guess) on the edges of the body. The spots look like to be deep into the wood...
    Click image for larger version. 

Name:	IMG-20160620-WA0013.jpg 
Views:	164 
Size:	141.1 KB 
ID:	12088

  2. #2
    GAStronomist wokkaboy's Avatar
    Join Date
    Dec 2012
    Location
    Perth WA
    Posts
    13,555
    Hi Ganna. Looking good but you need to sand more black ink so only the flames are popping. I'd try some goof off to try and remove the glue. Then a light 320 grit and apply the stain
    Current Builds and status
    scratch end grain pine tele - first clear coat on !
    JBA-4 - assembled - final tweaks
    Telemonster double scale tele - finish tobacco burst on body and sand neck

    Completed builds
    scratch oak.rose gum Jazzmaster - assembled needs setup
    MK-2 Mosrite - assembled - play in
    Ash tele with Baritone neck - neck pup wiring tweaks and play in

  3. #3
    Member
    Join Date
    May 2016
    Location
    Perth
    Posts
    44
    Hi wokka! So I need to go on sanding the top with the 320? How I know if I sand too much thru the cap?
    I post a picture of the glue spot.
    Thank you very much as always!Click image for larger version. 

Name:	side.jpg 
Views:	157 
Size:	149.9 KB 
ID:	12109

  4. #4
    GAStronomist wokkaboy's Avatar
    Join Date
    Dec 2012
    Location
    Perth WA
    Posts
    13,555
    Hi Ganna if you didn't do any pre sanding before the black ink you should be ok. Concentrate on removing the glue marks first. Then a light sand of 320. Just need to remove a bit more black ink
    Current Builds and status
    scratch end grain pine tele - first clear coat on !
    JBA-4 - assembled - final tweaks
    Telemonster double scale tele - finish tobacco burst on body and sand neck

    Completed builds
    scratch oak.rose gum Jazzmaster - assembled needs setup
    MK-2 Mosrite - assembled - play in
    Ash tele with Baritone neck - neck pup wiring tweaks and play in

  5. #5
    Member
    Join Date
    May 2016
    Location
    Perth
    Posts
    44
    ok Wokka. Thanks!

  6. #6
    GAStronomist wazkelly's Avatar
    Join Date
    Aug 2015
    Location
    Caloundra West, Sunshine Coast Qld
    Posts
    6,631
    Hi Ganna, if you used just ink try wiping a damp but not too wet rag over the top to soak up and take out as much of the black as possible. This will save having to sand the top and reduce risk of sanding through the thin cap. May need to do this a few times but if you wet it too much the thin veneer may bubble or do other crazy things, so easy does it over a few days until you get it where you want things to be.

  7. #7
    Member
    Join Date
    May 2016
    Location
    Perth
    Posts
    44
    OK guys, I've stained the guitar in red and I like the way it looks, the only problem is the crack that I have at the back of the guitar. I used grain filler before staining ad it feels smooth but it is still visible. Any suggestion on how to fix it?
    Click image for larger version. 

Name:	cr1.jpg 
Views:	156 
Size:	356.5 KB 
ID:	12172
    Click image for larger version. 

Name:	crbig.jpg 
Views:	165 
Size:	417.9 KB 
ID:	12173
    Last edited by ganna19; 23-06-2016 at 07:31 PM.

Posting Permissions

  • You may not post new threads
  • You may not post replies
  • You may not post attachments
  • You may not edit your posts
  •