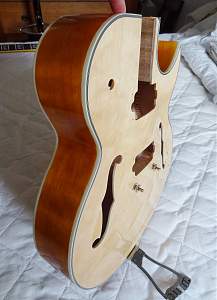
Just a tease shot I couldn't resist posting. 1st neck check since doing the finish.
More words and photos on the weekend.
Just a tease shot I couldn't resist posting. 1st neck check since doing the finish.
More words and photos on the weekend.
Last edited by enikoy; 07-04-2016 at 10:56 PM.
Hi Enikoy welcome to the forum, that ES-3 looks very cool. Please tell us more about the stains/colours
Current Builds and status
scratch end grain pine tele - first clear coat on !
JBA-4 - assembled - final tweaks
Telemonster double scale tele - finish tobacco burst on body and sand neck
Completed builds
scratch oak.rose gum Jazzmaster - assembled needs setup
MK-2 Mosrite - assembled - play in
Ash tele with Baritone neck - neck pup wiring tweaks and play in
I have a treasured 1975 ES-335 that I have had for many years, I also have two young kids. I wouldn't want the 335 and the kids to interact in an unpleasant way, so a few years ago I bought a used Yamaha Pacifica from Crime Convertors for $150. Incredible value for such a nice playing guitar and I can afford to not be precious with it. It lives on a stand for easy access, for me ….and the kids.
Really had an inkling for semi/hollow body to put on that stand, but these sort of guitars aren’t as plentiful or cheap as Strat/SG/LPjr clones at Cashies. So here we are, building a Gibson ES-175ish ES-3 kit.
Looking to fill the gap between these two.

I’ve done so much Googling on DIY guitar building that my head was in a spin. So I though I would jump in and start. Mistakes along the way would be educational and hopefully make me see why some people hold opinions on build schedules, finishes and hardware upgrades.
Please don’t hold back on the comments if you think I could have done something better or done something really stupid. I’m thick skinned and we can all learn
So far:
Got the kit
- Just spent some looking at it and thinking about how to go about things.
- Did a test assembly of the body and neck. Everything seemed to be where it should be, scale length correct to the pre-drilled bridge mounts. Neck angle provided a satisfactory action. The neck did have a bit of a back bow, so I released the truss road and is more or less flat now. Waiting to see what happens when it get some string tension on it.
- I did buy some “Vintage Amber ColorTone” stain from DIY Guitars, but this was just too yellow on my tests. After testing some browner stuff my Dad had, I raided Bunnings finally settled on Feast & Watson spirit stain “Golden Teak”.
Weekend 1
- Shape the headstock. Nothing ambitious for fear of stuffing it. Imagine a Gibson top simplified down to one drill hole, two saw cuts and some sanding. Simple and neat, and a huge change from the blank look.
- Sanded down the neck and stained it directly with Feast & Watson spirit stain “Golden Teak”. This highlighted some grain cut nasties that I didn’t spot when I wiped the timber down with metho to check for blemishes. Only one small glue spot on the heel of the neck.
Weekend 2
- Sanded down the body through the grades 120/180/240/320.
- After some research decided to use a sanding sealer to fill the grain, easy first sand and provide a more stable base for the stain to be applied to.
- Applied the stain, turned out perfect in the sides, the rear was good but some light cuts to grain across the body still showed up. Glad I used the sealer first, but based on the this I decided to not stain the front and leave it natural.
Weekend 3
- Applied coats 1 & 2 of the top coat. Probably controversial, but I used a Cabbots Poly-urethane rattle can. Very happy with the result.
Weekend 4
- Lightly sanded back the top coat to smooth things out. A few dust flecks and some grain was still sucking up the lacquer more than the rest.
- Unfortunately I hit the stain in one raised up spot, affecting the darkness of the tint. Re-applied the stain carefully and mostly rescued it. Only I’m going to spot this
- Applied coats 3 & 4 of the top coat. So glossy, I’m still thinking that satin might have been better.
- After a few days drying the coat appears mainly flat with only a few grain dips/pocks. After much consideration I decided to go with as is. I can live with it, other people think it’s awesome, plus I don’t want to stuff up what’s there currently or weigh the timber down with more coats.

Last edited by enikoy; 10-04-2016 at 12:54 PM.
looking great, I like the natural top
Build 19 PSH-1 Kustom
Build 18 HB-4S Kustom
Build 17 WL-1 Kustom
Build 16 TL-1TB Kustom
Build 15 PBG-2-
Build 14 FTD-1
Build 13 RD-1 Kustom
Build 12 DM-1S
Build 11 MKA-2 -
Build 10 Basic strat
Build 9 JM Kustom
Build 8 FV-1G
Build 7 ES-2V
Build 6- Community prototype
Build 5 LP-1LQ
Build 4 ES-5V
Build 3 JR-1
Build 2 GD-1
Build 1 TLA-1
OK neck now glued in place.
What is the general consensus on glue curing time before stringing up to concert pitch?
I've used Titebond II, about 2.5 days since set, clamped for the first 12 hours, ambient temperature around 23C.
That is looking GLORIOUS in its simplicity Enikoy. Look forward to some shots of body and neck united!
COOL....I bought 'Golden Teak" stain as well, haven't tried it yet..... thanks for showing what it looks like