Page 1 of 2 1 2 LastLast
Results 1 to 10 of 20

Thread: VP4 - 2nd build

  1. #1

    VP4 - 2nd build

    Hi. A little behind on posting, work and such has been a little over the top. But had a minute so I thought I'd post some of the progress. My dad got me a VP-4 for my birthday. He's PapaKen, built the ES-1GT in the Feb GOTM (which is a freaking SPECTACULAR guitar - I got to see and play it in person, I know pics don't do justice but it was phenomenal). We had been chatting and I was talking about wanting to start another project, and I love the big chrome pieces on the VP-4. So, for my bday, one showed up in the mail.

    Right out of the package, I was a little disappointed to be honest. The ground wire on the pots was literally hanging by a wire - it fell off as soon as I pulled the pick guard out. No biggy, I love soldering anyway. Then I did a dry fit - the neck and pocket have a very noticeable gap when dry fit. I couldn't get a good picture since it just looks like a shadow, but imagine if the pocket was cut so the sides were lower than the center or the neck was cut so the middle was thicker than the sides - there is a noticable gap on each side. No biggy, just some sanding and leveling. The pick guard... there is a huge gap at the end where the jack is. The guard comes to a point, and the routed hole actually widens. It can be moved to cover the hole, but then the neck cut out is waaaaay off. Even trimming up one side of the neck cavity part of the pick guard so it will fit around the neck and cover the routed hole isn't an option, because then the *other* side of the neck cutout on the guard is way off, and I can't *add* material. No biggy, I don't like that red in person and so the first thing I decided was I'm going to order a piece of pick guard material and make my own.

    Also, the chrome cover that goes over the pups, looks like one side will just mount to *only* the pickguard. Not sure if that is normal or not.

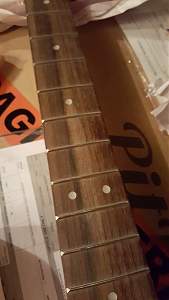
    The neck had some spots that were visibly softer, and easily dented with only moderate pressure and a fingernail... But who whould press on a neck with a fingernail... My plan was to use a superglue solution to help harden the soft spots so we'll see how that goes.

    Click image for larger version. 

Name:	20160311_222306.jpg 
Views:	257 
Size:	144.3 KB 
ID:	9700

    Click image for larger version. 

Name:	20160311_222300.jpg 
Views:	268 
Size:	162.8 KB 
ID:	9701

    Click image for larger version. 

Name:	20160311_231711.jpg 
Views:	267 
Size:	161.9 KB 
ID:	9702

    Click image for larger version. 

Name:	20160311_224301.jpg 
Views:	267 
Size:	163.6 KB 
ID:	9703

    Click image for larger version. 

Name:	20160311_230124.jpg 
Views:	277 
Size:	165.4 KB 
ID:	9704

  2. #2
    The next part was deciding on color and finish. My last build I used a lacquer finish just because I read that was a good and classic finish. After using the guitar for a while I decided that since the VP-4 is a solid wood (no cap) and I could sand the living hell out of it if I wanted to, I was going to go with a hand rubbed oil finish so the wood would look and feel like wood, not like wood encased in plastic. I decided I was going to go dark so the chrome would stand out and be the highlight. I was thinking about popping the grain with a black dye and then using a pickling to make the softer wood a lighter gray. So first step, a test with some black ink (to see how the grain reacts and raise it for the initial sanding). On the front there was a crazy solid line between two of the planks used in the body. One of the boards was super soft and soaked up like a sponge and the other.... didn't. There were a bunch of pretty severe glue spots too. The line I wasn't so concerned about since I could cover with pick guard. The glue spots... time for some sandpaper and elbow grease! Apparently I didn't get a good photo of the stain difference on the front, but that will be apparent soon....

    Click image for larger version. 

Name:	20160313_123351.jpg 
Views:	255 
Size:	101.6 KB 
ID:	9705

    Click image for larger version. 

Name:	20160313_123318.jpg 
Views:	270 
Size:	153.7 KB 
ID:	9706

  3. #3
    Overlord of Music Andy40's Avatar
    Join Date
    Oct 2015
    Posts
    3,913
    Good to see you back kenfu. Was a big fan of your LP-1SS and was going to ask if this one will be as shiny. Interesting what you said about the plasticy feel above. I was considering that for another build but may opt for another option because I don't like the plasticy feel.

    happy sanding!
    Build #1 - ST-1 - Completed
    Build #2 - LP-1SS - Completed
    Build #3 - TLA-1R - Completed
    Build #4 - SGD-612 - Completed
    Build #5 - ES-1G - Completed
    Build #6 - STA-1HT | Completed
    Build #7 - ST1JR - Completed
    Current Build #8 - JBA-4
    Build #9 - Semi-scratch build Tele x 2 - Completed
    Current Build #10 - PRS-1H
    Current Build #11 - AGJR-1 - Completed
    Current Build #12 - ATL-1SB
    Current Build #13 - GST-1
    Current Build #14 - FBM-1

  4. #4
    Hey andy. Thanks for the comment on the LP. The lacquer didn't protect as much as I thought (already a ding) and it feels ... not like wood. Not sure what I would have done differently with the cap though. Finish wise. If you want shiny, there really isn't much of an option other than a finish that makes a "case" over the wood, from my frankly amateur understanding. I've always used an oil rub for wood. So I thought I'd go back to that.

    Sorry for the delay, got a few things happening right now. thought I could get all the pics and the synopsis up, but best laid plans...

    Anyway, the sides of the body did exactly what I thought it would. Soak up everything (end grain). I was a bit surprised at the spot on the front that was so receptive to the wash. It was like end grain on the front. But like I said, I figured that was prime real estate to be covered by the pick guard (and the controls *have* to go in the guard there anyway, so no big deal).

    Insert here busting out the orbital sander to go from 50 - 320 grit. I should have taken some pics from those jet black to bare wood again. With the exception of that one spot on the front... Crazy. It was like it was made of sponge. After going to 320 with the power sander, I went back down to 150 up to 320 again with 3m Sandblaster Pro Ultra Flexible. I love this stuff. It is P grade and I wrap it around some cloth or sponge. If you haven't tried it, do. Since I was going for an oil hand-rubbed finish, I figured it wasn't going to be shiny so I wanted no sharp curves. Wrapping this stuff on a sponge gave me just what I wanted-any high point got sanded down, but only the high points. The high points pressed harder into the sponge, so they got more "sanding". Everything just equalized to the lowest common denominator and after a few days of working in the evening (one grit per day per beer) it was gloriously smooth.

    At this point, no pics since it was just sand, sand, when you think you are done, sand some more... Then the big time. Water based, to keep my options open, or oil based. I figure, go big or go home. I had some ebony oil stain from a different project. This was a pigment based oil stain so no "danish oil" or the like. I put on a bunch of wood conditioner since the grain was all over the place. I put on some stain, and after a bit of soul searching it went on the fingerboard too. I know, heresy. But I had a tiny piece of rosewood that did very well with a quick wipe on wipe off.... On the LP, the ink did awesome but it was uniformly black. And since the fretboard got lemon oil as a final coat and lemon oil would be a safe finish for this oil stain.... Why not? Let it ride.... Either awesome or experience. Both fine choices.

    After the stain, I sanded back the body and neck to try to "pop" the grain. I had in my brain a kind of "zebrawood" look. In reality, it looked like stained wood sanded back by a redneck in the basement. However, the grain had some great promise. So, one more round of stain, but this one was wipe on - wipe *immediately* off. Then, I did a little more on the sides, in the curves on the neck, and a little bit around the edges to soften the curves so it wouldn't have any sharp lines in contrast. And I wanted the edge to be black, and since it was end grain it complied gloriously. Note on the front the side that looks jet black. I thought I could maybe try to harden the grain, but whatever. Pickguard it is!

    Click image for larger version. 

Name:	20160322_101133.jpg 
Views:	256 
Size:	251.0 KB 
ID:	9716

    Click image for larger version. 

Name:	20160322_101112.jpg 
Views:	272 
Size:	226.9 KB 
ID:	9717

  5. #5
    ... after some more sanding and a scoth brite, a little more tweaking with some stain around the edges,the first and the second coat of tung oil (yes, real tung oil) it is kind of looking great. It feels like wood, it isn't shiny but a great satiny shine... Smooth as. Going to try to get a couple more rounds of soaking in tung oil before putting it on hiatus for a bit while I move. Figure a few weeks of curing while I move, and then design the pick guard and cut it out. Super stoked on how it is looking, pics just don't do it justice. Oil soaked wood has a look you just have to see to ... well, see it. And the fretboard... Couldn't be happier. The grain is crazy complex. This thing is going to be insane with the chrome on it!

    Click image for larger version. 

Name:	20160323_170053.jpg 
Views:	274 
Size:	170.3 KB 
ID:	9718

    Click image for larger version. 

Name:	20160323_165954.jpg 
Views:	263 
Size:	197.7 KB 
ID:	9719

    Click image for larger version. 

Name:	20160323_165757.jpg 
Views:	275 
Size:	245.2 KB 
ID:	9720

    Click image for larger version. 

Name:	20160323_165649.jpg 
Views:	263 
Size:	272.3 KB 
ID:	9721

  6. #6
    Banned
    Join Date
    Dec 2015
    Posts
    1,171
    Liking the colour mate

  7. #7
    GAStronomist wokkaboy's Avatar
    Join Date
    Dec 2012
    Location
    Perth WA
    Posts
    13,555
    hey Ken I agree with Tony like how this build is progressing. Keep up the good work
    Current Builds and status
    scratch end grain pine tele - first clear coat on !
    JBA-4 - assembled - final tweaks
    Telemonster double scale tele - finish tobacco burst on body and sand neck

    Completed builds
    scratch oak.rose gum Jazzmaster - assembled needs setup
    MK-2 Mosrite - assembled - play in
    Ash tele with Baritone neck - neck pup wiring tweaks and play in

  8. #8
    GAStronomist FrankenWashie's Avatar
    Join Date
    Jan 2016
    Location
    Glebe, NSW
    Posts
    5,666
    Looking good, i have an image in my head of that body/neck in a high gloss finish with chrome machinery and its a fantastic image! Look forward to seeing the progress for this build.

  9. #9
    Overlord of Music Andy40's Avatar
    Join Date
    Oct 2015
    Posts
    3,913
    Man that rosewood fretboard is somethin else!
    Build #1 - ST-1 - Completed
    Build #2 - LP-1SS - Completed
    Build #3 - TLA-1R - Completed
    Build #4 - SGD-612 - Completed
    Build #5 - ES-1G - Completed
    Build #6 - STA-1HT | Completed
    Build #7 - ST1JR - Completed
    Current Build #8 - JBA-4
    Build #9 - Semi-scratch build Tele x 2 - Completed
    Current Build #10 - PRS-1H
    Current Build #11 - AGJR-1 - Completed
    Current Build #12 - ATL-1SB
    Current Build #13 - GST-1
    Current Build #14 - FBM-1

  10. #10
    FrankenWashie, with the oil rub I'm using to finish it, it will be a more satin finish than gloss. And definitely feels pretty awesome. Just put coat 4 on tonight. I think it is getting close to done since it really isn't soaking up much oil anymore.

    Click image for larger version. 

Name:	20160325_201311.jpg 
Views:	245 
Size:	117.4 KB 
ID:	9790

Page 1 of 2 1 2 LastLast

Posting Permissions

  • You may not post new threads
  • You may not post replies
  • You may not post attachments
  • You may not edit your posts
  •