Page 1 of 10 1 2 3 ... LastLast
Results 1 to 10 of 95

Thread: FB-1M Flames Burls - Mahogany

  1. #1

    FB-1M Flames Burls - Mahogany

    That title will make some sense shortly.
    Decided it was time to play with using veneers on a build. Ordered the FB-1M kit without electronics and hardware, but with the pickguard and knobs.
    Click image for larger version. 

Name:	FB 1.jpg 
Views:	239 
Size:	248.3 KB 
ID:	7653Click image for larger version. 

Name:	FB 2.jpg 
Views:	253 
Size:	222.0 KB 
ID:	7654
    A small gap opened up at the end of the body, easily fixed with some titebond and clamping.
    Click image for larger version. 

Name:	FB 3.jpg 
Views:	243 
Size:	259.5 KB 
ID:	7655
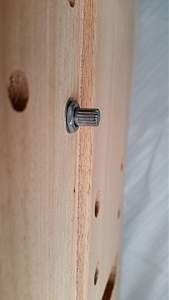
    Fitted a couple of pots and noticed the two volume knobs were too close to the raised centre section and will need to be moved. Actually not a problem as I have a plan (cue sinister laugh). Also the pots can't reach through far enough, just barely get a half turn of the nut on them, so will need to do some routing in the cavity to make them fit better.
    Click image for larger version. 

Name:	FB 4.jpg 
Views:	252 
Size:	277.8 KB 
ID:	7656Click image for larger version. 

Name:	FB 5.jpg 
Views:	236 
Size:	219.2 KB 
ID:	7657

  2. #2
    Next thing is to try and do something about where the body and neck join. I have relatively small hands and the overall size of the join would mean I couldn't get to the higher frets.
    Click image for larger version. 

Name:	FB 6.jpg 
Views:	237 
Size:	283.3 KB 
ID:	7658Click image for larger version. 

Name:	FB 7.jpg 
Views:	233 
Size:	239.7 KB 
ID:	7659
    I had some mahogany offcuts from my PBG-2 build and used them to make a pair of plugs for the two holes closest to the end of the body. Ordered a set of ferrules so I don't need to use the supplied plate and started shaping the body under the neck pocket to try to get more reach, still a work in progress.
    Click image for larger version. 

Name:	FB 9.jpg 
Views:	241 
Size:	248.5 KB 
ID:	7660Click image for larger version. 

Name:	FB 10.jpg 
Views:	249 
Size:	223.3 KB 
ID:	7661
    Warning - wood porn next.

  3. #3
    The body is mahogany, so where are the flames and burls? Right here
    Click image for larger version. 

Name:	FB 12.jpg 
Views:	248 
Size:	423.5 KB 
ID:	7662
    Got these beauties from Australian Premier Veneers. It's Myrtle burl.
    They will be going on the flanks, with the middle section to break them up. Cut out a stencil to work out how to get the most from the sheets. These are my first thoughts but maybe tweaked before cutting anything.
    Click image for larger version. 

Name:	FB 13.jpg 
Views:	297 
Size:	321.3 KB 
ID:	7663Click image for larger version. 

Name:	FB 14.jpg 
Views:	240 
Size:	282.8 KB 
ID:	7664Click image for larger version. 

Name:	FB 15.jpg 
Views:	257 
Size:	302.1 KB 
ID:	7665
    Not worried about bookmatching the pieces because the centre section breaks it up enough and will try to make it look like the veneers are one big piece with the mahogany added on top.
    Also asked Pabs to make a P-90 template for me. He made and posted it really quickly, thanks! He did advise to use it as a master and use it to make another from MDF, which I did. Now I need to check my measurements and get the router out.
    Click image for larger version. 

Name:	FB 16.jpg 
Views:	232 
Size:	286.6 KB 
ID:	7666

    Grant

  4. #4
    Overlord of Music gavinturner's Avatar
    Join Date
    May 2013
    Location
    HOLGATE NSW
    Posts
    3,057
    Wow Grant, that's some gorgeous veneer. Can't wait to see it on the body!

    cheers,
    Gav.
    --
    Build #01: BC-1
    Build #02: ST-1
    Build #03: JR-1DC
    Build #04: ES-2V
    Build #05: ESB-4 (GOTM July 2014)
    Build #06: RC-1
    Build #07: MK-2
    Build #08: TLA-1
    Build #09: JR-1DC
    Build #0A: LPA-1
    Build #0B: STA-1 (GOTM April 2015)
    Build #0C: MKA-2
    Build #0D: LP-1M
    Build #0E: JB-1
    Build #0F: FS-1

    Find me:
    https://www.facebook.com/firescreek.guitars/
    http://www.guitarkitbuilder.blogspot.com.au/

  5. #5
    Member Swanny's Avatar
    Join Date
    Sep 2015
    Location
    Morayfield, Qld
    Posts
    482
    That veneer looks incredible! I'll be patiently waiting to see the end result.

  6. #6
    GAStronomist wokkaboy's Avatar
    Join Date
    Dec 2012
    Location
    Perth WA
    Posts
    13,555
    Grant stunning veneer. Look forward to the results. You are such a natural builder!
    Current Builds and status
    scratch end grain pine tele - first clear coat on !
    JBA-4 - assembled - final tweaks
    Telemonster double scale tele - finish tobacco burst on body and sand neck

    Completed builds
    scratch oak.rose gum Jazzmaster - assembled needs setup
    MK-2 Mosrite - assembled - play in
    Ash tele with Baritone neck - neck pup wiring tweaks and play in

  7. #7
    Thanks Gav, Swanny and Wokks. Only made a small amount of progress so far.
    Have roughly trimmed the veneer to shape, this pic should give a better idea of what I'm going for.
    Click image for larger version. 

Name:	FB 17.jpg 
Views:	258 
Size:	406.9 KB 
ID:	8996
    The pickup cavities have been re-routed as well. The veneer sheets were pretty flat considering they are burled. Even so, still decided to flatten them with veneer softener and clamping. Found a recipe for diy softener on a woodworking forum somewhere on the interwebs, which was 6 parts water, 3 parts alcohol (I used metho) and 1 part glycerine. There are also mixes that use yellow glue as well, but that apparently makes the veneer sticky and can cause problems when applying stain. I don't plan on staining the veneer, but one less problem is one less problem to worry about fixing.
    Sprayed the mixture onto the veneer pieces, waited about ten minutes, then when most of the mix is absorbed, or dripped off, it was time to make a sandwich. I had two pieces of melamine offcuts to use as the upper and lower layer. lay a few sheets of newspaper down, then craft paper ( or any other plain paper) and then the first veneer piece. You want a barrier between the veneer and the newsprint or the ink will end up on the veneer). Then craft paper, newspaper, craft paper, veneer, craft paper, news paper, then upper melamine piece. Then clamps, lots of clamps.
    It's recommended to change the paper every 6 hours, I've changed it a couple times so far, just need to keep doing it until the veneers have dried enough. Still clamped at the moment.
    Click image for larger version. 

Name:	FB 18.jpg 
Views:	239 
Size:	289.3 KB 
ID:	8997

  8. #8
    Banned
    Join Date
    Dec 2015
    Posts
    1,171
    Looking very nice mate

  9. #9
    GAStronomist wokkaboy's Avatar
    Join Date
    Dec 2012
    Location
    Perth WA
    Posts
    13,555
    wow Grant that burl veneer is going to look fully sick !
    Are you planning natural finish ? No need for stain there are very nice natural colours in the myrtle burl.

    I got some red myrtle veneer at home from memory has a similar colour minus the burl
    Current Builds and status
    scratch end grain pine tele - first clear coat on !
    JBA-4 - assembled - final tweaks
    Telemonster double scale tele - finish tobacco burst on body and sand neck

    Completed builds
    scratch oak.rose gum Jazzmaster - assembled needs setup
    MK-2 Mosrite - assembled - play in
    Ash tele with Baritone neck - neck pup wiring tweaks and play in

  10. #10
    Have shaped the HS. Started with the standard firebird HS shape, then came across a pic of a custom build (not sure who by) on the web which was more angular at the top edge. Played around and came up with something in between.
    Click image for larger version. 

Name:	FB 19.jpg 
Views:	231 
Size:	371.3 KB 
ID:	8999
    Plan is to use some veneer on the HS, not cover the whole thing, but as a 'feature', for want of a better word. Made a caul from MDF to help shape the edge of the veneer and also act as a clamping caul, well that's the theory anyway. Not entirely sure the best way to attach veneer to caul and be able to remove easily, small spots of pva glue maybe? Or double sided tape? Will work something out.
    Click image for larger version. 

Name:	FB 20.jpg 
Views:	238 
Size:	464.8 KB 
ID:	9000Click image for larger version. 

Name:	FB 21.jpg 
Views:	226 
Size:	296.8 KB 
ID:	9001

Page 1 of 10 1 2 3 ... LastLast

Posting Permissions

  • You may not post new threads
  • You may not post replies
  • You may not post attachments
  • You may not edit your posts
  •