Page 1 of 4 1 2 3 ... LastLast
Results 1 to 10 of 33

Thread: First Build - LPA-1

  1. #1

    First Build - LPA-1

    Hi All,

    First build kicking off with an LPA-1.
    This one came with the Flame Maple top in the recent sale.

    I've had it a couple of weeks now, there have been some delays in getting started. (I may have ordered the kit while halfway through redoing the kitchen and dining room. After some intense negotiations with my lovely wife, the rooms may need to be finished before more work is done on the guitar...)

    Put together a mock build on the weekend, and it looks pretty good.
    Only one issue, with one of the tuners not screwing in properly. It may work if I really forced it, but this one won't screw in properly to any of the tuners.

    Here's the offending item...

    Click image for larger version. 

Name:	ea5501af-7f63-47d2-8d2f-c05a29915e32_zpsqxsmuwsx.jpg 
Views:	215 
Size:	129.6 KB 
ID:	5559

    The switch was a tight fit. I had to remove the nut from the bottom and just run with washer and nut on the top in order for it to fit. I guess I could sand a bit more out from under the body to give me some more space.

    Rest of it seemed to fit really well. The neck was a pretty tight fit, I've put a few pictures in, I'm assuming it's fitting correctly? There's a tiny gap at the bottom that's no real issue I don't think.

    Click image for larger version. 

Name:	28d64a14-1ec2-4da8-9c77-4379fc47fd2e_zpsznndq8be.jpg 
Views:	207 
Size:	132.9 KB 
ID:	5560

    Click image for larger version. 

Name:	36d96df3-cd80-41e3-9c5e-ce26befa642d_zpsrhjyayvj.jpg 
Views:	205 
Size:	111.5 KB 
ID:	5561

    Everything else lined up pretty well.
    Here's some of the top etc:
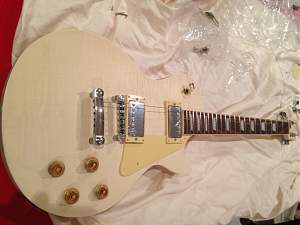
    Click image for larger version. 

Name:	61576c9d-5e43-4dcc-b396-aa7491db0a8f_zpspjxlsvpa.jpg 
Views:	221 
Size:	366.9 KB 
ID:	5564

    Click image for larger version. 

Name:	d6f282d9-16d7-4aea-8d98-9ef64f11d600_zpsju3qxbhb.jpg 
Views:	221 
Size:	401.8 KB 
ID:	5565

  2. #2
    Second post, won't go into too much detail:

    I assume glue? How will I remove this from the veneer top? Super light sanding or wire brush?

    Click image for larger version. 

Name:	6e7f5937-0034-450f-bcbf-4e10cbbfffeb_zpsljvqr7zr.jpg 
Views:	192 
Size:	156.8 KB 
ID:	5566

    Slight ding, no real dramas though. Tiny bit of sanding should be ok.

    Click image for larger version. 

Name:	407ba474-d629-47da-a7b2-f494d8b37d4a_zpsebypiegp.jpg 
Views:	222 
Size:	288.2 KB 
ID:	5567

    Lastly, the back:

    Click image for larger version. 

Name:	e3a03c83-2eae-4516-a0ab-6a63adbed1b3_zpsxn0mntqh.jpg 
Views:	204 
Size:	268.9 KB 
ID:	5568


    Not sure of the colours yet. I have a bit of sanding to do before I even think about that.....

    Really keen to get started. Excited to see how it's going to work out. (now to get painting my dining room....)

  3. #3
    Nice guitar Sandman! I had some glue spots on the veneer as well as a few very serious tape marks. I was pretty nervous about sanding the veneer since I have never worked with veneer before, just solid wood. I just used some 150 and cut a small piece (about 7mm square) and just wrapped it around my index finger. Used very very light strokes with the grain, and when it was almost to where I wanted it, switched to some 220 and continued, then when it was almost completely gone, wrapped a bigger piece of 220 around a clean rag and went over the whole area. Worked great and didn't harm the veneer at all.

    My switch cavity was really tight too. I ended up using a dremel with a plunge route bit, and took out 3.5mm before I could get the plate and nut on, and the switch fit perfectly. I used a caliper to measure the plate and nut (before routing the nut barely threaded on) and started at 2.5mm, then checked, then adjusted tiny bit, tested, repeat...

    Good luck!

  4. #4
    Thanks for the tip kenfu, I'll have a crack at it that way.

  5. #5
    Moderator dingobass's Avatar
    Join Date
    Sep 2012
    Location
    Perth
    Posts
    4,491
    Can you flick me an email with a pic of the underside of the tuners, (so I can see the number stamp) and I will dig up a replacement for you.
    Oh, and your postal address would help too

    dingobass at pitbullguitars dot com

    There is always a workaround for glitches, mistakes and other Guitar building gremlins.....

  6. #6
    Overlord of Music Fretworn's Avatar
    Join Date
    May 2013
    Location
    Hornsby Area, Sydney, NSW
    Posts
    3,951
    Sandman, consider replacing the tuners if you can. They are the weakest link in the factory hardware IMHO.
    Current:
    GTH-1

    Completed:
    AST-1FB
    First Act ME276 (resurrected curb-side find)
    ES-5V
    Scratchie lapsteel
    Custom ST-1 12 String
    JBA-4
    TL-1TB
    Scratch Lapsteel
    Meinl DIY Cajon
    Cigar Box lap steel

    Wishing:
    Baritone
    Open D/Standard Double 6 twin neck

  7. #7
    OK, finally had some time to start this build over the weekend.

    Sanding. Lots of sanding. In fact that's all I've done so far.... down to 400. Probably give it another go this weekend as well.

    A couple of questions about the body preparation.

    I've read a lot here about Timbermate and grain filling?
    What's the suggestion with this one (Ash Body, Maple cap)- is it something that people want to do, or is something that should definitely be done . I'm not going a solid colour, so it doesn't have to be perfectly flat.

    I'm not yet 100% sure about the plans with colours etc, but currently I'm planning on the back and maybe the neck having some form of art/drawing on it - my daughters mate is pretty good, and wants to do a guitar. Has done a lot of work on surfboards and skateboards in the past.

    He normally draws in sharpies or posca paint pens.

    What's going to be the best way to firstly prepare the wood (some form of light stain I'm thinking to give a relatively blank canvas) - and then protect the drawing afterwards - obviously the back is going to get some wear and tear through playing?

    The top I'll then work out depending on the colours he uses etc to see what will go with it.
    Last edited by sandman_thedog; 13-10-2015 at 10:07 AM.

  8. #8
    dingobass, I emailed Adam about the part and he said he'd send a replacement. I haven't got it yet - but then I didn't send an address.... I'll send the photos through via email, thanks.

  9. #9
    GAStronomist wokkaboy's Avatar
    Join Date
    Dec 2012
    Location
    Perth WA
    Posts
    13,555
    Hey Sandman, plans sound good
    Current Builds and status
    scratch end grain pine tele - first clear coat on !
    JBA-4 - assembled - final tweaks
    Telemonster double scale tele - finish tobacco burst on body and sand neck

    Completed builds
    scratch oak.rose gum Jazzmaster - assembled needs setup
    MK-2 Mosrite - assembled - play in
    Ash tele with Baritone neck - neck pup wiring tweaks and play in

  10. #10
    Moderator Brendan's Avatar
    Join Date
    Apr 2013
    Location
    Perth, WA
    Posts
    3,444
    Sandman - Ads should be able to get your address by matching up a few things - order, guitar, email address, etc. That said, usually a couple of days for delivery - depending on Australia Post. Main thing is that someone's looking after you .

Page 1 of 4 1 2 3 ... LastLast

Posting Permissions

  • You may not post new threads
  • You may not post replies
  • You may not post attachments
  • You may not edit your posts
  •