Page 1 of 5 1 2 3 ... LastLast
Results 1 to 10 of 45

Thread: Astro

  1. #1

    Astro

    Before I start, I have checked the ugly guitar tread and didn't see this one in there, unless it's been added in the last week or so.
    Picked up a PBG-2 kit in the summer sale coz I had a flash of inspiration / madness after looking thru a guitar book a few days earlier.
    The kit looks like this
    Click image for larger version. 

Name:	pbg-2.jpg 
Views:	184 
Size:	30.7 KB 
ID:	2388
    and I decided to try to turn it into this, the one on the left
    Click image for larger version. 

Name:	catalog page.jpg 
Views:	203 
Size:	71.8 KB 
ID:	2389
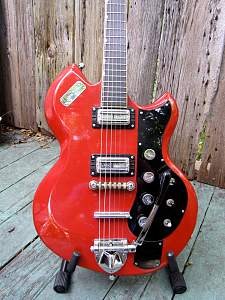
    Here is a pic of a real Astro-Jet
    Click image for larger version. 

Name:	Astro-Jet.jpg 
Views:	181 
Size:	77.7 KB 
ID:	2390

  2. #2
    Now this is more 'inspired by' than 'tribute to' so bear with me. After a few tracings and mucking around I figured I could get close to original shape although not entirely in proportion with the real thing.
    Shape pencilled in on body - might be a bit hard to see
    Click image for larger version. 

Name:	astro 2.jpg 
Views:	185 
Size:	28.3 KB 
ID:	2391
    They have a 4 by 2 headstock design I wasn't all that keen on replicating so took the easy option and borrowed a shape from a later Gretsch model which suited the 3-a-side headstock
    Click image for larger version. 

Name:	astro 3.jpg 
Views:	171 
Size:	28.8 KB 
ID:	2392
    Just hope it will match up OK with the body shape. Started shaping by cutting with a small bandsaw.
    Click image for larger version. 

Name:	astro 4.jpg 
Views:	178 
Size:	23.9 KB 
ID:	2393

  3. #3
    Used a sanding drum in the drill press to clean and square up the edges then marked out for the bevelling
    Click image for larger version. 

Name:	astro 5.jpg 
Views:	185 
Size:	27.5 KB 
ID:	2394
    Click image for larger version. 

Name:	astro 6.jpg 
Views:	176 
Size:	24.4 KB 
ID:	2395
    Click image for larger version. 

Name:	astro 7.jpg 
Views:	184 
Size:	24.2 KB 
ID:	2396
    Click image for larger version. 

Name:	astro 8.jpg 
Views:	172 
Size:	19.6 KB 
ID:	2397

  4. #4
    Got a spokeshave from the big blue shed and with that and a few rasps and some 60 grit sandpaper started shaping
    Click image for larger version. 

Name:	astro 11.jpg 
Views:	179 
Size:	26.6 KB 
ID:	2398
    Click image for larger version. 

Name:	astro 12.jpg 
Views:	185 
Size:	21.6 KB 
ID:	2399
    Click image for larger version. 

Name:	astro 13.jpg 
Views:	180 
Size:	23.1 KB 
ID:	2400
    Grain filled and sanded to 400 grit
    Click image for larger version. 

Name:	astro 14.jpg 
Views:	179 
Size:	24.9 KB 
ID:	2401
    Click image for larger version. 

Name:	astro 15.jpg 
Views:	175 
Size:	28.2 KB 
ID:	2402

  5. #5
    Because they are a mahogany body, I used mahogany Timbermate on the front and borrowed a tip from Gav and used ebony Timbermate on the back and sides (for grain filling). Sanded to 800 grit.
    Click image for larger version. 

Name:	astro 16.jpg 
Views:	179 
Size:	27.5 KB 
ID:	2403
    Click image for larger version. 

Name:	astro 17.jpg 
Views:	174 
Size:	31.0 KB 
ID:	2404
    Click image for larger version. 

Name:	astro 18.jpg 
Views:	191 
Size:	26.5 KB 
ID:	2405
    Click image for larger version. 

Name:	astro 19.jpg 
Views:	203 
Size:	27.6 KB 
ID:	2406

  6. #6
    GAStronomist stan's Avatar
    Join Date
    Aug 2013
    Location
    Geelong, Vic
    Posts
    5,290
    wow, you're doing a great job

  7. #7
    Overlord of Music andrewdosborne's Avatar
    Join Date
    May 2014
    Location
    Sydney, NSW
    Posts
    2,751
    Coming along very nicely and good idea on spoke shave for shaping

    Sent from my GT-I9506 using Tapatalk
    Current Projects
    #Planning 5 String Bass

  8. #8
    Speaking of borrowing ideas, I'll be using the stamp pad ink method with this one and wanting a gloss finish will use Tru-oil on top.
    Here is the front done with a 'double' coat of ink
    Click image for larger version. 

Name:	astro 20.jpg 
Views:	187 
Size:	30.9 KB 
ID:	2407
    The pic was taken about ten minutes after application so looks patchy due to some spots still being wet and others soaked in.
    Will probably need another coat, and when it can be handled will turn over and apply black to the back. The fun part will be getting the line where the two colours come together straight and trying to not get any bleed through from one colour to the other.
    The plan is to do the neck and headstock in black.

    Grant

  9. #9
    Thanks Stan, and Andrew, kind of thought this might appeal to you because it's a kind of skewed SG shape.
    Cheers

  10. #10
    Overlord of Music gavinturner's Avatar
    Join Date
    May 2013
    Location
    HOLGATE NSW
    Posts
    3,057
    What an amazing project! Super progress never was, I'm loving it!

    cheers,
    gav.
    --
    Build #01: BC-1
    Build #02: ST-1
    Build #03: JR-1DC
    Build #04: ES-2V
    Build #05: ESB-4 (GOTM July 2014)
    Build #06: RC-1
    Build #07: MK-2
    Build #08: TLA-1
    Build #09: JR-1DC
    Build #0A: LPA-1
    Build #0B: STA-1 (GOTM April 2015)
    Build #0C: MKA-2
    Build #0D: LP-1M
    Build #0E: JB-1
    Build #0F: FS-1

    Find me:
    https://www.facebook.com/firescreek.guitars/
    http://www.guitarkitbuilder.blogspot.com.au/

Page 1 of 5 1 2 3 ... LastLast

Posting Permissions

  • You may not post new threads
  • You may not post replies
  • You may not post attachments
  • You may not edit your posts
  •