looks great Rick, hard to tell the colour on the left shot but the right shot must be more like the real colour ?
looks great Rick, hard to tell the colour on the left shot but the right shot must be more like the real colour ?
Current Builds and status
scratch end grain pine tele - first clear coat on !
JBA-4 - assembled - final tweaks
Telemonster double scale tele - finish tobacco burst on body and sand neck
Completed builds
scratch oak.rose gum Jazzmaster - assembled needs setup
MK-2 Mosrite - assembled - play in
Ash tele with Baritone neck - neck pup wiring tweaks and play in
Hi Buddy. The lighting in the first shot may be telling lies if you think they look the same (before and after) as it appears to have more of greenish tinge when compared to the 2nd outside shot.
Had to work today and if this rain pings off will do a bit of frankensteining mixing some TO with ink & food dye tomorrow to see what happens. Plan to do a bit with cyan blue inkjet ink and another sample with Red food colouring and will let you know how that goes. Unfortunately I will be applying to raw scrap pine so may not be able to comment on how it reacts with existing layers of TO. Presume you would just need to let it sit and cure a bit longer before applying.
Acknowledge how frustrating this part of the build can be and it takes lots of patience and perseverance to finally get to where you want or hoped to be. Keep at it as the finish line is in sight.
Guys it may help the mixing if you thin the TO a little with mineral turps. It will also slow the drying rate so you can work with it.
cheers,
Gav.
--
Build #01: BC-1
Build #02: ST-1
Build #03: JR-1DC
Build #04: ES-2V
Build #05: ESB-4 (GOTM July 2014)
Build #06: RC-1
Build #07: MK-2
Build #08: TLA-1
Build #09: JR-1DC
Build #0A: LPA-1
Build #0B: STA-1 (GOTM April 2015)
Build #0C: MKA-2
Build #0D: LP-1M
Build #0E: JB-1
Build #0F: FS-1
Find me:
https://www.facebook.com/firescreek.guitars/
http://www.guitarkitbuilder.blogspot.com.au/
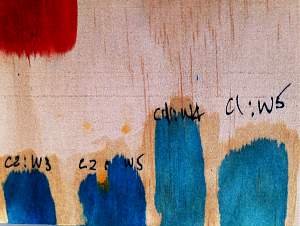
Good point Gav as I had a play around late this afternoon and posted some photos below. The TO easily goes over the top of anything however when mixing the blue ink jet ink with a small amount of TO, all good but when adding the red food colouring it wanted to separate suggesting more water based content in the food dye. Suspect Ink jet ink has other stuff in it as it didn't seem to react at all.
Rockmof, the Cyan comes out very dark straight from the bottle. Unfortunately iPhone photo colouring is not always a true representation as C1:W4 & C1:W5 are actually quite light and aqua/turquoise to the naked eye and somewhere near the colouring I am chasing for my flame top tele. The notations mean C1 = 1 part Cyan to W4 = 4 parts Water, etc.
Hopes this helps if you are tempted to have a go with adding a blue tinted TO coat or two to add more depth to the top. If so, find the cheapest cyan blue separate colour tank that you could split open and use an eye dropper to add a little bit at a time to a small batch of TO that would normally be sufficient to cover the top of the body only.

Ok Why am I mucking around with this when I don't even like it, the top.
I gave it another stain but didn't sand it back enough, but I did like the result. but will need to sand it back then redo it.
So the photos give an idea of what I hope the finished article will look like.
The green look is because of the flash, although it looks as if it has a bit of green in it, I don't like thats I hope it won't be in the final finish.
Rick why would you want to sand back the top again ? looks fine to me. You are making this build much harder than it should be ! How many times have you sanded it back already ?
Current Builds and status
scratch end grain pine tele - first clear coat on !
JBA-4 - assembled - final tweaks
Telemonster double scale tele - finish tobacco burst on body and sand neck
Completed builds
scratch oak.rose gum Jazzmaster - assembled needs setup
MK-2 Mosrite - assembled - play in
Ash tele with Baritone neck - neck pup wiring tweaks and play in
You will always get a bit of green using tru oil on blue. I think it looks ace.
'As long as there's, you know, sex and drugs, I can do without the rock and roll.'
Yep agree with Nik, keep the finish.
Sent from my GT-I9506 using Tapatalk
Current Projects
#Planning 5 String Bass
Gotta be happy with that. May just need to let the final TO coats cure for a while then hit it with some Maguires ultimate compound that you can buy at Autobarn or Supercheap if chasing a mirror finish shine.