
looks good Sansan, this is going to be a very cool build !


looks good Sansan, this is going to be a very cool build !
Current Builds and status
scratch end grain pine tele - first clear coat on !
JBA-4 - assembled - final tweaks
Telemonster double scale tele - finish tobacco burst on body and sand neck
Completed builds
scratch oak.rose gum Jazzmaster - assembled needs setup
MK-2 Mosrite - assembled - play in
Ash tele with Baritone neck - neck pup wiring tweaks and play in

Hi there, some minor update....
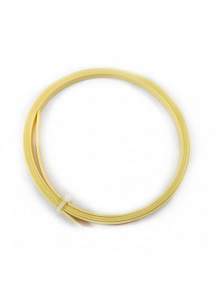
Finally, i get some steel bar from a walmart kind a place here in Europe, to make a cheap fret leveler, but before, lets make the truss rod hole so i can straighten the neck a little more.
I think a single hole is just than enough. 13 mm drill bit, quick and easy, key fits well, ok its done.
I started to binding out the entire guitar, using the acetone/binding cement mixing, and for me its the best method.
Some wood filling or maybe binding cement refilling...not a problem
Last edited by sansan; 05-02-2016 at 03:04 PM.
sometimes you eat the bear....and sometimes the bear eats you
I tried out the CA gluing, but a few spots on the wood, make me change my mind..
Lets start scrapping
Thats all for now!
S!
Last edited by sansan; 05-02-2016 at 03:05 PM.
sometimes you eat the bear....and sometimes the bear eats you
HI!!
Currently finishing the binding of the entire bass, and when i had drill the last dot hole of the fretboard side, i do realize that i drill the (2) 12 fret holes in the 9th fret channel.....so, start again doing the left side of the binding...Nothing matters, because there were a couple of things i didnt like from scraping.. Next will be better.
One question a have about the set of the neck into the body..There is almost a nice fit but needs to refill at the end just a little to be perfect...
Where its supposed to be better? On the sides of the neck joint or body cavity? I've read about two ways in diferent threads, but i think i would get some more stability from neck joint reinforcement, right?
S!
Last edited by sansan; 12-02-2016 at 01:21 AM.
sometimes you eat the bear....and sometimes the bear eats you

Hi Sansan
I'm not sure if I understood correctly but do you mean that the neck joint fit is not perfect?
When I built the RC-4 my neck heel was just a bit angled for maybe 1mm and I just took a sanding block and sanded it straight. Some builders have reinforced the neck joint by either putting blocks of wood on the sides/deeper cavities next to the neck or one poured some kind of epoxy or something to fill the sides. When I sanded the neck to fit properly to the pocket - I didn't do anything but glue the neck in place. Mine has been secure in place and so far no signs of bending on the back of the body or twisting on the neck (7 months). But I understand if one wants to make it stronger just in case cause the thickness of wood between neck and back of the body is quite thin. If I did it again now I would propably do the same myself.
Hi Arzi, thanks for reply.
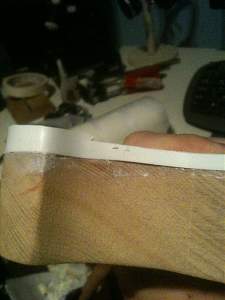
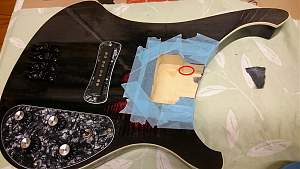
I mean, the sides of the neck when meets with the body hole is not tight, so the neck just move from left to right making some angle due the tiny space between them. This can make some confusion when placing the bridge on the right position.
Maybe regular gluing do the trick, but i prefer to have a perfect match that keep the neck and body together without any glue..
There is a little gap (0.4mm or less) between
and
Last edited by sansan; 12-02-2016 at 01:19 AM.
sometimes you eat the bear....and sometimes the bear eats you
Ok now I understand and you're right - the fit should be snug so the area that is glued would not get to move. I'm not sure if and how well to what point this can be solved with just applying enough glue - will it do the trick. If there is too much gap it would need filling. Now I don't have the expertise to give advise on how to do this. Hope the more experienced guys like DB and others can help you. I'm also interested to hear what methods there are.
The answer might be some glue that would not shrink too much and would fill the gap at the same time while you clamp the neck in place.
See you found my build...
0,4mm doesn't sound too much and when you divide it it's 0,2mm per side. Now I think this is a gap that could be filled with just glue but I'm gonna let someone else give their opinion too.
THanks for posting on your RC-4 build. I am also interested in building one....a "Fireglo" 4003 is like a Ferrari to me, a dream that I can't justify...but this, yeah, I could do it. QUESTION: did the kit come with both the body and the neck already bound? Pitbull advertises the binding as "Cream"...I would prefer white, but how dark is the cream binding compared to white? Thanks!
Thanks again arzi, got to think what to do with the gap.
Hi muxo, the kit comes all bound. i changed it because i want it in white color to match with the inlays. REmoving the binding was not easy, plus, there so many parts in neck and body that rip off some wood, so have in mind to fix the channels for the new binding.
I barely remember, but it reminds me more like an ivory...
definitily not as cream as
Last edited by sansan; 12-02-2016 at 02:10 PM.
sometimes you eat the bear....and sometimes the bear eats you
 Posting Permissions


 Reply With Quote
