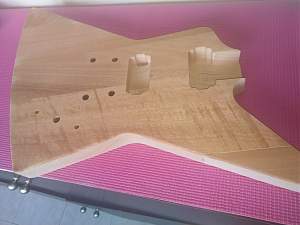
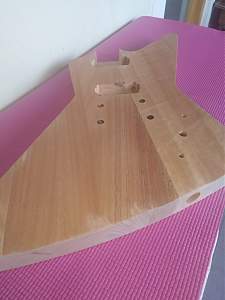
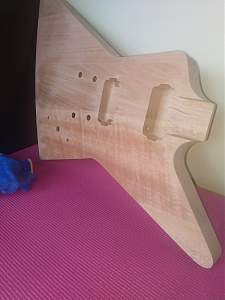
Page 5 of 8 FirstFirst ... 3 4 5 6 7 ... LastLast
Results 41 to 50 of 77

Thread: #2 - EXM-1 Guitar Kit...

Hybrid View

Previous Post Previous Post   Next Post Next Post
  1. #1
    Member
    Join Date
    May 2020
    Location
    Gold Coast, Qld
    Posts
    213
    Pleased I came across this thread. I'm looking at the EX for staining too. You've done well rjmc to get it to this stage. The black red is looking good!
    I had the same problem with the gap in the neck pocket on my AG kit when I had to kick the neck to line the strings up right. I filled it with glue and saw dust. The stain didn't take to it but the Tru Oil did help a lot when I did the finish coats.

  2. #2
    Hi,

    Thank you for your kind feedback... I used a bit of grainfiller to fill a tiny gap in the neck pocket. The grainfiller I use can be applied to fill tinny gaps. It is stainable and doesn't crack, and is also compatible with every kind of finish.

  3. #3
    Hi everyone,

    Staining done, time for some Crimson Guitars Penetrating oil... Currently finishing the third coat...

    Click image for larger version. 

Name:	2.jpg 
Views:	239 
Size:	30.2 KB 
ID:	36281 Click image for larger version. 

Name:	3.jpg 
Views:	239 
Size:	32.8 KB 
ID:	36282 Click image for larger version. 

Name:	4.jpg 
Views:	261 
Size:	54.6 KB 
ID:	36283

    Click image for larger version. 

Name:	5.jpg 
Views:	250 
Size:	35.2 KB 
ID:	36284 Click image for larger version. 

Name:	1.jpg 
Views:	240 
Size:	32.4 KB 
ID:	36285

  4. #4
    Hi,

    Starting to put some coats of Crimson's High Build Guitar Finishing Oil. However, even without 0 experience, and with the issues previously discussed on the body, I think I got a fair result....

    Click image for larger version. 

Name:	1.jpg 
Views:	239 
Size:	141.3 KB 
ID:	36954 Click image for larger version. 

Name:	2.jpg 
Views:	250 
Size:	155.7 KB 
ID:	36955

    Second coat this night....

    Click image for larger version. 

Name:	3.png 
Views:	244 
Size:	848.7 KB 
ID:	36956 Click image for larger version. 

Name:	4.png 
Views:	244 
Size:	911.0 KB 
ID:	36957 Click image for larger version. 

Name:	5.png 
Views:	239 
Size:	193.0 KB 
ID:	36958

  5. #5
    And, for those who have followed this from ther beginning...

    Remember the flaws on the kit?

    Click image for larger version. 

Name:	erro 1.png 
Views:	248 
Size:	836.9 KB 
ID:	36959 Click image for larger version. 

Name:	erro 3.png 
Views:	225 
Size:	167.1 KB 
ID:	36960

    How the flaws are currently

    Click image for larger version. 

Name:	erro 2.png 
Views:	227 
Size:	901.1 KB 
ID:	36961 Click image for larger version. 

Name:	erro 4.png 
Views:	244 
Size:	710.0 KB 
ID:	36962

  6. #6
    Good morning...

    I've added one more coat of oil, but this time, took some pictures with a better camera.... with/without natural light

    Click image for larger version. 

Name:	IMG_0379.JPG 
Views:	221 
Size:	253.3 KB 
ID:	37149 Click image for larger version. 

Name:	IMG_0380.JPG 
Views:	239 
Size:	216.7 KB 
ID:	37150 Click image for larger version. 

Name:	IMG_0381.JPG 
Views:	240 
Size:	202.9 KB 
ID:	37151

    Click image for larger version. 

Name:	IMG_0382.JPG 
Views:	263 
Size:	180.4 KB 
ID:	37152 Click image for larger version. 

Name:	IMG_0383.JPG 
Views:	236 
Size:	208.7 KB 
ID:	37153

  7. #7

  8. #8
    Mentor JimC's Avatar
    Join Date
    Sep 2019
    Location
    SE England
    Posts
    519
    Nice job.
    Hey, how different are the Crimson cherry and crimson stains? I'm mulling over a project and wondering about using the cherry to accentuate the grain under the crimson, but on my monitor the crimson examples don't look very different, so I wonder how much effect I'd get and whether I'd be better using a small admixture of brown instead.
    Last edited by JimC; 30-08-2020 at 06:00 PM.
    Build #1, failed solid body 6 string using neck from a scrapped acoustic (45+ odd years ago as a teenager!)
    Build #2, ugly parlour semi with scratch built body and ex Peavey neck
    Build #3, Appalachian Dulcimer from EMS kit
    Build #4, pre-owned PB ESB-4
    Build #5, Lockdown Mandolin
    Build #6, Sixty six body for Squier
    Build #7, Mini Midi Bass
    Build #8, Acousticish Telecasterish Guitar

  9. #9
    Quote Originally Posted by JimC View Post
    Nice job.
    Hey, how different are the Crimson cherry and crimson stains? I'm mulling over a project and wondering about using the cherry to accentuate the grain under the crimson, but on my monitor the crimson examples don't look very different, so I wonder how much effect I'd get and whether I'd be better using a small admixture of brown instead.
    Hi,

    Thank you for your feedback.

    I have been messing around with Crimson Guitars range of products (see notes below). Explaining the process, well, after applying the grainfiller, I've used three coats of *SS black, sanding in between the coats. I left the kit for curing for 3 days (my work schedule wasn't making things easier as well).

    Then, I've switched between *SS cherry red and *SS crimson red. I've applied 6 coats, and sanded in between the first 3 coats. The red achieved was very light, and my friend wanted something darker. Also I wanted to hide the flaws as best as humanly possible.

    So, I've applied **SSS cherry red, let cure, then balanced with a slightly diluted **SSS crimson red. Repeated the process two more times... and at that point I've achieved the result on the pictures on 19-06-2020, 01:55 AM post. Proceeded then to apply the ***PO, 5 coats (first coat I soaked the wood, *****let cure for 5 mintes, removed the excess).

    Same process when moving to ****HBO. After applying the second coat, 11-08-2020, 12:14 AM post, on the third I saw a technique used by Ben from Crimson Guitars where he applied the oil with wet and dry sandpaper, and it's purpose is to pop up the grain / colour applied. Well... I did that with 2000 grit... big mistake... the layer of finish I had wasn't "big" enough to support that technique and ended up with front and back completely scratched....

    In desperation, I've mixed a tiny bit of slightly diluted *SSS crimson red and a bit of **SSS cherry red. Then I soaked the paper on that "solution" and applied on the opposite direction of the scratches. Let it dry a bit, and applied more until the scratches faded. Left it to dry, then started to apply thin layers of oil and on the fourth coat I've noticed another mistake, but, I think that mistake ended up not only fade away the scratches, but making the kit flaws almost a thing of the past. If you zoom in the pictures on 29-08-2020, 09:48 AM and 29-08-2020, 09:45 AM post, you can see some spots of heavy red dots that look like spilled blood. These oils (***PO and ****HBO) are fantastic because accept stains over it. I left it as it is, and continued to apply the ****HBO. At the moment I'm on the fifth coat.

    My wife decided to publish all my work on Instagram and Facebook. I've said no, but, when I found out, was too late...

    I leave here a link, where you can see on video how the guitar really looks....

    Instagram

    Facebook

    Sorry for this long text. I hope this answers many questions.

    **************
    Notes:

    *Crimson Guitars Stunning Stains -> SS
    **Crimson Guitars Stunning Stains -> SSS
    ***Crimson Guitars Penetrating Oil -> PO
    ****Crimson Guitars High Build Oil -> HBO
    ***** This applies to both oils, after applying leave to cure/absorve for 5 minutes (dependeds on your weather conditions) and remove the excess
    Last edited by rjmc; 31-08-2020 at 02:20 PM.

  10. #10
    GAStronomist Simon Barden's Avatar
    Join Date
    Oct 2016
    Location
    Reading, UK
    Posts
    10,547
    I like that look. It’s both interesting and involving. And it’s obviously hidden the flaws pretty well. Great work.

Page 5 of 8 FirstFirst ... 3 4 5 6 7 ... LastLast

Posting Permissions

  • You may not post new threads
  • You may not post replies
  • You may not post attachments
  • You may not edit your posts
  •