
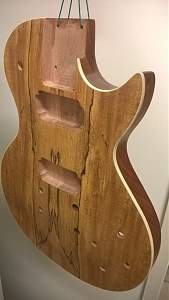
Sanding got the scrape out...
But I sort of "gently" sanded it back to wood
So ended up reapplying stain and intensifier.


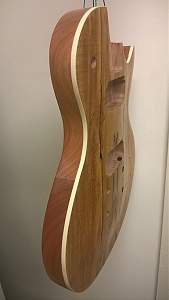
Sanding got the scrape out...
But I sort of "gently" sanded it back to wood
So ended up reapplying stain and intensifier.
Those last shots were from a week or so ago and since then it's had a second final coat that's come out quite nicely so I might leave as is.

Intersting choice of pups Bluesy, why did you go with the Rocksong and SD combo?
Build #1 - ST-1 - Completed
Build #2 - LP-1SS - Completed
Build #3 - TLA-1R - Completed
Build #4 - SGD-612 - Completed
Build #5 - ES-1G - Completed
Build #6 - STA-1HT | Completed
Build #7 - ST1JR - Completed
Current Build #8 - JBA-4
Build #9 - Semi-scratch build Tele x 2 - Completed
Current Build #10 - PRS-1H
Current Build #11 - AGJR-1 - Completed
Current Build #12 - ATL-1SB
Current Build #13 - GST-1
Current Build #14 - FBM-1
Coming along nicely

Nice job, looking better all the time
Stan's LP Build for my Sister: http://www.buildyourownguitar.com.au...ead.php?t=3146
Benson Pickup Strat mod: http://www.buildyourownguitar.com.au...ead.php?t=5229
Epiphone LP headstock fix: http://www.buildyourownguitar.com.au...ead.php?t=3410
Martin Backpacker Repair: http://www.buildyourownguitar.com.au...?t=5038&page=3
'57 Harmony Jazz guitar project: http://www.buildyourownguitar.com.au...ead.php?t=2972
Hey Andy, the pickups in the photos are both Toneriders. The neck pickup is a Rebel 90, I wanted something p90-like in the neck. The SD packaging is just part of the pile of crap I had on the table (I was using the SD in mock ups of my JM-1).Originally Posted by Andy40

Ahh right...toneriders good work! love to hear a demo when your done
Build #1 - ST-1 - Completed
Build #2 - LP-1SS - Completed
Build #3 - TLA-1R - Completed
Build #4 - SGD-612 - Completed
Build #5 - ES-1G - Completed
Build #6 - STA-1HT | Completed
Build #7 - ST1JR - Completed
Current Build #8 - JBA-4
Build #9 - Semi-scratch build Tele x 2 - Completed
Current Build #10 - PRS-1H
Current Build #11 - AGJR-1 - Completed
Current Build #12 - ATL-1SB
Current Build #13 - GST-1
Current Build #14 - FBM-1
Feels like the home stretch now.
Had to drill some extra depth for the pickup screws in the neck cavity.
Shielding
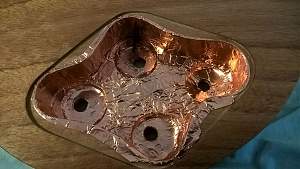
Had to scratch off the black coating on the bridge bushing in order to get conductivity.

Once the bushing was grounded, it was persuaded into place with a rubber mallet.
Installed tuners, bridge and e strings to align the neck. Getting the neck in place was a bit hairy as it was difficult to clamp and get accurate measurements around the clamp. Took several attempts but finally got the neck positioned, marked, drilled and bolted on.
Couldn't help throwing the remaining strings on to see how she goes as an acoustic...
...and the answer is, very well indeed. The thin finish gives it a very organic feel that matches the natural look and even with the stock nut and hardware the unplugged sound has nice sustain and resonance. There should be some hardware upgrades in the mail this week, but I'm thinking I'll put in all the stock electronics and do a before and after comparison with the upgrades. Something for next weekend...
Geez thats looking real good mate, cant wait to hear it.
 Posting Permissions

 Reply With Quote