
This looks really cool. Nice work on the heel as well, I always prefer that to be smoothed off a bit.


This looks really cool. Nice work on the heel as well, I always prefer that to be smoothed off a bit.
Build 1 - Shoegazer MK1 JMA-1
Build 2 - The Relliecaster TL-1
Build 3 - The Black Cherry SG AG-1
Build 4 - The Sonicaster TL-1ish
Build 5 - The Steampunker Bass YB-4
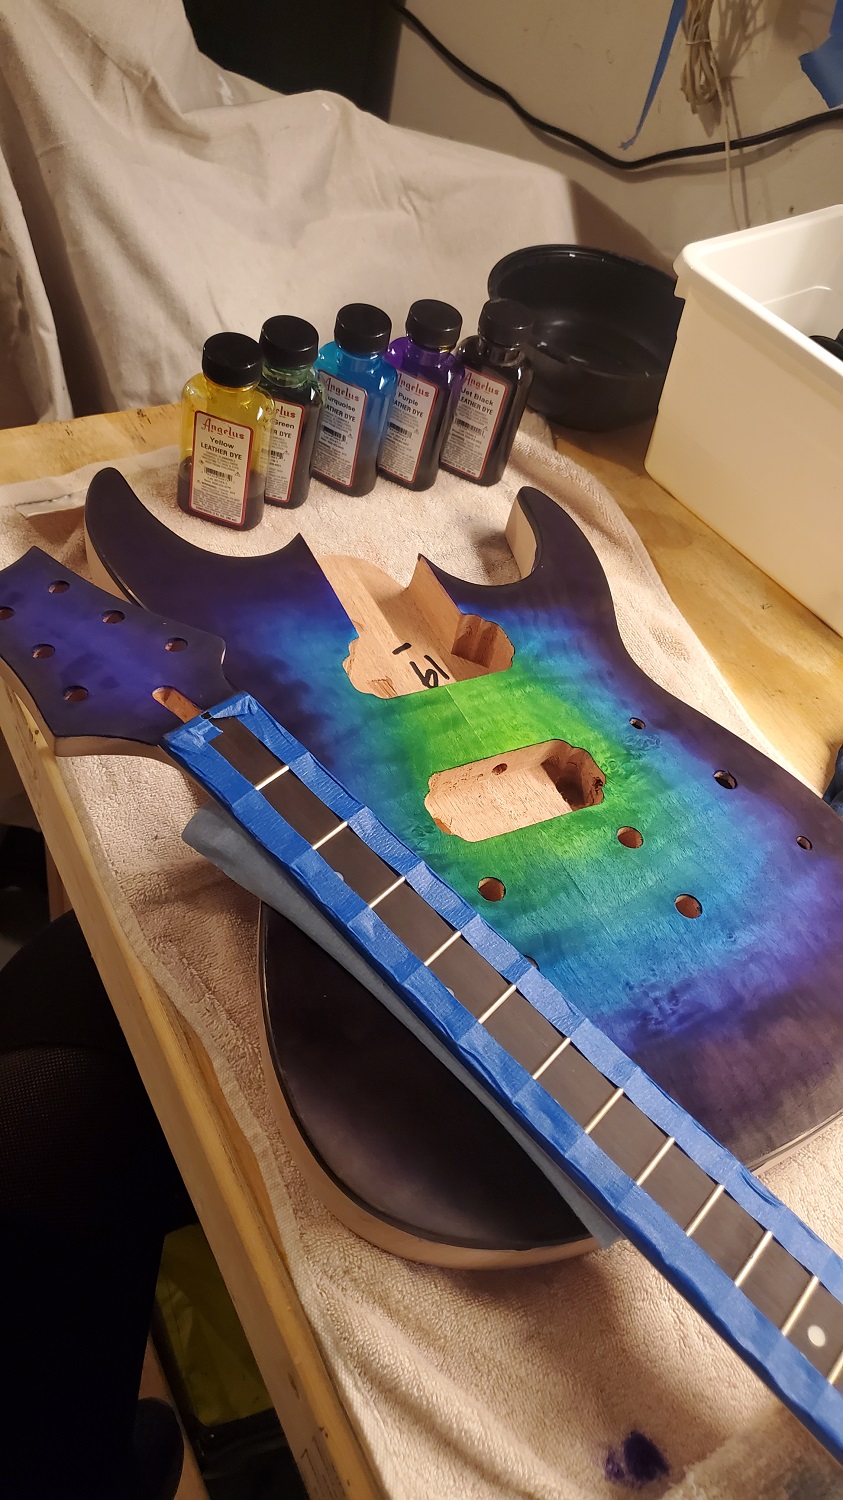
Build 6 - The Howling Gowing ST-1
"What I lack in talent I make up for with enthusiasm"
i did my first guitar soldering not long ago, i found it really helpful to get a couple of extra pots and wiring and do a practice one exactly the same as the real one, watch loads of vids and also get solder with flux inside it, much easier to work with.Originally Posted by marcianotmarsha

Also solder as much as you can on a template outside the guitar before you install, as it can get quite busy trying to do it all inside the guitar.
That's a hell of a paint job, friend-o! Love what you've done with the heel sculpting as well. I'm about to try it (likely with far-uglier results) on a build of mine.
Electrical is definitely nerve wracking, I would suggest getting a few wiring diagrams from the web, plus the folks here really know what they're talking about. You're in good hands

The nice thing about electrics is that most individual bits are fairly cheap, and unless you contrive to melt the pickups or something it's hard to do anything irrevocable. The main thing is to make sure the soldering iron can't possibly contact that spectacular finish. Lots of cardboard masks and stuff.
Build #1, failed solid body 6 string using neck from a scrapped acoustic (45+ odd years ago as a teenager!)
Build #2, ugly parlour semi with scratch built body and ex Peavey neck
Build #3, Appalachian Dulcimer from EMS kit
Build #4, pre-owned PB ESB-4
Build #5, Lockdown Mandolin
Build #6, Sixty six body for Squier
Build #7, Mini Midi Bass
Build #8, Acousticish Telecasterish Guitar
soldering really isn't a black art, its very easy when you follow a few basic rules. The surfaces to be joined have to be clean and bright, not such a problem on the wire but the back of pots need abrading to make them shine a bit.
The soldering iron tip needs to also be clean, abrade it the tip with a light rub of wet and dry and then tip cleaner. Dip in in flux (which I personally use for all soldering, even with flux cored solder) and then when it comes in contact with solder the latter should be shiny, if it's dull and blobby you'll get a cold joint which will lead to excessive contact with electrical parts trying to get a good joint and possible burn out of pots.
Also when soldering a resistor to a pot, use a heat sink such as an hair clip to on one of the terminals to prevent over heating of the component.
Soldering if done correctly is in out fast, if the preparation is right that's the way it will go.
decided to make a fret leveler.
First I leveled off an aluminum level by sanding it down until I wore off all the sharpie from the entire surface,
then double sided duct tape for the win to attatch 1200 grit sandpaper.


Also, been shellacking and poly-ing the body and neck...
Not "Black art" you say.
I know SOME of the words in all of what you've said. But not many of them.yikes!
Here is a good link for soldering, its for electronic boards but still relevant for some technique
http://mightyohm.com/files/soldercom...erComic_EN.pdf

That's great! Good on ya.decided to make a fret leveler.
First I leveled off an aluminum level by sanding it down until I wore off all the sharpie from the entire surface,
then double sided duct tape for the win to attatch 1200 grit sandpaper.
You'll find there are quite a few DIY luthier tools that are inexpensive to make, and can be just as effective as bought ones.
I personally prefer a shorter levelling bar, but plenty of folks use longer ones. They both have their places.
Another alternative to double-sided tape is painter's tape and CA glue. Crimson Guitars does a video on how to do it if you're interested.
Making the world a better place; one guitar at a time...
how did you go about drilling such an animal? as far as the angling to be able to do that from the bridge to the bridge pickup?? and would it be something I needed to do if I grounded the copper shielding tape?
the wiring is starting to get me nervous, as that's coming up really soon. I've just been working (and reworking) on the finish the last couple of weeks.
 Posting Permissions

 Reply With Quote