
Thank you Tony. I'm trying.


Thank you Tony. I'm trying.

New binding looking good Muzza. I also like the colour you have stained the body.
Current Projects
#Planning 5 String Bass
2 steps forward, 4 steps back. Ya live, ya learn.
New binding had to come off.
There were a few 'oversights' I made - first of which, the cheap router bit I used wasn't symmetrical in either cutter blade width or depth.
The distance 'A' is greater than 'B'. This wouldn't have been a problem if 'A' was less than 'B', or both cutter blades were the same depth. Combined, they left a little 'step' at the bottom of the rebate (rabbet for you North Americans) which I didn't notice with my barely adequate eyesight.
I only found out when the masking tape holding the binding in place came off - I noticed that the binding had a slight angle to it - the face of the binding not being parallel with the face of the guitar edge.
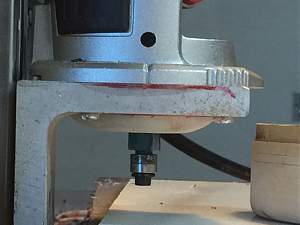
Another problem I encountered was that the edge of the body wasn't square, so when it came to trimming the binding with a flush trimmer, I went right through to the black core in a few places.
So, I went to square up the sides of the guitar body, only to find that my bench mounted router has decided it doesn't want to work any more.
So with my by now famous lack-of-patience, I decided to square it all up with a hand held router...VEEEEERRRRRY CAAAAAREFULYYYYYY!
Only one tiny nick, which can be filled, so I'm happy with that.
I found a better quality flush bit that I'd actually forgotten I had - the one that came with my Makita router. Not bad quality at all.
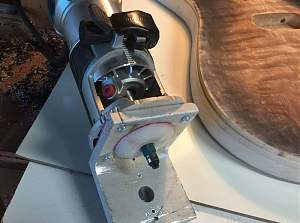
Now here's my cheap-assed luthier tip for the day - instead of spending nearly $300 for the StewMac binding router set, if you've got a set of router bits, you've got what you need to make a 0.0625" binding channel rebate (rabbet)
The flush cutter will have a 1/2" guide bearing (0.5"), the chamfer bit, rounding bit, edge moulding bit, etc will have a 3/8" bit (0.375") and the same internal diameter. 0.5" minus 0.375" equals 0.125". Halve that and there's your 0.0625" binding channel. The white/black/white binding I'm using is 0.07", so with the bit of give in the soft basswood, the channel is exactly the right depth.
Take off the 1/2 inch bearing and put on the 3/8" bearing. If the bit that holds the bearing in place is slightly too long (this is actually a GOOD thing) put two bearings on. This will distribute the lateral force over a larger area of bearing face, so it won't dig into the basswood as deeply.
I've read that you can also reduce the depth of cut quite accurately by putting one, two or three layers of the copper shielding tape (accurately!!!) over the top of the bearings. I haven't personally tried this as the stock dimensions fitted my needs perfickly.
Last edited by Muzza; 05-03-2016 at 11:08 AM.
first build PRS-1TS in progress...
http://www.buildyourownguitar.com.au...ead.php?t=4937
second build PRS-1Q in progress...
http://www.buildyourownguitar.com.au...ead.php?t=4956
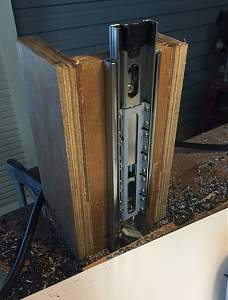
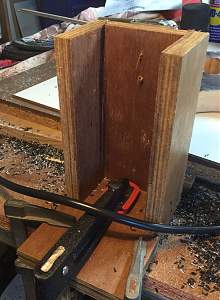
I don't know if you're interested, but here's the binding routing jig I made.
It's main components are a drawer slider, an aluminium solar panel mounting bracket and a nylon cutting board.
I had to shorten the drawer slider, which is a task not recommended for the faint of heart. The Makita laminate trimmer's power cord is quite thick and unyeilding, and comes out right where it's most unwelcome.
Also, if I was to make another one, I would use both drawer sliders (comes in a pack of 2) as there is a bit of lateral pressure when you're cutting the channel and although it's not critical, (the bearing dictates the depth of cut) the amount of movement was visibly noticeable.
The nylon guide - I used a holesaw to cut out a disk from one of the missus' cutting boards. I then screwed it onto to a coach bolt, (you know the ones with the round head and square shaft immediately below it?) The square bit held the nylon disc in place, I put the coach bolt into the drill press, put it on the highest speed, used the drill press vise table as a tool rest for a very sharp chisel. That's how I got the rounded sides.
You just have to make sure that all the bits of timber for the mounting frame are all perfectly square.
first build PRS-1TS in progress...
http://www.buildyourownguitar.com.au...ead.php?t=4937
second build PRS-1Q in progress...
http://www.buildyourownguitar.com.au...ead.php?t=4956

Great job on the binding router jig Muz, while you're probably not enjoying the tribulations you're certainly overcoming them.

cool jig, hang in there mate
Stan's LP Build for my Sister: http://www.buildyourownguitar.com.au...ead.php?t=3146
Benson Pickup Strat mod: http://www.buildyourownguitar.com.au...ead.php?t=5229
Epiphone LP headstock fix: http://www.buildyourownguitar.com.au...ead.php?t=3410
Martin Backpacker Repair: http://www.buildyourownguitar.com.au...?t=5038&page=3
'57 Harmony Jazz guitar project: http://www.buildyourownguitar.com.au...ead.php?t=2972
Love the jig, i am just about to buy a palm router, i will have to keep this in mind.

This build is looking really classy. I like it a lot, well done Muzza
Geez, thanks Dedman.
I don't think anybody's ever attributed the word "classy" to anything I've been associated with.
first build PRS-1TS in progress...
http://www.buildyourownguitar.com.au...ead.php?t=4937
second build PRS-1Q in progress...
http://www.buildyourownguitar.com.au...ead.php?t=4956

Bugga about that, but good lesson.
Build #1 - ST-1 - Completed
Build #2 - LP-1SS - Completed
Build #3 - TLA-1R - Completed
Build #4 - SGD-612 - Completed
Build #5 - ES-1G - Completed
Build #6 - STA-1HT | Completed
Build #7 - ST1JR - Completed
Current Build #8 - JBA-4
Build #9 - Semi-scratch build Tele x 2 - Completed
Current Build #10 - PRS-1H
Current Build #11 - AGJR-1 - Completed
Current Build #12 - ATL-1SB
Current Build #13 - GST-1
Current Build #14 - FBM-1
 Posting Permissions

 Reply With Quote