Heat from wax potting doesnt affect it, you are only potting at 60C to 65C Poly U doesnt have a melting point
Heat from wax potting doesnt affect it, you are only potting at 60C to 65C Poly U doesnt have a melting point
Last edited by tonyw; 25-02-2016 at 01:55 PM.
All right, thanks Tony.
Progress of sorts. First the good news, the veneer softener worked great and when the pieces were unclamped they were perfectly flat.
The straight edge had moved a bit and wasn't straight any more, but I expected that. In the time spent trimming the edge back to straight and taping that edge to the body, the veneer started to warp a bit. It felt dry, maybe not dry enough. Applied titebond and spread out with a plastic scraper, then into a vacuum bag ( think it was Tindrrel who did that on a ST). The vacuum pulled the veneer onto the body well, but the narrowest part, midway down the body, started to buckle. Clamped some timber over that area and also at the ends of the body. Left it that way for over an hour.
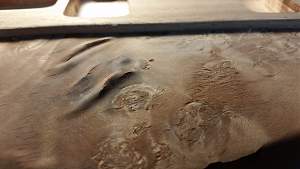
Now the bad news. I have a mountain range next to the neck pickup. The buckling had to go somewhere I guess.
My question to the experienced among you, will cutting the veneer and syringing in glue and clamping fix this, or do I need to scrape off and start again?
At least I now know to clamp one piece of melamine across the whole length when doing the other side.
First pic is the body in the vac bag before the clamps, second is the problem area - had to put a lamp behind it to get the raised bits to show up and not look like part of the burl.
Grant
Bugga!
You may be able to salvage it by wetting and attacking it with a soldering iron to see if it will shrink.
If it does shrink substantially, try injecting some glue and spot clamp it..
For future reference, Fish glue is the easiest glue to use for veneer.
It is water soluable, so all you need to do is coat both surfaces, then mist and clamp/ vacuum bag it.
If you get any bubbles they can be easily dealt with.
Of course, you wont be able to use any water based finishes....
Thanks for the advice, DB.
Just went and checked and the situation has changed slightly. The mountain range isn't as high as it was, good. There are a couple of splits opening up, bad. Two small splits/cracks around burls, probably won't notice when sanded and finished.
From the last pic, the small middle ridge, closest to camera, has split along its length, about 1cm long and .5mm wide. Looks like the veneer wasn't dry enough. If that is the case and it keeps shrinking/drying out, it may need to come off, will wait and see.
Want to use stronger language than Bugga!
Mate you wouldn't be a member here if you didn't have to redo something that took you ages, ask me about painting, haha
Stan's LP Build for my Sister: http://www.buildyourownguitar.com.au...ead.php?t=3146
Benson Pickup Strat mod: http://www.buildyourownguitar.com.au...ead.php?t=5229
Epiphone LP headstock fix: http://www.buildyourownguitar.com.au...ead.php?t=3410
Martin Backpacker Repair: http://www.buildyourownguitar.com.au...?t=5038&page=3
'57 Harmony Jazz guitar project: http://www.buildyourownguitar.com.au...ead.php?t=2972
I'll echo Waz. Too true Stan, too true. I've had a couple - sand back and start again - episodes on previous builds so it's not new ground for me. This one hurts a bit more. Picked the piece that looked the best for that side hoping to only need to do it once. Lesson here is to make sure the veneer is dry enough, didn't have the tool for measuring moisture content and thought it felt dry enough. Nope.
Tried DB's fix. Wet the area with a damp paper towel for 5 minutes then heated it with the soldering iron, in the way you would steam out a dent, hope that is what you meant DB. Did manage to shrink the ridges a bit but they are still there and now all are split. Looks like the splitting was going to happen anyway.
Will need to come off after all. Chalk it down to experience.

bummer Grant, I've had to sand off a body veneer similar thing happened. Hope you have some spare burl veneer
Current Builds and status
scratch end grain pine tele - first clear coat on !
JBA-4 - assembled - final tweaks
Telemonster double scale tele - finish tobacco burst on body and sand neck
Completed builds
scratch oak.rose gum Jazzmaster - assembled needs setup
MK-2 Mosrite - assembled - play in
Ash tele with Baritone neck - neck pup wiring tweaks and play in
Fortunately the minimum order was four sheets, consecutive slices/leaves.
For the replacement, when I think it's ready, will give it an extra week before applying to make sure it's dry enough. The old once bitten thing.
yeah always wise to have backup veneer Grant.
What sort of glue were you using ?
Current Builds and status
scratch end grain pine tele - first clear coat on !
JBA-4 - assembled - final tweaks
Telemonster double scale tele - finish tobacco burst on body and sand neck
Completed builds
scratch oak.rose gum Jazzmaster - assembled needs setup
MK-2 Mosrite - assembled - play in
Ash tele with Baritone neck - neck pup wiring tweaks and play in