
haha Pabs the Fonz, nice work bro


haha Pabs the Fonz, nice work bro
Current Builds and status
scratch end grain pine tele - first clear coat on !
JBA-4 - assembled - final tweaks
Telemonster double scale tele - finish tobacco burst on body and sand neck
Completed builds
scratch oak.rose gum Jazzmaster - assembled needs setup
MK-2 Mosrite - assembled - play in
Ash tele with Baritone neck - neck pup wiring tweaks and play in

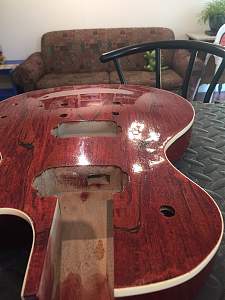
Hey guys another annoying question. gave the body a buff with the micro mesh pads, came up pretty glassy.
However, the spalted cap, although glassy is quite ripply, probably because i was too shit scared to sand it too much before applying the finish.
Do you think i should slap on more naughty oil to cake up then sand down to flat finish or keep it ripply? I don't want it to look too plasticy but i also don't want it to look half finished.
Build #1 - ST-1 - Completed
Build #2 - LP-1SS - Completed
Build #3 - TLA-1R - Completed
Build #4 - SGD-612 - Completed
Build #5 - ES-1G - Completed
Build #6 - STA-1HT | Completed
Build #7 - ST1JR - Completed
Current Build #8 - JBA-4
Build #9 - Semi-scratch build Tele x 2 - Completed
Current Build #10 - PRS-1H
Current Build #11 - AGJR-1 - Completed
Current Build #12 - ATL-1SB
Current Build #13 - GST-1
Current Build #14 - FBM-1
Hey Andy, back looks excellent. Spalted tops are far from flat, so it's really up to you. If you grain filled it, it probably would have ended up much flatter. Personally I would probably leave it and see how it looks cut/polished.I think it would take 5-10 more coats of TO to fill in the low points.
How long since the last coat of TO ? I'd leave it to cure preferably 2-3 weeks before you micro mesh anymore or cut/polish it
Current Builds and status
scratch end grain pine tele - first clear coat on !
JBA-4 - assembled - final tweaks
Telemonster double scale tele - finish tobacco burst on body and sand neck
Completed builds
scratch oak.rose gum Jazzmaster - assembled needs setup
MK-2 Mosrite - assembled - play in
Ash tele with Baritone neck - neck pup wiring tweaks and play in

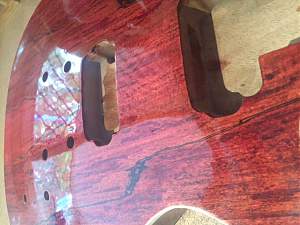
Agree with Woks in that it looks a bit thirsty and in need of more TO as a grain filler as per the manufacturers recommendations.
Hi guys, not much to report. I am literally applying TO coats to try and fill the dips in spalting, waiting to cure, sanding down then re-applying.
The TO can't soak much because i already grain filled with ebony timbermate and sanded flattish (as much as I dared on the veneer), its also had umpteen coats of DT stain and intensifying coats before I switched to TO as a finish.
I am getting there, but its a S L O W process but I imagine it will be rewarding. I reckon I'm about 75% to 85% there.....
I can comment now that TO is definitely a forgiving finish for Qld's humid conditions. It was about 90frigginpercent humidity yesterday when I slapped on a coat and there was no problems....no hazing, clouding over or long drying time (just a bit longer than usual)
Build #1 - ST-1 - Completed
Build #2 - LP-1SS - Completed
Build #3 - TLA-1R - Completed
Build #4 - SGD-612 - Completed
Build #5 - ES-1G - Completed
Build #6 - STA-1HT | Completed
Build #7 - ST1JR - Completed
Current Build #8 - JBA-4
Build #9 - Semi-scratch build Tele x 2 - Completed
Current Build #10 - PRS-1H
Current Build #11 - AGJR-1 - Completed
Current Build #12 - ATL-1SB
Current Build #13 - GST-1
Current Build #14 - FBM-1
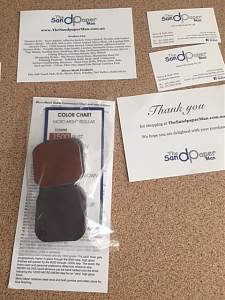
Just as a side note (especially for Qld) I bought the Micromesh pads from the Sandpaperman here in brissy. https://www.thesandpaperman.com.au/
I was too lazy to drive there, so they sent them to me. great product and service. They are, as "Snoopdog" would say, "dope".
Build #1 - ST-1 - Completed
Build #2 - LP-1SS - Completed
Build #3 - TLA-1R - Completed
Build #4 - SGD-612 - Completed
Build #5 - ES-1G - Completed
Build #6 - STA-1HT | Completed
Build #7 - ST1JR - Completed
Current Build #8 - JBA-4
Build #9 - Semi-scratch build Tele x 2 - Completed
Current Build #10 - PRS-1H
Current Build #11 - AGJR-1 - Completed
Current Build #12 - ATL-1SB
Current Build #13 - GST-1
Current Build #14 - FBM-1

That's looking pretty spectacular, Andy!
I appreciate your frustration with the humidity... it's just dropped to 78%, and we were hoping to put some paint on the young bloke's MB-1 today.
1st build - Blue ES-12G ->-Build Diary-<-
2nd build - Father/Son collaboration MB-1 ->-Build Diary-<-
3rd build - GR-SF1 ->-Build Diary-<-
4th build - FS-1 ->-Build Diary-<-
thats looking nice and shiny Andy, looks pretty close to me !
Those micro mesh pads will get the TO nice and flat, but give it 2-3 weeks final curing or you may have the problem Pabs had the TO hadn't fully cured.
Surely this axe will be good enough to hang on a wall in the house somewhere !
Current Builds and status
scratch end grain pine tele - first clear coat on !
JBA-4 - assembled - final tweaks
Telemonster double scale tele - finish tobacco burst on body and sand neck
Completed builds
scratch oak.rose gum Jazzmaster - assembled needs setup
MK-2 Mosrite - assembled - play in
Ash tele with Baritone neck - neck pup wiring tweaks and play in
Thanks guys.
@swanny...I hope the humidity drops enough for you, but not sure if thats going to happen!
@wokks...thats what i'm aiming for ....straight to the lounge room!
Build #1 - ST-1 - Completed
Build #2 - LP-1SS - Completed
Build #3 - TLA-1R - Completed
Build #4 - SGD-612 - Completed
Build #5 - ES-1G - Completed
Build #6 - STA-1HT | Completed
Build #7 - ST1JR - Completed
Current Build #8 - JBA-4
Build #9 - Semi-scratch build Tele x 2 - Completed
Current Build #10 - PRS-1H
Current Build #11 - AGJR-1 - Completed
Current Build #12 - ATL-1SB
Current Build #13 - GST-1
Current Build #14 - FBM-1

Wow looking nice and shiny Andy. TO does become a little frustrating (at least for me) when you get the shine 98% there and you are just looking for that last coat. Despite that, you seem to have knack. The colour looks amazing and the clear coats are showing it off perfectly.
cheers,
Gav.
--
Build #01: BC-1
Build #02: ST-1
Build #03: JR-1DC
Build #04: ES-2V
Build #05: ESB-4 (GOTM July 2014)
Build #06: RC-1
Build #07: MK-2
Build #08: TLA-1
Build #09: JR-1DC
Build #0A: LPA-1
Build #0B: STA-1 (GOTM April 2015)
Build #0C: MKA-2
Build #0D: LP-1M
Build #0E: JB-1
Build #0F: FS-1
Find me:
https://www.facebook.com/firescreek.guitars/
http://www.guitarkitbuilder.blogspot.com.au/
 Posting Permissions


 Reply With Quote