
Now that looks awesome.Originally Posted by zeromick


Now that looks awesome.

Cheers man, so yeah... its just black burst and clear on mine, I think it would suit yours way better as you've already got the burst going on with the stains. It should blend through real nice and fix the problem of the stain not taking on the edges

wow, nice job. that burst worked out just right
Stan's LP Build for my Sister: http://www.buildyourownguitar.com.au...ead.php?t=3146
Benson Pickup Strat mod: http://www.buildyourownguitar.com.au...ead.php?t=5229
Epiphone LP headstock fix: http://www.buildyourownguitar.com.au...ead.php?t=3410
Martin Backpacker Repair: http://www.buildyourownguitar.com.au...?t=5038&page=3
'57 Harmony Jazz guitar project: http://www.buildyourownguitar.com.au...ead.php?t=2972

Nice burst! Can't believe you did it with a rattle can. Amazing job man!
cheers,
Gav.
--
Build #01: BC-1
Build #02: ST-1
Build #03: JR-1DC
Build #04: ES-2V
Build #05: ESB-4 (GOTM July 2014)
Build #06: RC-1
Build #07: MK-2
Build #08: TLA-1
Build #09: JR-1DC
Build #0A: LPA-1
Build #0B: STA-1 (GOTM April 2015)
Build #0C: MKA-2
Build #0D: LP-1M
Build #0E: JB-1
Build #0F: FS-1
Find me:
https://www.facebook.com/firescreek.guitars/
http://www.guitarkitbuilder.blogspot.com.au/
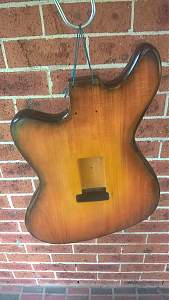
It was swelteringly hot at the start of the week, so I took the opportunity to get another round of stains done. I really didn't like how the left edge of the body was looking, so I sanded it back to wood (just that one edge) to see if it would make any difference in regards to taking stain. It didn't.
So I tried staining the bare edge with orange (Outback Sunset) but that didn't have much more luck than the black. It was so hot that the stain was drying fairly quick, so I spent probably an hour just going over that section with black slowly darkening the colour and also put another layer of stain across the rest of the body.
I don't have any photos from during the week, but today I opened up another bottle of black stump and did another full stain coat and tried to darken those edges some more.
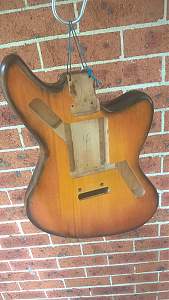
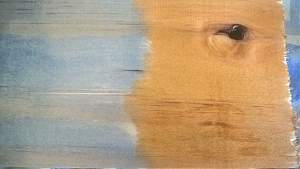
This patch up by the neck joint just won't take any more stain.
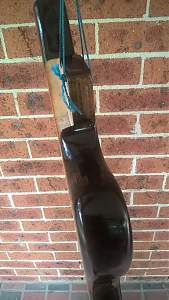
These shots are of the edge I sanded back. There's actually a hint of orange in the light patches that the camera doesn't pick up. The crappy phone actually makes it look better than in the flesh.
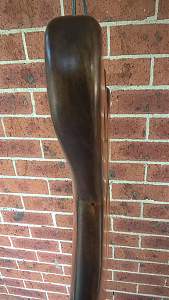
Here's the neck with 2nd intensifier coat
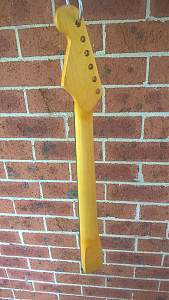
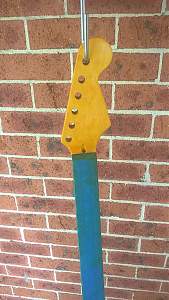
I'm reasonably happy with how it's looking, it's a nice golden vintagey looking yellow. The secret has been the otherwise unused bottle of Bondi Blue I had laying around.
After the Mission Beach stain mix, I used a similar mix of DT intensifiers: equal parts Outback Sunset and Bondi Blue to make a dark pooey brown and then Coolangatta Gold to lighten it to a... lighter pooey brown.
This is the intensifier mix on pine:
I think I'm just going to live with the imperfections in the stain in the body and move on to doing intensifier coats next week. I have considered painting the edges as suggested by Zeromick above, but I will probably balls it up. Plus I am kinda liking the reliced look and the Dingotone feels really good. After about 4 coats of just the stain and rubbing back with steel wool it had an almost satin like feel. I'd be happy with it as is really.
Do I need to use the intensifier and final coats?
Dunno man, she looks pretty sweet from what I can see. You'll find that once the intensifyer and clear coats go on the fnish will deepen and many of the perceived imperfections will fade away. She's gonna look killer!
cheers,
Gav.
--
Build #01: BC-1
Build #02: ST-1
Build #03: JR-1DC
Build #04: ES-2V
Build #05: ESB-4 (GOTM July 2014)
Build #06: RC-1
Build #07: MK-2
Build #08: TLA-1
Build #09: JR-1DC
Build #0A: LPA-1
Build #0B: STA-1 (GOTM April 2015)
Build #0C: MKA-2
Build #0D: LP-1M
Build #0E: JB-1
Build #0F: FS-1
Find me:
https://www.facebook.com/firescreek.guitars/
http://www.guitarkitbuilder.blogspot.com.au/
Thanks Gav. I'll continue on with the intensifier and clear coats. It's tough being patient though. I'm hoping the weather warms up again to speed up the drying times.

Looking sweet as Bluesy. I like the neck colour
Current Builds and status
scratch end grain pine tele - first clear coat on !
JBA-4 - assembled - final tweaks
Telemonster double scale tele - finish tobacco burst on body and sand neck
Completed builds
scratch oak.rose gum Jazzmaster - assembled needs setup
MK-2 Mosrite - assembled - play in
Ash tele with Baritone neck - neck pup wiring tweaks and play in
 Posting Permissions


 Reply With Quote