
Thanks for the tip wokka. I'll start with the black on the second coat and let it dry a bit before adding the colours.


Thanks for the tip wokka. I'll start with the black on the second coat and let it dry a bit before adding the colours.

hey BH the neck looks unreal I love the colour you got. If it's too bright for your taste sand it back a bit and add a bit more OS in the mix for next coat. That may suit the body colour better
Last edited by wokkaboy; 02-01-2016 at 10:24 AM.
Current Builds and status
scratch end grain pine tele - first clear coat on !
JBA-4 - assembled - final tweaks
Telemonster double scale tele - finish tobacco burst on body and sand neck
Completed builds
scratch oak.rose gum Jazzmaster - assembled needs setup
MK-2 Mosrite - assembled - play in
Ash tele with Baritone neck - neck pup wiring tweaks and play in

Be careful mixing in the OS as things can turn very Orange very quickly as I found on my EX-5.Originally Posted by wokkaboy


Awesome job on the burst man... looks the goods!
slight left of field idea here, on a scratch build I done a few years ago with a similar finish to yours I hit the outside edge with some black paint, just enough to cover the timber but still keep the burst on the face and back.
@wokkaboy
Now that you mention it, I should have sanded the first coat back a bit before applying the second. I'll see how it looks once it has dried.
@wazkelly
Thanks for the tip wazkelly, the colour guide in your EX-5 diary was what helped me decide on the CG/OS burst. It's a great reference. I am hesitant to use more OS. To hazard a guess, I mixed about 1 part OS to at least 10 parts MB. It's a bit hard to see with my crappy phone, but there was some bare maple on the heel after the first coat. I went over it with the second coat just to see the colour difference - and it is quite orange. I don't think I'd want any more than that.
@zeromick
I was wondering if that would work. I have no idea about paint and finishing, is there a particular type of paint that should be used?
Hi Blueshound, happy that my DT experiment on the EX-5 has helped others with how much OS to use. I was using 3:1 ratio and in hindsight 5:1 CG to OS might have been closer to where I wanted to be but it all turned out OK. These days everyone keeps telling me Orange is the new Black.
Hahaha, yes.
It was straight back to work in the new year so I haven't been online lately, but I have been doing a lot of evening sanding on my other LP-1S build.
Second stain coat has gone on.
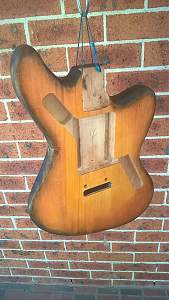
For the second coat I lightly sanded back the black edges, then started with the black. I let it dry a bit before hitting it with the orange. Unfortunately the areas that didn't take the black stain the first time around, still didn't take the second coat of stain. Still, I'm pretty happy with how it's looking.
I was thinking of painting the black edges but I'm worried it's not going to blend with what's already there - and I do like the burnt look. The other option I was thinking of was to go over the patchy black areas with the Outback Sunset to continue the burn motif. Something for next weekend.
Hey mate, I just used rattle can black (if you are clearing it make sure the paints will be compatible)
I just sprayed it directly on the sides and the overspray worked itself out to a nice consistent gradient.

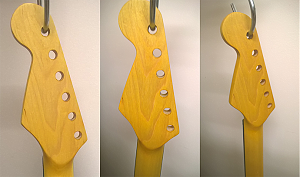
The neck dried back to the fluoro yellow as if the orange I mixed in got sucked away into the ether. At this point, I want to try and explain myself because when you look at the previous pictures, the colour actually looks quite good. So what is this guy whinging about?
When viewing the neck from a distance indoors, it does actually look like the photos. It's only under bright light, up close that it starts to look like something worn at a construction site. Even with a few other colours as reference, I can't capture it on my phone:
So I resorted to Photoshop to give a bit more of a representation of what it looks - or rather, looked - like:
Quite a bit of sanding, colour experimentation and a day of drying later and I think I've got a yellow tone that I'm happy with.
And yes, when you line up all the photos of the colour changes it does seem a bit like going from Ocean Grey to Military Grey, but my obsessive compulsive side can rest a bit easier - for now.
 Posting Permissions

 Reply With Quote
