
That's looking fantastic, Fred! I like the touches of gold showing through, as well. I'm with Andrew, leave it as it is, it's not a flaw, it's part of the guitar's character.


That's looking fantastic, Fred! I like the touches of gold showing through, as well. I'm with Andrew, leave it as it is, it's not a flaw, it's part of the guitar's character.

I've got a question for the Meguiars experts here: the body is very shinny now, but it seems to be quite soft and it can easily be scratched.
Is that going to dry harder?
And should I finish the body with wax? I've got some Dingotone Wax, does it work over Acrylic?
Cheers
#1- STA1M - Completed Jan16 - GOTM Feb16 - Here
#2- IB5 - Completed Aug16 - Here
#3- 335 style 12 strings - 3rd build - Almost done - Here
No #- SG1 'Franck Zappa' - Completed Apr16 for a friend - No build diary (yet?)
#4- 'The Red Plywood Strat' - Completed Aug16 - Here
#5- ST-1JR Star Wars - Completed Dec16 - Here
#6- SG 3 pickups - Almost done - Here
#7- JBA-4M JPJ Bass - Completed Mar18 - Here

hey Fred this is looking very nice, love the level of gloss you got. I'd leave that crack, it's a feature that shows it's been hand made.
If the gloss seems a bit soft then I'd let it cure a bit longer. I'd continue with your polish and wax the fingerboard
Current Builds and status
scratch end grain pine tele - first clear coat on !
JBA-4 - assembled - final tweaks
Telemonster double scale tele - finish tobacco burst on body and sand neck
Completed builds
scratch oak.rose gum Jazzmaster - assembled needs setup
MK-2 Mosrite - assembled - play in
Ash tele with Baritone neck - neck pup wiring tweaks and play in
Thanks guys. I'm sold, the crack will stay as a proof that I made this guitar! :-)
I'm going to let it cure a bit more as suggested.
The neck got it's final final coat of dingotone Sat, so i'm going to leave it alone for a few days too.
I've got to start the electronics anyway. Swapping the standard pickups for the toneriders, changing the jack and maybe changing the wires with proper one too.
Sent from my 0PJA10 using Tapatalk
#1- STA1M - Completed Jan16 - GOTM Feb16 - Here
#2- IB5 - Completed Aug16 - Here
#3- 335 style 12 strings - 3rd build - Almost done - Here
No #- SG1 'Franck Zappa' - Completed Apr16 for a friend - No build diary (yet?)
#4- 'The Red Plywood Strat' - Completed Aug16 - Here
#5- ST-1JR Star Wars - Completed Dec16 - Here
#6- SG 3 pickups - Almost done - Here
#7- JBA-4M JPJ Bass - Completed Mar18 - Here

Looks great! I am not game to try a burst for my first one, you have done a great job.
So, I'm on leave and the weather is just rubbish here in Sydney, so I thought I'd finally get started on the electronics for the STA1M.
I removed everything from the pickguard first, and applied copper tape everywhere:
I used a mix of tape I got from PBG and a roll of snail and slug barrier from the green shed.
The snail and slug barrier is actually a roll of copper tape, and it's narrower than the PBG tape so was good to get in corners and small spots.
Once installed I tested continuity with the multimeter and all good, even without any soldering. Pretty happy with that.
Next I installed the tonerider pure vintage and re-installed the pots and the switch.
I had ordered gold screws for the pickups and the switch as I didn't want to have a few chrome screw heads next to the pickguard golden screw heads.
No issues with the pickup screws, but the switch is a problem...
The gold screws I got are slightly bigger than the one that came with the kit... and they don't fit in the switch holes. I thought I could just enlarge the switch holes with the drill. I did one, but it didn't work... and because I've drilled it, the original screw is too small now... bummer...
So for now I've installed the switch with one original screw, and I've soldered the golden screw in place... pretty 'ghetto' and it's not tight enough.
So I've just ordered online a new switch (I used that as an excuse to upgrade to a good one), and a new set of gold screws as I think I messed up one...
Anyway, I still soldered it all together so I can test it while I wait for the new switch.
Talking of soldering, I had not touched a soldering iron since I left uni... 18 years ago... and I struggled big time... pretty ordinary considering I've got a master in electrical engineering!
I managed to solder the pickups grounds to the back of the pots where I removed the old ones from... but I was scared I'd cook the pot...
Looks like I'd better watch a few 'soldering for dummies' youtube videos!!!
Here are a few pics of the pickguard completed:
The switch with different screws:
And because I still had some time, I also shielded the body cavities:
I should get started putting it together, but I the acrylic gloss finish still feel 'softish'. It's harder to scratch than before (I've been trying to scratch it with my nail where the pickguard will cover), but I'm still scared I'm going to make a big scratch...
For the guys who are using White Knight Acrylic Gloss and then buff with the Meguiar products, have you had any issue with the finish taking a long time to cure?
Do you add any way or anything to protect it?
Cheers
#1- STA1M - Completed Jan16 - GOTM Feb16 - Here
#2- IB5 - Completed Aug16 - Here
#3- 335 style 12 strings - 3rd build - Almost done - Here
No #- SG1 'Franck Zappa' - Completed Apr16 for a friend - No build diary (yet?)
#4- 'The Red Plywood Strat' - Completed Aug16 - Here
#5- ST-1JR Star Wars - Completed Dec16 - Here
#6- SG 3 pickups - Almost done - Here
#7- JBA-4M JPJ Bass - Completed Mar18 - Here
Hey guys,
So I received the new 5 way switch (CRL 5 Way Switch) and I replaced the one that came with the kit with this one:
I had to bend the connectors and wires as this switch is a bit deeper than the initial one and I was concerned it would make contact with the cavity shielding.
And then it was time to put it all together!
Pretty happy with the result I have to admit! There's a few small defects but I can live with them and I'll put that on the lack of experience for the first build.
I then started to intonate, etc. and I was struggling with buzzing frets.
I lowered the bone nut, checked that the neck was straight and added some bow. I got it working, but the saddles were very high and the action wasn't great at all.
Then I realised I still had the cheap loose strings that came with the kit (not the PitBull guitars ones, the ones that are not even packed). I used them to check alignment etc. and when I was playing with the nut height. I had buzzing issues before on my Ibanez because the strings were too old, so I swapped the crappy strings with the PBG ones.
While the strings were off I reversed most of the corrections I did, straightened the neck again, lowered saddles and I saw on Gavin Turner's blog that he lowered the six last frets to help lower the action, so I did that:
I retuned the guitar, played with the saddles a fair bit, and now the action is much much better!
I'm going to see how it settles after a few days/weeks before I call it finished.
Anyway, I plugged it in, and I love the sound!
The Tonerider Pure Vintage sound very nice! And I now have a guitar with single coil pickups to complement my HH Ibanez. Pretty happy!
Last edited by FredA; 10-01-2016 at 01:21 PM.
#1- STA1M - Completed Jan16 - GOTM Feb16 - Here
#2- IB5 - Completed Aug16 - Here
#3- 335 style 12 strings - 3rd build - Almost done - Here
No #- SG1 'Franck Zappa' - Completed Apr16 for a friend - No build diary (yet?)
#4- 'The Red Plywood Strat' - Completed Aug16 - Here
#5- ST-1JR Star Wars - Completed Dec16 - Here
#6- SG 3 pickups - Almost done - Here
#7- JBA-4M JPJ Bass - Completed Mar18 - Here
And now that the guitar finally looks like a complete job, I took it out in the sun and had a bit of a photo shoot session, looks pretty nice!
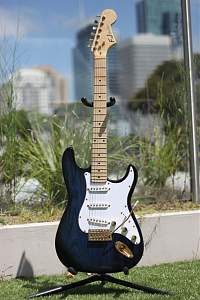


Last edited by FredA; 10-01-2016 at 01:22 PM.
#1- STA1M - Completed Jan16 - GOTM Feb16 - Here
#2- IB5 - Completed Aug16 - Here
#3- 335 style 12 strings - 3rd build - Almost done - Here
No #- SG1 'Franck Zappa' - Completed Apr16 for a friend - No build diary (yet?)
#4- 'The Red Plywood Strat' - Completed Aug16 - Here
#5- ST-1JR Star Wars - Completed Dec16 - Here
#6- SG 3 pickups - Almost done - Here
#7- JBA-4M JPJ Bass - Completed Mar18 - Here
And a few more:
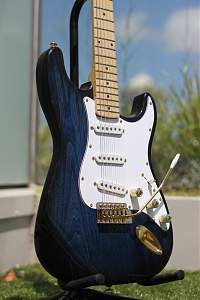
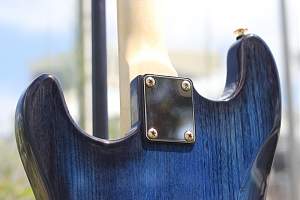
Last edited by FredA; 10-01-2016 at 01:23 PM.
#1- STA1M - Completed Jan16 - GOTM Feb16 - Here
#2- IB5 - Completed Aug16 - Here
#3- 335 style 12 strings - 3rd build - Almost done - Here
No #- SG1 'Franck Zappa' - Completed Apr16 for a friend - No build diary (yet?)
#4- 'The Red Plywood Strat' - Completed Aug16 - Here
#5- ST-1JR Star Wars - Completed Dec16 - Here
#6- SG 3 pickups - Almost done - Here
#7- JBA-4M JPJ Bass - Completed Mar18 - Here

Fred that has come up a treat. very nice guitar
Tony
 Posting Permissions

 Reply With Quote
