Page 3 of 3 FirstFirst 1 2 3
Results 21 to 28 of 28

Thread: My first build ES-1GT

  1. #21
    Member
    Join Date
    Mar 2023
    Location
    Adelaide
    Posts
    20
    Well, Time to get back to my log, it's been a while and I have recently (early December) finished my journey but have lagged behind keeping up with the documentation.

    The four week wait passed really slowly so in the mean time, back to ebay to pick up a sander/polisher. Now that I have a compressor there are no end of air tools to explore.

    Click image for larger version. 

Name:	Sander-polisher.jpg 
Views:	1110 
Size:	206.0 KB 
ID:	45002

    I also bought some foam pads and a bunch of sheepskin pads.

    I wet sanded the Nitro by hand with 800, 1500, 2000 and finally 3000 grit paper.

    I then polished using Meguiar's Polishing compound using my air polisher with 2 different grades of foam.
    Click image for larger version. 

Name:	Air polisher.jpg 
Views:	1127 
Size:	166.2 KB 
ID:	45005 Click image for larger version. 

Name:	Air polisher2.jpg 
Views:	1183 
Size:	179.5 KB 
ID:	45006

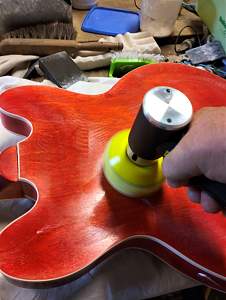
    Here it is after polishing:
    Click image for larger version. 

Name:	ready to polish.jpg 
Views:	1154 
Size:	263.6 KB 
ID:	45003 Click image for larger version. 

Name:	high gloss2.jpg 
Views:	1157 
Size:	223.1 KB 
ID:	45004

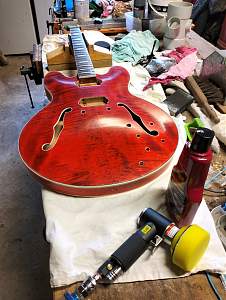
    The pictures don't really show just how shiney this is now.
    Last edited by davidhart; 26-12-2023 at 01:03 PM. Reason: update

  2. #22
    Member
    Join Date
    Mar 2023
    Location
    Adelaide
    Posts
    20
    With the finishing done, I lined the pickup cavities with copper sheilding:

    Click image for larger version. 

Name:	copper sheilding.jpg 
Views:	1003 
Size:	311.4 KB 
ID:	45008

    I overlapped the edges of the pieces and soldered between them. This was probably unnecessary but easy to do to ensure continuity.

    I then installed the Tonerider Birmingham Pickups and a roller bridge that I also picked up while waiting for the Nitro to cure.

    Click image for larger version. 

Name:	pickups in.jpg 
Views:	1001 
Size:	214.0 KB 
ID:	45012

    I found getting the electronics into the cavity a challenge. I started out using plastic tubing to pull the pots through but that turned out to be more trouble than it was worth and ended up using brass wire which was way more flexible.

    Click image for larger version. 

Name:	electronics.jpg 
Views:	976 
Size:	228.4 KB 
ID:	45013

    When I tested the wiring, I found that one of the volume pots was very noisy and intermittent so I had to pull the whole lot out again and order a new pot.
    Last edited by davidhart; 26-12-2023 at 01:47 PM.

  3. #23
    Member
    Join Date
    Mar 2023
    Location
    Adelaide
    Posts
    20
    In the mean time I researched different wiring diagrams for split coil pick ups and went with a variation the following.

    Click image for larger version. 

Name:	Split and phase reverse.jpg 
Views:	1003 
Size:	172.2 KB 
ID:	45011

    This gives me a master coil split on the Bridge volume (I can have both pickups split or neither) and a phase revese on the Neck Volume.

    The Variation is that I ran the hot wire from the pickups to the centre of the volume pots and the pickup selector swith from the lefthand terminal (looking at the back) so that I can blend the pickups without losing both if I turn one all the way down. This is hard for me to explain but here goes. With most wiring diagrams I have seen, the pickup selector switch is wired to the centre of the volume pot. When you turn the volume down to nothing this puts an earth from the pot case onto the centre of the selector switch - ok when using a single pickup. When you set the switch to use middle position (both pickups) and turn one down, that earth is applied to both pickups via the selector switch so if you turn one all the way down, you lose the signal from both.

    I also opted for 50's wiring for the tone pots.

    I then did a full setup following the TRAIN acronym:
    Tune, Releif, Action, Intonation, Nut. I then balanced the Pickup heights to give an even volume bewween them.
    Last edited by davidhart; 26-12-2023 at 02:03 PM.

  4. #24
    Member
    Join Date
    Mar 2023
    Location
    Adelaide
    Posts
    20
    So, Here is the finished ES-1GT in Cherry Red with Nitrocelulose Lacquer with a custom Mother of Pearl Headstock inlay.

    with the following upgrades:

    Tonerider Birmingham Pickups
    Locking Tuners
    Bone Nut
    Push Pull Bournes Volume Pots
    CTS Tone Pots
    Orange Drop Capacitors
    Roller Bridge
    Strap Locks (I do not want to drop this instrument)

    Click image for larger version. 

Name:	IMG20231010170143.jpg 
Views:	1010 
Size:	274.8 KB 
ID:	45014 Click image for larger version. 

Name:	back.jpg 
Views:	986 
Size:	205.6 KB 
ID:	45016 Click image for larger version. 

Name:	headstock (2).jpg 
Views:	1003 
Size:	183.2 KB 
ID:	45015

    She plays like a dream with a very low action.
    Sounds great through my 5 watt Big White Monkey "Chimp" MK III valve combo.
    The pickups are great. Very clear clean tones but not as 'chimey' as my Gretch.
    Last edited by davidhart; 26-12-2023 at 02:20 PM.

  5. #25
    Moderator Trevor Davies's Avatar
    Join Date
    May 2020
    Location
    Perth
    Posts
    1,671
    Looks great, well done! The colour combo goes really well.
    PitBull Builds: FVB-4, LP-1SS, FBM-1, AG-2, TB-4, SSCM-1, TLA-1,TL-1TB, STA-1HT, DSCM-1 Truckster, ST-1, STA-1, MBM-1, MBM custom, GHR-1 (Resonator).

    Scratch Builds: Pine Explorer, Axe Bass, Mr Scary, Scratchy Tele's.

    The little voices in my head keep telling me "build more guitars"

  6. #26
    Member
    Join Date
    Mar 2023
    Location
    Adelaide
    Posts
    20
    Thanks Trevor.

  7. #27
    Member
    Join Date
    Aug 2021
    Location
    Blue Mountains NSW
    Posts
    134
    Super neat! great work there!!

  8. #28
    Member XP Rider's Avatar
    Join Date
    Sep 2019
    Location
    Western Utah
    Posts
    170
    Cute little polisher. What kind is that? Looks very light and easy to use with one hand.

    BTW, it does look fantastic. Especially the custom work on the headstock.

Page 3 of 3 FirstFirst 1 2 3

Posting Permissions

  • You may not post new threads
  • You may not post replies
  • You may not post attachments
  • You may not edit your posts
  •