Page 21 of 24 FirstFirst ... 11 19 20 21 22 23 ... LastLast
Results 201 to 210 of 233

Thread: Astracaster First Build FS-1

  1. #201
    Moderator fender3x's Avatar
    Join Date
    Jan 2016
    Location
    Miami, FL, USA
    Posts
    2,670
    This has been a very hard lesson for a cheapskate like me to learn: Stop using the rattle can before it's empty. Also, replace the cap if you see the slightest hint of splatter. Test the new cap on scrap before using.

    With regard to the first question about the two different textures, two things: (1) Yes, you need to let it build up, and (2) don't sand back. You are just scuff sanding, that is, you are not really trying to take finish off, you are just making the surface a little rougher to allow the new coat to grip. Depending on the finish, it may not even really be necessary to scuff sand. If the finish is a kind of lacquer it may adhere to the previous coat by dissolving the top of the underlying coat. You may want to experiment or check out the experiments of others on Youtube with your particular type of finish.

    With regard to drips. First, don't do anything about them until they are completely dry. If you break the surface of a bubble or drip and it is still wet, wait. There are a variety of approaches to getting rid of them. Two approaches that I have seen and tried are the use of drywall compound to build up around the edges of the drip. The idea is that as you sand down you'll be sanding the drip and drywall compound rather than drip and thin finish around it.

    Another technique I have used is to scrape with a razor blade with a piece of cellophane tape on each side, and a space just big enough for the drip. That only works on very flat surfaces, however. Plenty of Youtube on both approaches.

    A technique that I have used with some success, but have not seen on the internet is to take a piece of 220-320 and hold it so that the surface is convex. I then sand the top of the high spot with the top of the convex surface. I try not to push the sandpaper into the surface hard enough for the sandpaper to do more than flatten a little.

    My current approach has been to address a drip somewhat as I am putting the finish on, but not to try to get it perfect. Get it a bit flatter, and take care of any bubbles or dust specs, but if it finishes clear, just keep building up finish. This is partly because I use a slow curing water based finish, and waiting to fix every imperfection would be impractical. It's also partly because it is MUCH easier to take an imperfection out wen there is a high degree of finish built up, than to do it when there is relatively little finish built up.

    As in all things, YMMV, and it's good to practice. I have often made drips on test pieces so that I can practice getting rid of them.

  2. #202
    @fender3x Thank you for the details. I did check the guitar after 5 days today. The drip bubbles are still not dry. The nail indentation test is positive. Should i start only when the drip is rock hard? I don't know. It may take a couple of weeks I think. My hands are itching. Should i take it from the bathroom and keep it in the sun to make it dry faster?.

    I checked on the methods. I can try the first method, I have lot of timbermate left over. I can try to use that instead of drywall compound as it cleans up with water well too. I did check out a video on Highline guitar youtube channel.

    I can try the razor scraping method too. But in india the razors blade look very different from razor blades that are available in america as I see in videos


    Do u think I can do it with ones available in India?


    Sent from my NE2211 using Tapatalk

  3. #203
    Moderator fender3x's Avatar
    Join Date
    Jan 2016
    Location
    Miami, FL, USA
    Posts
    2,670


    All the advice I have ever seen suggests that you need the drips, runs or sags to be completely dry/cured before sanding. I think that is the safest thing to do.

    Some finishes cure faster in heat, but it could just as easily cause a different problem, so I would not do that without consulting the mfg.

    I have been known to do things that are stupid, like using the razor blade to very carefully cut off the top of a big drip to get it to cure faster. I won't say this has never worked, but I will say it can go either way.

    I have almost exclusively used a water-based, brushed on clear, and I put more coats on than the mfg recommends. It gets the occasional drip. The mfg says it needs 4 weeks to fully cure. That is a long time to wait to sand out a drip. So I will sometimes try to do it a little sooner than that. If I see it balls up when you sand, STOP and wait.

    If the drip is not too thick, had dried clear and doesn't have a dust spec* or something in it, what I will sometimes do (also a little risky) is just keep adding finish, until I have the full set of coats. In my finishes there are brushstrokes that need to be sanded out anyway, so drip is not radically different than other imperfections in my finishes.

    Once the full set of coats has fully cured, then I deal with the drips or other imperfections. The thing I like best about this method is that the finish is considerably flatter--including the drips--after waiting 6 weeks for the finish to cure than it was when the drip was wet.

    I don't know whether this is an idiosyncrasy of the water based finishes I use. Maybe the result would not be as good with other kinds of finishes? Also it does not really cut down on the dry time before getting rid of the drip. It just allows you to keep adding finish while you wait for it to cure.

    Hopefully others will chime in with better reasoned advice.

    With regard to the razor blade. I was definitely referring to the "American" type. We have what you call the "Indian" type too...but only for shaving. I would worry that it might be too flimsy for this usage. If you can't find the American-type razor blade how about a utility knife blade?
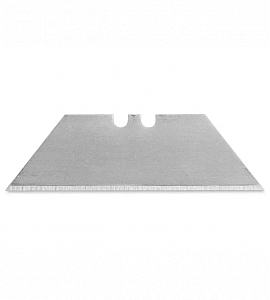
    Click image for larger version. 

Name:	util_knfpng.png 
Views:	956 
Size:	92.9 KB 
ID:	44912

  4. #204
    Quote Originally Posted by fender3x View Post


    All the advice I have ever seen suggests that you need the drips, runs or sags to be completely dry/cured before sanding. I think that is the safest thing to do.

    Some finishes cure faster in heat, but it could just as easily cause a different problem, so I would not do that without consulting the mfg.

    I have been known to do things that are stupid, like using the razor blade to very carefully cut off the top of a big drip to get it to cure faster. I won't say this has never worked, but I will say it can go either way.

    I have almost exclusively used a water-based, brushed on clear, and I put more coats on than the mfg recommends. It gets the occasional drip. The mfg says it needs 4 weeks to fully cure. That is a long time to wait to sand out a drip. So I will sometimes try to do it a little sooner than that. If I see it balls up when you sand, STOP and wait.

    If the drip is not too thick, had dried clear and doesn't have a dust spec* or something in it, what I will sometimes do (also a little risky) is just keep adding finish, until I have the full set of coats. In my finishes there are brushstrokes that need to be sanded out anyway, so drip is not radically different than other imperfections in my finishes.

    Once the full set of coats has fully cured, then I deal with the drips or other imperfections. The thing I like best about this method is that the finish is considerably flatter--including the drips--after waiting 6 weeks for the finish to cure than it was when the drip was wet.

    I don't know whether this is an idiosyncrasy of the water based finishes I use. Maybe the result would not be as good with other kinds of finishes? Also it does not really cut down on the dry time before getting rid of the drip. It just allows you to keep adding finish while you wait for it to cure.

    Hopefully others will chime in with better reasoned advice.

    With regard to the razor blade. I was definitely referring to the "American" type. We have what you call the "Indian" type too...but only for shaving. I would worry that it might be too flimsy for this usage. If you can't find the American-type razor blade how about a utility knife blade?

    Click image for larger version. 

Name:	util_knfpng.png 
Views:	956 
Size:	92.9 KB 
ID:	44912
    Finally the coat seems to have hardened. I tried sanding a blob back and it didn't ball up and came out as powdery. So have applied some putty over the drip for sanding and waiting for it to dry. Wish me luck guys


    Sent from my NE2211 using Tapatalk

  5. #205
    Moderator Trevor Davies's Avatar
    Join Date
    May 2020
    Location
    Perth
    Posts
    1,717
    Never heard of this before. Good luck!
    PitBull Builds: FVB-4, LP-1SS, FBM-1, AG-2, TB-4, SSCM-1, TLA-1,TL-1TB, STA-1HT, DSCM-1 Truckster, ST-1, STA-1, MBM-1, MBM custom, GHR-1 (Resonator), FH-5V (Acoustic).

    Scratch Builds: Pine Explorer, Axe Bass, Mr Scary, Scratchy Tele's.

    The little voices in my head keep telling me "build more guitars"

  6. #206
    Quote Originally Posted by Trevor Davies View Post
    Never heard of this before. Good luck!
    @Trevor Davies

    https://youtu.be/N1e_vxH4QdA?feature=shared


    Sent from my NE2211 using Tapatalk

  7. #207


    Finally sanded the drip and is on the process of building up the clear coats. Two coats with the next rattle can is over. Checking everytime if the can is near empty.

    One more trick that my friend who uses DIY paint cans for grafitty told me is to warm the rattlecan in warm water ( around 75 to 80 degrees). It seems it will help in better atomization of the spray.

    Got a Hygrometer / Thermometer to check the Humidy levels and Temparature in my makeshift spraybooth bathroom. The temparature and humidity levels seems to be ok

    Sent from my NE2211 using Tapatalk

  8. #208


    It's been a long time. It has been raining continuously here. So have been spraying clear coat when ever humidity levels are acceptable. There has been a lot of drips due to my bad spraying technique which has been duly sanded and sprayed again. I still have 1 more rattle can to spray before I start wet sanding and polishing.

    It's time I start suloldering electronics too.

    Will keep you guys posted

    Drashkum.

    Sent from my NE2211 using Tapatalk
    Last edited by Drashkum; 18-11-2023 at 08:42 AM.

  9. #209
    Moderator fender3x's Avatar
    Join Date
    Jan 2016
    Location
    Miami, FL, USA
    Posts
    2,670
    I like doing the electronics much better than clear coating. It is nevertheless always a bit of a battle to get the electronics through the F holes! I put a coil split switch on the V pots, and that did nothing to make it easier to mount.

    The other thing that I did wrong on the first go-round was to forget not to run wiring between the switch and the lower volume pot. If you do that you can see the wiring through the f-holes. All the wiring needs to go in sort of a C shape from the switch to the top V to the top T to the Bottom T and end at the Bottom V. Otherwise you see wires through the hole.

    But for the one big drip, your finish looks great! Judging by the fact that there are no other visible drips your drip-sanding technique seems to be working. How did you like the approach you used? I am in final (I hope) sanding mode, and may have use of it!

  10. #210
    Quote Originally Posted by fender3x View Post
    I like doing the electronics much better than clear coating. It is nevertheless always a bit of a battle to get the electronics through the F holes! I put a coil split switch on the V pots, and that did nothing to make it easier to mount.

    The other thing that I did wrong on the first go-round was to forget not to run wiring between the switch and the lower volume pot. If you do that you can see the wiring through the f-holes. All the wiring needs to go in sort of a C shape from the switch to the top V to the top T to the Bottom T and end at the Bottom V. Otherwise you see wires through the hole.

    But for the one big drip, your finish looks great! Judging by the fact that there are no other visible drips your drip-sanding technique seems to be working. How did you like the approach you used? I am in final (I hope) sanding mode, and may have use of it!
    The approach to sand the drip after applying the grainfiller like timbermate of which i posted a video earlier from Highline guitars is flawless. I have done that a couple of times now on various drips on my Guitar and it seems to pay off nicely. Only grouse is that I have to wait well enough for the clearcoat to dry each time for me to do that. And each time that waiting time has been 10 days or so as the drip-nail test seems to fail before 10 days. So that's a frustrating wait.

    I am trying to keep the electronics simple here. No push pull pots as the pickups supplied with the kit have only 2 conductor wires. I may order tone rider pickups for my next build ( Same starcaster which was sent to me earlier which I will be trying to salvage) for which I have an extensive plan of Coilspliting and piezo TOM bridge which will use the Artec MB1 chip.

    As you say doing everything through F Holes is a pain. That's the next learning hurdle which I may have to ace. I may also have to get those polishing compounds and polishing pads for hand drill that I may have to use for polishing.

    Geez! Building a guitar first time needs a lot of investment!!


    Sent from my NE2211 using Tapatalk

Page 21 of 24 FirstFirst ... 11 19 20 21 22 23 ... LastLast

Tags for this Thread

Posting Permissions

  • You may not post new threads
  • You may not post replies
  • You may not post attachments
  • You may not edit your posts
  •