Gidday everyone this is my diary of the Les Paul build so far, here are some fotos of the neck join i fettled the wood to get the best tolerances i could between the body cavity and neck i wanted it streamlined and smooth with no gaps or noticeable protrusions in that area.
Here are some images if you dont mind.
So far so good hehe.
I am going to spray it with nitro in a light blue colour with clear over the top lightly sanded between coats for a hi gloss finish, cant wait for the paint to come and the next kit i have ordered the tele also, they are great kits and with some care and thought and research you can build yourself a nice axe.
The neck needs some truss rod adjustment but i always forget which way is up or down lol righty-tighty-lefty-loosey il ask or googles it again before i adjust to get the neck dead flat before stringing it up and theres also the intontation has to be done proper good as well if you want it to ring properly.
I dont know if you guys post your music here but if you do i can post up some of my playing, but im new here so im just feeling things out,
thanks to Adam for sorting my Telecaster order this week, seems like a real gentleman and very pleasant & helpful to deal with, good on you for that sir.
Kind regards from dave b in melb vic.
I might buy a few more kits soon when im not so poor lol.
I've done a couple of guitars in nitro Daphne Blue.
The first was my 1995 Jap Strat.
The most recent was an ES1 I built for a friend, who saw my blue Strat and wanted the ES1 the same colour.
With mahogany, you are definitely going to have to grain fill the surface first as it does have a lot of pores that will take a lot of paint to fill if you don't grain fill it first, and nitro isn't cheap.
I'd also then apply a couple of coats of shellac as a sanding sealer before spraying nitro on the surface. I've used nitro sanding sealer/filler from Rothko and Frost/Dartfords in the past, but it is very soft and powdery, so best used as a coat to sand down almost back to the wood, and just use it to do a final grain fill IMO.
I personally wouldn't sand each coat of nitro unless there are big dust particles or insects that need removing. And then only very lightly. If you get a paint run, you can leave it until the final flat sand to remove if you want. Otherwise, wait at least two days before sanding a run, as it takes the centre of it quite some time to dry hard enough to sand. Sand too soon, and you'll create a pit where you've pulled away at the soft centre where the solvent has softened the layers underneath.
Are you painting the whole guitar blue, or just the top, and doing a standard stain and clear coat sides, back and neck?
Also, if you are planning to fit full-sized pots as replacement for the kit ones, check they will fit in the control cavity. On some kits, the cavities are quite tight even for the mini-pots, and you might have to work at enlarging the cavity around the pot positions. A drum sander attachment on a Dremel is useful for this if you don't want to use a router.
Heres the sanding fill done now, the nitros arrived, its coming along quite well so far, the kits from here, i was thinking of doing some inlay but decided on the next one. Hope the spraying goes well and thanks @ Simon Barden for the advice above it all helps, thank you sir. Il take your advice on the sanding between coats if i dont have to i wont and yes you cant spray your way out of mistakes lol learnt that the hard way before. Daphne blue is the colour with a white nitro undercoat. Doing the whole body & neck, might get a pearlised sticker made up through a mate for the headstock, my brothers asking him today hes got 100k printing machine apparently that can print stickers and bang it on before the clear, if i was to lightly dust sand between a coat id probably use 1600 - 2000 wet/dry but il see.
Hope it goes alright very much enjoyed the process so far.
If you plan on fitting full-size CTS pots, youll find the shafts are wider than on the mini-pots in the kit, so youll need to drill or ream out the potentiometer holes at some point so theyll fit. If so, its easiest to do it now without risk of damaging the lacquer later.
Ok noted, they're 250k pots arent they usually?
I might salvage some vintage ones i was thinking, im pretty sure even if there not 2500 a resistor across can fix that from memory.
Heres after the sanding, im going to get some 1000 grit to go over it now as well, the fine foam pads are great but not quite fine enough.
Im doing it for my brother so its up to him on the pots, i know he was going to get some pickups later on, il let him know tonight before we go ahead spraying etc. I dont have a dremel but i can loan one.
Its decent of you to give me the heads up as it would not have occured to me either.
Thank you sir. david.
P.S. The guitars in daphe above look the proper lovely to me. Great job.
Last edited by david bodycomb; 31-07-2023 at 12:20 PM.
500k audio/log taper volume pots for Les Pauls and humbucker-equipped guitars is standard. Tone pots are normally 500k as standard, and can be either audio or linear taper to personal taste. I prefer audio tpoer for tone.
250k audio taper for single coil volumes like Strats and Teles. 250k again for tone, though audio taper is normally used by Fender here but again, linear is an option.
Audio taper on tone spreads the operating action of the pot over a wider range of travel, and stops it being almost all right at the bottom.
Powerful single coils like P-90s normally use 500k pots for a brighter sound, and some very powerful standard single coils can benefit from 500k pots as well.
I quite like using 250k audio tone pots on humbuckers as the lower resistance also spreads the main tone affecting range of the pot travel out more - say from 7 to 0 on rather than 3.5 to 0, with not too much happening on the initial 10-7 pot travel.
250k tone pots will knock a small amount of treble off compared to 500k pots, but it is very small, and I prefer to loose a bit of treble in order to gain more controllability.
If you have very powerful humbuckers with high DCRs, they can benefit from 1 Meg audio volume pots to keep as much treble content as possible, as they can be very dark sounding.
Sometimes manufacturers can vary from the norm for specific reasons relating to the pickup choice. In the era of Gibson T-top humbuckers (late 70s-early 80s), the bridge humbucker was quite shrill sounding, which was probably why they switched to 300k volume pots. But they also used 100k tone pots. Both choices reduced the treble content. 100k for a tone pot does give you tone control all the way from 10 to 0, but you have lost a good amount of treble to start with.
The tone control can be looked on as a simple 6dB/octave RC high-pass filter with the R being the impedance of the pickup coil and C the tone control capacitor (reality is slightly different as there are also the pickup capacitance and inductance to consider but the impedance and tone control cap are the driving factors here). The resistance of the tone control pot only acts to limit the amount of output signal being bled off through the capacitor to ground. So, assuming linear taper tone control pots, a 250k pot on 10 is like a 500k pot on 5, whilst a 100k pot on 10 is like a 500k pot on 2, or a 250k pot on 4. So tone pot value selection can allow you to fine tune the guitar sound if you want to.
If you are into sanding pads, then youll like like the 3M ScotchBrite pads. The dark red/maroon, grey and white pads are roughly equivalent to 0, 00 and 0000 steel wool respectively, but dont leave the small pieces of embedded steel splinters that steel wool is prone to do on soft surfaces. They are fairly contour-following though, so youll want to ensure that youve sanded the surfaces flat first, otherwise if using a mist coat, it can look like there are no pits/dips left, but in reality youve sanded the bottom of the dips.
Much prefer log pots,
linear is fine for stereos just my humble opinion.
Its coming along pretty goodlies so far this is the first guitar ive built but not the first time ive sprayed or worked with wood.
Im up to the 2nd coat of colour and its gone on great, must make sure the cans warm before application i used a saucepan with water and gently warmed can in it over the stove on lowest setting for 15 mins there are some slight flaws but im under the pump to finish it for my brother and hes not as fussy as me lol.
Its his axe.
I rekon by the 3rd coat of colour it will be pretty ok il do that coat tomorrow 2 a day is enough.
ive never spray painted a guitar before only semi trailer tankers a while ago but i have done a lot of house painiting so theres familiarity, i sanded the primer and refilled the grain ive also straightened the neck with truss rod to set it almost flat so far so good, few more coats and then il be soldering, Simon the kindly gentlemen above has suggested to upgrade the pots which will happen when the pickups are upgraded later on, im pretty handy with a dremel and can carve out the cavities without damaging the surface cos its my brothers its up to him when he buys some pikups.
Ive got a Tele from here happening too now so il get some pics of that up soon why not?
Good on you and enjoy if you are methodical and think before you do things and research take your time [best you can lol] you can do it just follow the process and learn as much as you can first, kind regards from david.
Last edited by david bodycomb; 02-08-2023 at 03:26 PM.
Its curing outside today 3rd & 4th coats over the wkend now im loathe to sand without ity being somewhat cured there are some small flaws nothing to worry about when i do the next coats im only going to coat the front & back & headstock the rest is really good i will sand with 2500 first very lightly just a dusting with the sander helps the coats adhere and to produce more perfection over the few slight flaws.
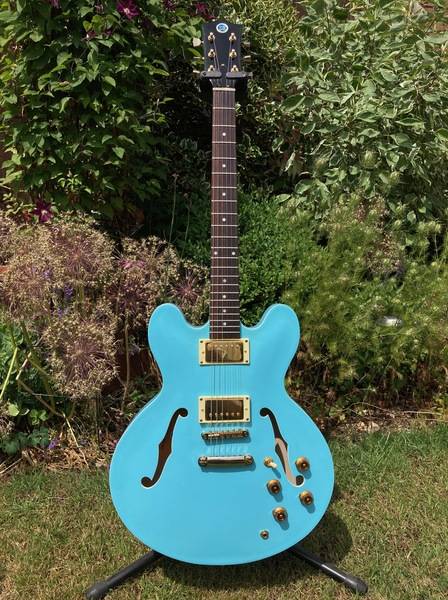
Overall im very happy with the results so far and i love the daphe Blue colour with the cream scratchplates and covers its knockout vintage aesthetic appeal and looks great to my humble eyes.


 Reply With Quote

 Il take your advice on the sanding between coats if i dont have to i wont and yes you cant spray your way out of mistakes lol learnt that the hard way before. Daphne blue is the colour with a white nitro undercoat. Doing the whole body & neck, might get a pearlised sticker made up through a mate for the headstock, my brothers asking him today hes got 100k printing machine apparently that can print stickers and bang it on before the clear, if i was to lightly dust sand between a coat id probably use 1600 - 2000 wet/dry but il see.