Page 1 of 2 1 2 LastLast
Results 1 to 10 of 18

Thread: Mka-2

  1. #1
    Member GreyFloyd's Avatar
    Join Date
    Nov 2018
    Location
    Freo
    Posts
    110

    Mka-2

    Started a new kit this week, a Mosrite copy. Thought I'd try my hand at a sunburst. Using Feast & Watson Prooftint and doing it by hand. Started by using sanding sealer on the body then a 320 sanding. Gave the back of the body a go just to see how good/bad it might be. Back looked reasonable after a first stain so thought I'd try out the front today. As you can see from the photo, it's not looking too good albeit first cover. There are patches where it seems the wood (Ash) is simply not taking up the stain near the bottom. I've had this once before on my 335 but dismissed it as a fault in the wood. Any ideas how to retrieve the situation before I head for the sandpaper?
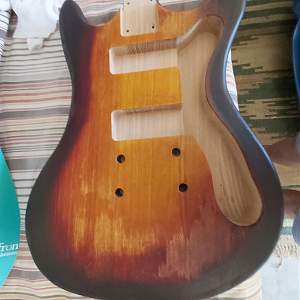
Click image for larger version. 

Name:	20230105_134050.jpg 
Views:	326 
Size:	167.0 KB 
ID:	43909

  2. #2
    Member GreyFloyd's Avatar
    Join Date
    Nov 2018
    Location
    Freo
    Posts
    110
    Tried second stain coats on back and front of body but little difference. Neck came up pretty well using just black Prooftint (2 coats) then Stain & Varnish (two coats) followed by a coat of Truoil. However I'm reluctant to proceed until I gain some feedback about the ash not taking the stain in parts of the back and front of the body. Desperate! Where is Simon when I need him??

  3. #3
    Moderator Trevor Davies's Avatar
    Join Date
    May 2020
    Location
    Perth
    Posts
    1,671
    Hi GreyFloyd,

    I think you will need to sand the front of the body back. It must be glue (!) on there to leave those marks. I have never had much success staining on sanding sealer with FW products (I know others have which is why I tried, and tried again! on test bits of wood). Maybe don't go above 180 g sand paper before adding the stain (which is what some people on this forum recommend).

    Just for interest - did you rub a damp rag (water, or metho!) on the body to check for glue spots?
    PitBull Builds: FVB-4, LP-1SS, FBM-1, AG-2, TB-4, SSCM-1, TLA-1,TL-1TB, STA-1HT, DSCM-1 Truckster, ST-1, STA-1, MBM-1, MBM custom, GHR-1 (Resonator).

    Scratch Builds: Pine Explorer, Axe Bass, Mr Scary, Scratchy Tele's.

    The little voices in my head keep telling me "build more guitars"

  4. #4
    Member GreyFloyd's Avatar
    Join Date
    Nov 2018
    Location
    Freo
    Posts
    110
    Thanks Trevor I'll give the sanding a go maybe with 120. No I didn't check for glue just applied sanding sealer which I used on the violin bass 3 kits ago. Here's hoping.

  5. #5
    Member GreyFloyd's Avatar
    Join Date
    Nov 2018
    Location
    Freo
    Posts
    110
    Did a fairly hard sanding with 120 then applied a coat of stain (colours Golden Teak, Mahogany and Black) and came up with the attached (see pic). A better result compared to first attempt so thanks Trevor for the advice. Maybe a second coat will further improve the look (or maybe I could suggest that it looks a bit 'vintage' (ha ha)). Unfortunately the 'best' bit of staining (between the pickups) will be totally covered by the pickguard - should have thought about that!Click image for larger version. 

Name:	20230110_173458.jpg 
Views:	323 
Size:	244.8 KB 
ID:	43925

  6. #6
    Moderator Trevor Davies's Avatar
    Join Date
    May 2020
    Location
    Perth
    Posts
    1,671
    Looking much better.
    PitBull Builds: FVB-4, LP-1SS, FBM-1, AG-2, TB-4, SSCM-1, TLA-1,TL-1TB, STA-1HT, DSCM-1 Truckster, ST-1, STA-1, MBM-1, MBM custom, GHR-1 (Resonator).

    Scratch Builds: Pine Explorer, Axe Bass, Mr Scary, Scratchy Tele's.

    The little voices in my head keep telling me "build more guitars"

  7. #7
    Member GreyFloyd's Avatar
    Join Date
    Nov 2018
    Location
    Freo
    Posts
    110
    After several applications of Truoil each one followed by a light sand with 0000 steel wool, kit body looking better. Bolted on the neck yesterday having applied a PitBull decal to headstock (hard to source a Mosrite decal!). Will probably apply some Dingotone wax a little later. Now ready to open the packet of 'goodies' for assembly.Click image for larger version. 

Name:	20230118_122922.jpg 
Views:	317 
Size:	339.4 KB 
ID:	43945

  8. #8
    Member GreyFloyd's Avatar
    Join Date
    Nov 2018
    Location
    Freo
    Posts
    110
    Fitted the tuners and strap pins. Took a look at the electronics - presumably the neck pickup (humbucker) needs to have its black plastic surround removed in order to fit under the pickguard? Only reason I can see that it has the surround fitted is to enable the pickup to be transported in the kit?? After the pickup is fitted to the pickguard, tightening the two screws either side (to raise the pickup) would result in the screws eventually touching the bottom of the cavity, thereby restricting the pickup being heightened further? Haven't come across this on 14 kits so far. Any suggestions?

  9. #9
    Moderator Trevor Davies's Avatar
    Join Date
    May 2020
    Location
    Perth
    Posts
    1,671
    Quote Originally Posted by GreyFloyd View Post
    Fitted the tuners and strap pins. Took a look at the electronics - presumably the neck pickup (humbucker) needs to have its black plastic surround removed in order to fit under the pickguard? Only reason I can see that it has the surround fitted is to enable the pickup to be transported in the kit?? After the pickup is fitted to the pickguard, tightening the two screws either side (to raise the pickup) would result in the screws eventually touching the bottom of the cavity, thereby restricting the pickup being heightened further? Haven't come across this on 14 kits so far. Any suggestions?
    The humbuckers must leave the factory with a surround. Maybe it does help to protect them!

    The neck pickup cavity on the MKA-2 is different to the kits I have done with neck humbuckers, I assume because my kits did not have the pickguard covering the route. Check out the TL-1TB kit at https://www.buildyourownguitar.com.a...l=1#post218292. But the humbucker routes usually have deeper sections for the screws (bolts?).

    But I do recall having to drill a bit more space for one kit to allow the height adjustments screws to fit when using the pickguard. Work out where the screws will hit the cavity base and carefully drill some space Or you could shorten the screws! The screws don't change their length in the cavity as the pups are raised or lowered since the top of the screw always sits flush with the top of the pickguard.
    PitBull Builds: FVB-4, LP-1SS, FBM-1, AG-2, TB-4, SSCM-1, TLA-1,TL-1TB, STA-1HT, DSCM-1 Truckster, ST-1, STA-1, MBM-1, MBM custom, GHR-1 (Resonator).

    Scratch Builds: Pine Explorer, Axe Bass, Mr Scary, Scratchy Tele's.

    The little voices in my head keep telling me "build more guitars"

  10. #10
    Member GreyFloyd's Avatar
    Join Date
    Nov 2018
    Location
    Freo
    Posts
    110
    Thanks again Trevor; drilled some 4mm deep holes in bottom of neck pup cavity and a couple into bridge pup cavity even though this single pickup actually had 'screws' supplied, as opposed to the 'bolts' for the humbucker. Anyway they are both fitted to pickguard and it fits nicely onto the body. Apart from the earth wire to the bridge post, it looks like a case of fitting all the electronics to the pickguard (a bit like the Strat), so that will be something new for me.Click image for larger version. 

Name:	20230120_141815.jpg 
Views:	318 
Size:	195.9 KB 
ID:	43949

Page 1 of 2 1 2 LastLast

Posting Permissions

  • You may not post new threads
  • You may not post replies
  • You may not post attachments
  • You may not edit your posts
  •