
We know what Frankie is doing this weekendOriginally Posted by FrankenWashie


We know what Frankie is doing this weekend

I just bought a set of rotary sanding arbours for my drill press from Carbatec, who are only 5 mins drive from my office. Im basically stuffed.
FrankenLab:
Turning tone wood into expensive sawdust since 2016!
Haha
I made some template following Sanders (robo Sanders) for my drill press and a base with bearing for them to go into. To avoid sideways torsion on the press.

Great and very interesting reading thanks Robin. Fantastic work on the body. Makes putting a kit together seem like child's play after reading this..Looking forward to seeing the end result!

No worries guys, I am reading with interest and much envy.
@Rodc
Thanks Rod, but skill level is no more than required to make a nice kit. You just have to be a stubborn Luddite with too much spare time.
Lol.! Im sure skill comes into it somewhere Robin..😉
Finally fine enough here in Brissie to get a bit of work done. So Ive been a bit busy.
First off was to cut out where the pickups and the control cavity are going to go. Because of the body construction that means I only have to cut out the top layer of pine.
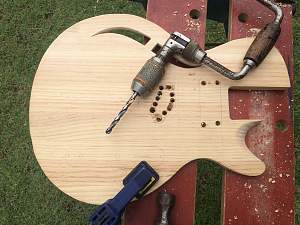
I can now use the top layer as a template for roughing out the locations for the wiring in the middle section.
Then cut it out
Then .........
Seeing as #20 is a bit of a bitza I am undecided whether to stain or paint. Im thinking of a bit of a rustic look, so I thought that I would stain her first, see how she looks and if I dont like it I will then just paint over it.
So I thought that either way I would stain inside the chamber so the pine behind the f hole would not look so stark.
For those of you who are still confused at this madness this is how it works
This is inside the back of the guitar (Layer 1). Notice how the stain really shows off my horrendous chisel work on the chamber. Hopefully the ugly part wont be visible to the casual observer.
On top of that is the ply section (Layer 2) which has the chamber cut out and also the wiring routing.
Then finally the front of the guitar (Layer 3). The part that hides all my crappy workmanship.
Then you glue the whole lot together. Im not sure but I think some ancient Greek philosopher once said You can never have too many clamps. But if he didnt, he should have.
I can now start the final shaping and actually do a mock-up build to see if all the bits and pieces are in their rightful places.
Cheers guys
rob
Im not sure but I think some ancient Greek philosopher once said You can never have too many clamps. But if he didnt, he should have.
That is commonly attributed to Irwinocrates though many believe it may have been an earlier mentor Besseyokoulos.
Then finally the front of the guitar (Layer 3). The part that hides all my crappy workmanship
There is a school of thought that says Out of sight, out of mind
ifn they cant sees it, then taint thur!
FrankenLab:
Turning tone wood into expensive sawdust since 2016!
 Posting Permissions


 Reply With Quote