Sapele pour Homme, par Jean Paul Gautier.


Sapele pour Homme, par Jean Paul Gautier.

Reading this in the early A.M. wearing the beanie with frost on the windows makes you realise that this is a global forum.Originally Posted by Simon Barden

I'm almost familiar with the issues regarding masking tape, however I'm sure that they'll be overcome.
cheers Mark.
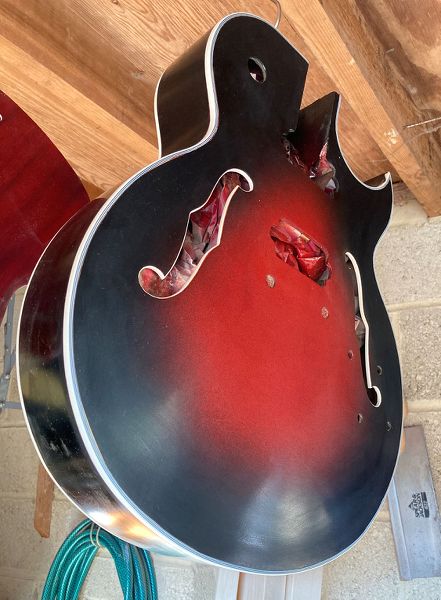
Most f the issues have been overcome with some scraping and a run over with 0000 wire wool. I thought Id try that and it worked well, It's taken away almost all the orange peel and tape marks. Certainly enough to make me happy again. Not quite as hot today as yesterday, but still too hot to do too much. A little bit of biding cleaning to do, and then some touching up around the binding edges.
I've ordered a new mini-gun, an HVLP one,as I was having problems spraying clear with my HPS one in the heat. I bought one just for spraying clear, but I don't think it's as good as the original one I have, despite being the same except for a chrome, not black, finish.
And I splashed out on some very expensive Solarez UV curing grain filler and clear lacquer. I now have the grain filler but the lacquer will come from the US and take a few weeks.
But I've tried out the grain filler and I really like it.
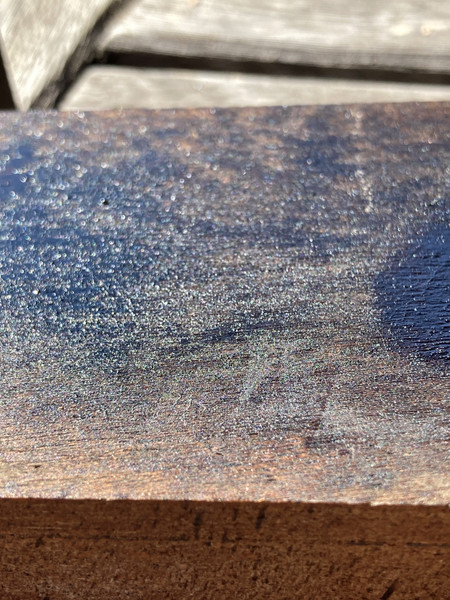
Piece of sapele (mahogany-style wood) without the grain filler:
You can see the longitudinal grain lines making the surface relatively rough.
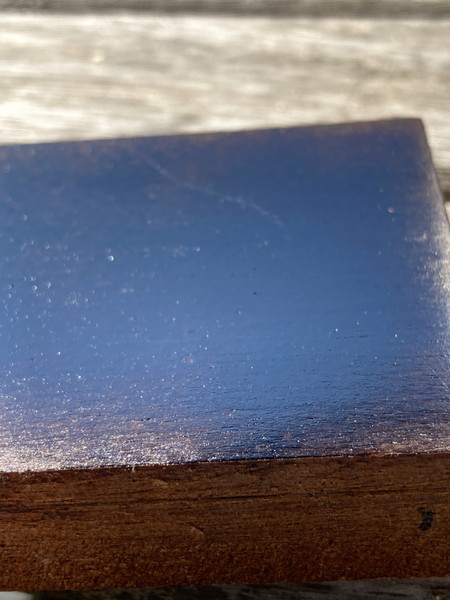
And here's the wood about eight minutes later after two applications of the grain filler and sanding back with P320.
Yes, that's two applications. Both sanded. And it's fully dry. In eight minutes. Not hours. Minutes.
It sands flat really easily, no effort required with the residue making a really fine dust (so wear a mask).
So I then immediately sprayed it with some black nitro from a can. I took the next two pics 15 minutes after spraying. Here's an untreated section of the wood, so you can see how the nitro has sunk into the wood and followed the grain pattern:
And here's the section that was grain filled. The nitro is sitting nicely on top, hasn't sunk in at all, and displays an almost flat surface. Any pits there are are very small and probably could be improved by a bit more sanding and using some finer grit paper (they recommend using 400 grit, but I don't know if that's 400 US (about P800) or coarser P400).
I'll revisit that in a week to see if the nitro stays where it is or does sink in a bit. But as the grain filler is fully cured, it should only be into any exposed wood fibres if it does.
It's certainly better and easier and quicker to use than any grain filler I've used so far, including Aqua Coat. No VOCs, so it's environmentally friendly and can be applied indoors (you can let it soak in and level for a few minutes if you want), then taken outside to cure (providing its sunny) or use a UV light on it.
Downsides are:
1) The price (no UK of Australian distributors listed for these finish products, only their UV-curable resins) so you are normally paying a lot for shipping etc. It's also sold in US pint containers, which are about 4/5 the size of an imperial pint, so not a hige quantity for your money.
2) There's no info on whether you can tint the product for highlights. Possibly with a water-based dye or straight dye concentrate, but any colour could affect the UV permeability of the filler, and so may not cure properly (or at all). It needs UV, not time, to cure. So if you wanted to highlight the grain pattern, you might have to use another grain filler such as stained Timbermate first, then apply this over the top. But that may prevent any paint sinkage issues that you can get with Timbermate (if the Solarez proves to be sink-resistant with time) as there are no solvents with Solarez to affect the Timbermate.
Also not sure whether this will take a stain over the top or not - will have to do some more tests. It's clear, so should go over stains, but you obviously may sand through the filler if you overdo it and take some stain. But you'd have the same issues with the clear lacquer.
Now I can't wait to get the lacquer and see what that's like (it's very similar I believe). Supposed to get a nitro-like finish, not as hard as poly and should wear nicely over time. Combining the two products and a sunny day and you could finish probably do a complete finish in a day, given an appropriate finish choice.
Apparently according to Highline Guitars, the Solarez grain filler can be used directly over a stained body if the stain/dye has binders in it, but otherwise you may need to use some spray shellac over the dye first (especially if you've done a burst). That does slow down the process slightly, but no more so than with most other grain fillers.
90% cleaned up and wire-wooled. Some touching up round the binding edges and where the binding pieces join up is still required.

That looks fantastic. I have wondered about Solarres since I saw the Highline guitars vid. Will be interested to see how it works for you.
35C is hot anywhere. It's 34C with 69% humidity outside in Miami today, and it feels plenty hot. I have found though, that it's often more uncomfortable in places that are used to cool summers. Here, even my garage is insulated and has AC, and no matter how hot I get when I am outside, the refuge of AC is always close by. Meanwhile I have a daughter who lives in the Black Forest in Germany where there is almost no such thing as AC. Temperatures around 30 get very tiresome after a while when there is not escape.

Yeah, AC is pretty much unheard of in any domestic environment in the UK.
Looking pretty good there Simon, interesting find with the UV stuff.
First (proper) build: http://www.buildyourownguitar.com.au...ead.php?t=8546
Second build: http://www.buildyourownguitar.com.au...ad.php?t=10229
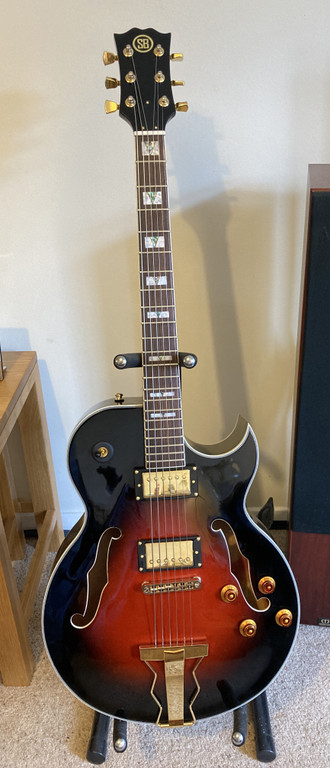
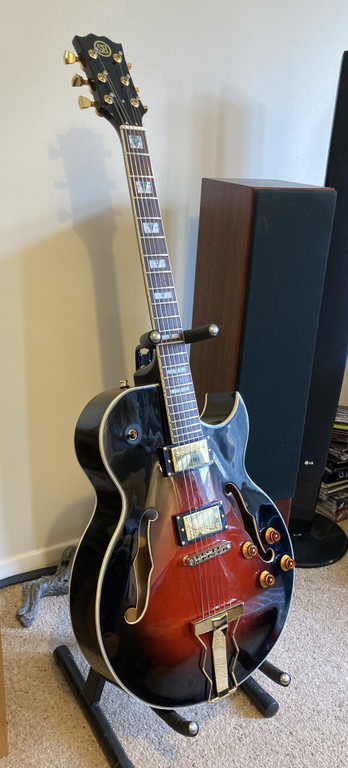
Finally finished the first assembly of my ES-175 style kit. Just leaving it strung up for a while now to settle before I start to look at the action, as it's miles high at the moment.
Hard to believe I started this kit 4 years ago.
The neck angle turned out to be way too shallow (grrrr), and I've had to file down the base of the bridge to get it low enough to have any chance of getting a reasonable action, and I may end up filing it down some more once.
The amber knobs are temporary as I bought them for the other sunburst finish, but they look odd to me, so will be fitting standard gold ones that match the hardware better.
Various knocks and scratches need sorting out that I added sorting the assembly, but they can wait. Bridge pickup surround needs a bit of work to get the top sitting level, as it's angled a bit too much - hard to tell these things without the strings on.
This one will definitely have a scratchplate fitted, which I need to make. But not today.
Fitted with D'Addario chrome flatwound 11s ad Iron gear Blues Engine PAF-style pickups, it does sound nice and jazzy. Less impressed with the Bare Knuckle 550k CTS pots I fitted as they are nothing like as smooth acting and progressive as standard CTS pots. But making and fitting another wiring harness can wait for another day as well.
It's fully hollow, with just a small wooden block under the bridge linking the front and back together - and that's only wedged in. Weighs in at almost exactly 7lbs (3.16kg), so not that heavy. Almost exactly the same weight as the SG kit I made. A lot of that is in the heavy Allparts 175-style tailpiece!
I went for an authentic ES-175-style rubber pickup selector mount, but wished I hadn't as it's a complete PITA to fit the switch in. Lots of cutting out bits of rubber to try and get enough thread showing to fit the locking ring on. Finally worked out that you had to poke the switch through the hole, put the grubber grommet on, then insert the knurled ring in the indent in the grommet. squeeze the grommet so that it gripped the ring and then you turn the grommet to wind the ring onto the thread until it's tight. After that you then have to force the grommet back into the hole, which is a lot harder to do once there's a solid switch body in the middle making it far less compressible. Never again.
To be fair, it would have taken me about four years to get a finish like that too...
First (proper) build: http://www.buildyourownguitar.com.au...ead.php?t=8546
Second build: http://www.buildyourownguitar.com.au...ad.php?t=10229

This is such a good result. I saw this guitar in some of its less happy intermediate stages, and I was wondering what on earth could be done. I know I would have been tempted to reach for the matches.
Last edited by JimC; 18-11-2020 at 06:38 PM.
Build #1, failed solid body 6 string using neck from a scrapped acoustic (45+ odd years ago as a teenager!)
Build #2, ugly parlour semi with scratch built body and ex Peavey neck
Build #3, Appalachian Dulcimer from EMS kit
Build #4, pre-owned PB ESB-4
Build #5, Lockdown Mandolin
Build #6, Sixty six body for Squier
Build #7, Mini Midi Bass
Build #8, Acousticish Telecasterish Guitar
 Posting Permissions

 Reply With Quote