
Wow, that is the worst truss rod access I've ever seen. I'd be super curious to see what it looks like with the fretboard off.


Wow, that is the worst truss rod access I've ever seen. I'd be super curious to see what it looks like with the fretboard off.
Build 1 - Shoegazer MK1 JMA-1
Build 2 - The Relliecaster TL-1
Build 3 - The Black Cherry SG AG-1
Build 4 - The Sonicaster TL-1ish
Build 5 - The Steampunker Bass YB-4
Build 6 - The Howling Gowing ST-1
"What I lack in talent I make up for with enthusiasm"

Well spotted Simon.
Given that 24" necks don't appear in the Pitbull 'Necks' page, I guess a replacement would have to come from another kit.
I was considering a 24" replacement for my DMS at some stage.
This one was a serious contender, however the truss rod is adjustable from the butt end...so I decided no.
https://www.ebay.com.au/itm/24inch-M...frcectupt=true
Be interested in how this issue pans out.
cheers, Mark.

Good news and Bad news on the neck;
Good news; Pitbull have agreed that the neck needs to be replaced. Thank you, PBG, very grateful
Bad news; They don't have any maple short scale necks in stock and will have to order some up from the factory - 6 to 8 week delay. To be fair, they offered me a rosewood one now, but I'm really taken with the maple neck on what I plan to be a natural finish body. Not entirely a traditional approach for a Mustang, but I've seen a few pictures done like that and they look good to me.
So, while I'm waiting for the new neck, I can get on with some sanding. Then some more sanding....
So, various bits and bobs ordered to work on the body while I wait for the new neck to arrive, including a new random orbital sander (how on earth did that get in the order, dammit?) and body sanded to 240 then grain filler applied. It's now drying overnight when I'll find out if I've applied enough or have to go back for a second attempt.
Having read various articles here and elsewhere on t'internet, I was torn between just applying several coats of polyurethane with lots of sanding, or the much advocated grain filler followed by loads of coats of Tru-oil. Eventually, I decided to go for grain filler and oil, mostly because I've never used these things before and I wanted to see how it would work. Got the grain filler, but no Tru-oil in my local old-fashioned hardware shop, despite them having more wood finishing products than I've seen anywhere, ever. So I've bought some Danish oil which, various discussion articles conclude, might be more or less the same thing but maybe with less varnish in it. I'm anticipating howls of 'You idiot !" from forum members...

For future reference tru oil comes from your local gun shop.
Build #1, failed solid body 6 string using neck from a scrapped acoustic (45+ odd years ago as a teenager!)
Build #2, ugly parlour semi with scratch built body and ex Peavey neck
Build #3, Appalachian Dulcimer from EMS kit
Build #4, pre-owned PB ESB-4
Build #5, Lockdown Mandolin
Build #6, Sixty six body for Squier
Build #7, Mini Midi Bass
Build #8, Acousticish Telecasterish Guitar

...or Amazon/ebay/online (which Jim doesn't do).
You'll need at least two grain filler applications with ash, maybe three. It will always shrink a bit after application as the water or oil evaporates, best to let the first application dry well before sanding back, and then leave it a day or so to allow for further shrinkage before the next application. Not like you're racing to get it all done at once!
So whilst I'm waiting for the neck to show up, I decided to get going on the body finish and the electrics. Not the ideal order of tasks, I suspect, but better than watching TV....
Body grain-filled three times then sanded to 240 grit with a machine, then hand-sanded to 360. First coat of Danish oil applied, only (insert large number here) more coats to go...but it does feel very smooth already.
Then I got on with loading the scratch-plate. As you will recall, the wire from the switch to the volume control on the pre-wired harness was a touch too short for comfort so I've replaced it. I also replaced the rather tatty masking tape that covered the join in the bridge pick-up cable with heat-shrink tubing, after redoing the joint. Copper screening applied, although just the scratch-plate took all of the pack that I bought with the kit, so I'll need some more to do inside the body.

Soooo...after waiting nearly three months, it turns out that the factory can't supply Pit Bull with replacement necks for DMS-1 kits (24" scale length). That's a bit of a blow and something of a hole in the whole selling and servicing of kits chain, in my view. Anyway, Ben agreed to refund some of the cost, which will go some way towards buying a new neck myself - which I've done. Without going to bespoke companies or top-end suppliers of licensed neck, I found a 24" scale neck from a seller on eBay, in the UK. Undoubtedly made in China at the price, but supplied from the UK in only a few days. The fretboard isn't maple, as I'd wanted, but it's the only one I could find, so it'll have to do.
It is fractionally small than the Pit Bull neck, so I've moved up to veneer to pack out the neck pocket, then sanded it down slightly for a snug fit.
Here's the neck, embellished with my proposed logo. It's an épée, a fencing sword, a big thing in my past.
I've drilled the holes for the tuners, and after a bit of trepidation, and a couple of clamps, drilled the holes for the neck screws.
Having got the neck fitted, I took to a bit of repeated measuring to work out exactly where the bridge should go, front to back, and used bits of thin string running over the nut to work out where it should go, left to right (or up and down, depending on your view) to get the strings equidistant from each side of the neck. And forgot to take any pictures before drilling the bridge holes. The cheap plastic nut that came with the neck has now gone, and will be replaced by the bone one I ordered with the original Pit Bull neck. I'll see if it needs any modification later on.
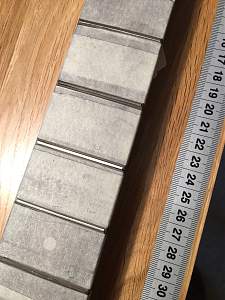
Next up, neck out and fret levelling. Made the neck flat with a notched edge, then loads of masking tape on the fretboard, sharpie marking on the frets, and 360 grit on a long piece of known flat hardwood. Once they were all level, repeat very gently with 600 grit. As you can see in the photo, there was quite a difference between the highest frets and the lowest. Hopefully fret crowning will still be OK, given that some frets are only just flat on the top and some are very flat...we'll see when the newly ordered fret-crowning file arrives!
That's a blow. Probably the reason why the DMS kits have disappeared.Originally Posted by AllTheseThings

At least your replacement is proper rosewood...the DMS one's were 'engineered' rosewood.
cheers, Mark.
Fret crowning file arrived so, rather nervously, started the filing. I don't know if I've done it properly, or enough, and I guess I won't know until I get it strung up and try to play it. I decided that i'd rather file the frets too little at this stage, rather than too much...
I did make a rookie error with the masking, as I discovered after taking the neck to the polishing wheel....fortunatley it came off with some 600 grit sandpaper, which I will have to do all over before applying Danish oil to the neck.

 Posting Permissions

 Reply With Quote