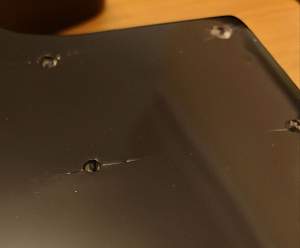
This relationship is not working out. She's split on me !
After working through the sanding and doing the final polish - followed by jumping around the house, and getting really really excited because it is so very much better than I had ever hoped or dreamed i could do ...... about 4 hours later - some really small, tiny tiny smaller than hairline cracks I noticed in the finish around the holes for the neck screws have grown considerably. Thinking about it - splashing water on wood - it is obvious really. DOH ! I reckon the wood has soaked up the water and expanded around the holes cracking the finish.
Has anyone else seen this ? What could I have done ? (filled holes with wax perhaps ?). This didn't happen on a previous build (but then i used a soap solution when I did the final sanding ... the sanding was going so well this time, I just used plain old water).

Completed Builds
#7 FS-1
#6 FV-1G
#5 ATL 1SB Thinline
#4 ST1-Jnr
# 3 JBA-4
# 2 LP-1S
# 1 TLA-1R
Yes, water in the holes. Wax will normally stop it, but there are never any guarantees. Just had the same problem myself on a guitar body around the pot holes (that should have been well sealed at the edges with paint by now).
I'd get a very small drill bit and drill a small hole in the finish at the very end of each crack, which should stop the cracks expanding further, especially if they want to run out from under the neck plate.
I must say that none of my six Gibsons has ever showed any signs of finish cracking, but two of my Fender Strats had the ubiquitous lower pocket edge crack appear over time.
But a lovely smooth and very shiny finish. I feel your pain with the cracks.
Thats a good idea Simon. Thank you.
Will get my finest drill bit and try to put in put in a crack stopper. One crack might already be just at the edge of where the plate will go though, so it will need to be small and very carefully placed. The wood is drying out a bit now and the cracks definitely have much less relief / raised edges.
The only guitar I've had a crackle problem with was a Firebird I bought a few years back which started crazing near the pots after just a month ! When i wrote and queried it they told me it happens - changing temperature etc, and pointed out that some folks would like that relict look. Was not impressed initially - but you know - it is growing on me. The finish on my Strat however is pristine after 15+ years.
Completed Builds
#7 FS-1
#6 FV-1G
#5 ATL 1SB Thinline
#4 ST1-Jnr
# 3 JBA-4
# 2 LP-1S
# 1 TLA-1R
Very nice! However I think you now have to airbrush that selfie onto the back!
Bugger about the splitting. I've been there too.
I know it's a hindsight thing now, but just adding to what Simon said about wax, I've used both bees wax and surfboard wax for this.
Just plug the holes and smooth it over. I wipe off any excess/smears on the finish with naptha or metho then do the wet sanding.
Another trick I do to be doubly sure, is "paint" the inside of the screw holes with shellac using an appropriately sized artist's brush.
I also do this to the inside of pickup & control cavities. Particularly with a stained finish when there's not necessarily a sealed finish in them already.
Making the world a better place; one guitar at a time...
I'm sure I have done the beeswax thing with the neck screw holes before - but this has been a long drawn out build and I must have completely forgotten. I'll not forget next time !
Looking at the guitar this morning, Simon's crack stopper is not going to work because the crack comes right to the edge of the plate - a small hole would be visible. However, the cracks do appear to be settling back as the guitar is drying out.
Completed Builds
#7 FS-1
#6 FV-1G
#5 ATL 1SB Thinline
#4 ST1-Jnr
# 3 JBA-4
# 2 LP-1S
# 1 TLA-1R
You could try clamping that area to see if you can at least get the swellings flat again. Then if you can face at least putting some more finish on over the cracks to patch them up and hopefully help hold them together. Maybe even wick some thin CA in the cracks first? Most of it won't be seen, but it will be nice to know it's done properly.